Unity3D :创建自定义编辑器窗口

推荐:将NSDT场景编辑器加入你的3D工具链
3D工具集:NSDT简石数字孪生
创建自定义编辑器窗口
自定义编辑器窗口允许您通过实现自己的编辑器和工作流来扩展 Unity。本指南介绍如何通过代码创建编辑器窗口、响应用户输入、使用户界面
可调整大小并处理热重载。
在本教程中,您将创建一个精灵
浏览器,查找并显示项目内的所有精灵,并将它们显示为列表。在列表中选择一个角色将在窗口右侧显示图像。
您可以在编辑器窗口脚本部分找到完整的示例。
先决条件
本指南面向熟悉 Unity 但不熟悉 UI 工具包的开发人员。建议对 Unity 和 C# 脚本有基本的了解。
本指南还引用了以下概念:
- 可视化树
- 控制
内容
本指南中使用的控件:
- 列表视图
- 双窗格拆分视图
- 标签
- 图像
在本指南中,您将执行以下操作:
- 创建编辑器窗口脚本。
- 创建菜单项以打开窗口。
- 将 UI 控件添加到窗口。
- 编写代码以响应用户选择。
- 使 UI 可调整大小。
- 支持编辑器热重载。
创建编辑器窗口脚本
| 提示 |
|---|
您可以生成必要的代码,以便在 Unity 编辑器中创建编辑器窗口脚本。在“项目”窗口中,右键单击并选择“>编辑器窗口创建 UI 工具包>”。对于本指南,请禁用UXML和USS复选框。您可能还必须在文件顶部添加其他指令,如下所示。using |
可以通过 C# 创建编辑器窗口脚本
在您的项目中。自定义编辑器窗口是从该类派生的类。EditorWindow
在“资产/编辑器”文件夹下创建新的脚本文件。将以下代码粘贴到脚本中:MyCustomEditor.cs
using System.Collections.Generic;
using System.Linq;
using UnityEditor;
using UnityEngine;
using UnityEngine.UIElements;

public class MyCustomEditor : EditorWindow
{
}
| 注意 |
|---|
这是一个包含命名空间的仅限编辑器的窗口,因此文件必须放置在文件夹下或仅编辑器程序集定义中。UnityEditorEditor |
创建菜单项以打开窗口
要打开新的编辑器窗口,必须在编辑器菜单中创建一个条目。
将属性添加到静态方法。在此示例中,静态方法的名称为 。MenuItemShowMyEditor()
在 中,调用 EditorWindow.GetWindow() 方法来创建和显示窗口。它返回一个 EditorWindow 对象。若要设置窗口标题,请更改 EditorWindow.titleContent 属性。ShowMyEditor()
在上一步中创建的类中添加以下函数。MyCustomEditor
[MenuItem("Tools/My Custom Editor")]
public static void ShowMyEditor()
{
  // This method is called when the user selects the menu item in the Editor
  EditorWindow wnd = GetWindow<MyCustomEditor>();
  wnd.titleContent = new GUIContent("My Custom Editor");
}
通过“我的自定义编辑器”中的“Unity 编辑器”菜单“工具”打开新窗口>测试新窗口。
向窗口添加 UI 控件
UI 工具包使用 CreateGUI 方法将控件添加到编辑器 UI,Unity 会在需要显示窗口时自动调用该方法。此方法的工作方式与 或 等方法相同。CreateGUIAwakeUpdate
可以通过添加 UI 将 UI 控件添加到 UI视觉元素
到可视化树。VisualElement.Add() 方法用于将子元素添加到现有可视元素。编辑器窗口的可视化树可通过该属性访问。rootvisualElement
首先,向自定义编辑器类添加一个函数并添加“Hello”标签:CreateGUI()
public void CreateGUI()
{
  rootVisualElement.Add(new Label("Hello"));
}

| 注意 |
|---|
若要显示精灵列表,请使用函数查找项目中的所有精灵。AssetDatabase |
将里面的代码替换为下面的代码,以枚举项目内的所有精灵。CreateGUI()
public void CreateGUI()
{
  // Get a list of all sprites in the project
  var allObjectGuids = AssetDatabase.FindAssets("t:Sprite");
  var allObjects = new List<Sprite>();
  foreach (var guid in allObjectGuids)
  {
    allObjects.Add(AssetDatabase.LoadAssetAtPath<Sprite>(AssetDatabase.GUIDToAssetPath(guid)));
  }
}
对于精灵浏览器,顶级视觉元素将是 TwoPaneSplitView。此控件将可用窗口空间拆分为两个窗格:一个固定大小窗格和一个灵活大小窗格。调整窗口大小时,只有灵活窗格会调整大小,而固定大小的窗格保持相同的大小。
要使控件正常工作,它需要正好有两个子项。在内部添加代码以创建 ,然后添加两个子元素作为不同控件的占位符。TwoPaneSplitViewCreateGUI()TwoPaneSplitview
// Create a two-pane view with the left pane being fixed with
var splitView = new TwoPaneSplitView(0, 250, TwoPaneSplitViewOrientation.Horizontal);

// Add the view to the visual tree by adding it as a child to the root element
rootVisualElement.Add(splitView);

// A TwoPaneSplitView always needs exactly two child elements
var leftPane = new VisualElement();
splitView.Add(leftPane);
var rightPane = new VisualElement();
splitView.Add(rightPane);
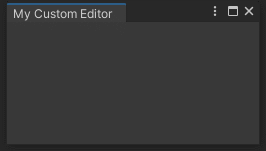
下图显示了包含两个空面板的自定义窗口。分隔条可以移动。
对于精灵浏览器,左窗格将是一个列表,其中包含在项目中找到的所有精灵的名称。ListView 控件派生自 ,因此很容易修改代码以使用 而不是空白 。VisualElementListViewVisualElement
修改函数中的代码,为左窗格而不是 .CreateGUI()ListViewVisualElement
public void CreateGUI()
{
  ...
  var leftPane = new ListView();
  splitView.Add(leftPane);
  ...
}
控件显示可选项的列表。它经过优化,仅创建足够的元素来覆盖可见区域,并在滚动列表时池化和回收可视元素。这可以优化性能并减少内存占用,即使在包含许多项的列表中也是如此。
要利用这一点,必须使用以下方法正确初始化:ListView
- 数据项的数组。
- 一个回调函数,用于在列表中创建单个可视列表条目。
- 一个绑定函数,它使用数据数组中的项初始化可视列表条目。
您可以为列表中的每个元素创建复杂的 UI 结构,但此示例使用简单的文本标签来显示子画面名称。
将代码添加到初始化 .CreateGUI()ListView
public void CreateGUI()
{
  ...
  // Initialize the list view with all sprites' names
  leftPane.makeItem = () => new Label();
  leftPane.bindItem = (item, index) => { (item as Label).text = allObjects[index].name; };
  leftPane.itemsSource = allObjects;
}
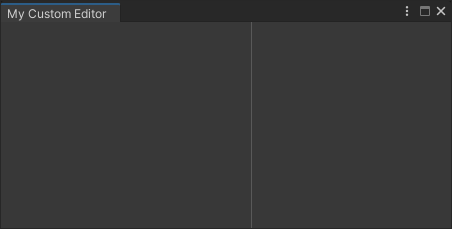
下图显示了具有可滚动列表视图和可选项的编辑器窗口。
作为参考,以下是整个函数的当前代码:CreateGUI()
public void CreateGUI()
{
  // Get a list of all sprites in the project
  var allObjectGuids = AssetDatabase.FindAssets("t:Sprite");
  var allObjects = new List<Sprite>();
  foreach (var guid in allObjectGuids)
  {
    allObjects.Add(AssetDatabase.LoadAssetAtPath<Sprite>(AssetDatabase.GUIDToAssetPath(guid)));
  }

  // Create a two-pane view with the left pane being fixed with
  var splitView = new TwoPaneSplitView(0, 250, TwoPaneSplitViewOrientation.Horizontal);

  // Add the panel to the visual tree by adding it as a child to the root element
  rootVisualElement.Add(splitView);

  // A TwoPaneSplitView always needs exactly two child elements
  var leftPane = new ListView();
  splitView.Add(leftPane);
  var rightPane = new VisualElement();
  splitView.Add(rightPane);

  // Initialize the list view with all sprites' names
  leftPane.makeItem = () => new Label();
  leftPane.bindItem = (item, index) => { (item as Label).text = allObjects[index].name; };
  leftPane.itemsSource = allObjects;
}
添加回调
从左窗格的列表中选择一个子画面时,其图像必须显示在右窗格中。为此,您需要提供一个回调函数,当用户做出选择时,该函数可以调用。该控件具有用于此目的的属性。ListViewListViewonSelectionChange
回调函数接收一个列表,其中包含用户选择的一个或多个项。可以将 配置为允许多选,但默认情况下,选择模式仅限于单个项目。ListView
当用户从左窗格中的列表中更改选择时添加回调函数。
public void CreateGUI()
{
  ...

  // React to the user's selection
  leftPane.onSelectionChange += OnSpriteSelectionChange;
}

private void OnSpriteSelectionChange(IEnumerable<object> selectedItems)
{
}
| 注意 |
|---|
| 如果您丢失了窗口并且菜单无法重新打开,请通过“窗口>面板”>“关闭所有浮动面板”下的菜单关闭所有浮动面板,或重置窗口布局。 |
要在窗口右侧显示所选精灵的图像,函数需要能够访问 的右侧窗格。可以将此控件设置为类的成员变量,以便能够在回调函数中访问它。TwoPaneSplitView
将创建的内部转换为成员变量。rightPaneCreateGUI()
private VisualElement m_RightPane;

public void CreateGUI()
{
  ...

  m_RightPane = new VisualElement();
  splitView.Add(m_RightPane);

  ...
}
引用 ,可以通过属性访问右窗格。 在右窗格上创建新控件之前,请使用 删除上一个图像。此方法从现有可视元素中删除所有子元素。TwoPaneSplitViewflexedPaneImageVisualElement.Clear()
清除所有先前内容中的右窗格,并为所选精灵创建新的 Image 控件。
private void OnSpriteSelectionChange(IEnumerable<object> selectedItems)
{
  // Clear all previous content from the pane
  m_RightPane.Clear();

  // Get the selected sprite
  var selectedSprite = selectedItems.First() as Sprite;
  if (selectedSprite == null)
    return;

  // Add a new Image control and display the sprite
  var spriteImage = new Image();
  spriteImage.scaleMode = ScaleMode.ScaleToFit;
  spriteImage.sprite = selectedSprite;

  // Add the Image control to the right-hand pane
  m_RightPane.Add(spriteImage);
}
| 注意 |
|---|
请确保在文件顶部包含以对参数使用该方法。using System.Linq;First()selectedItems |
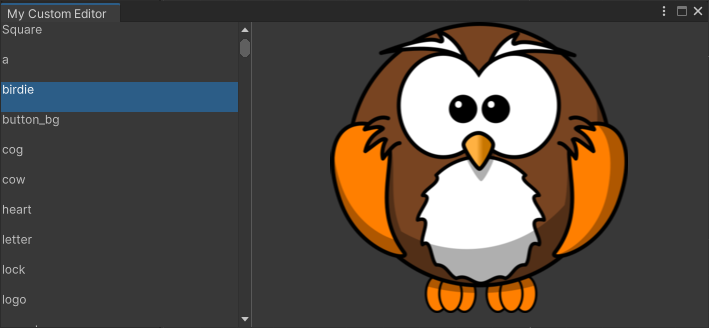
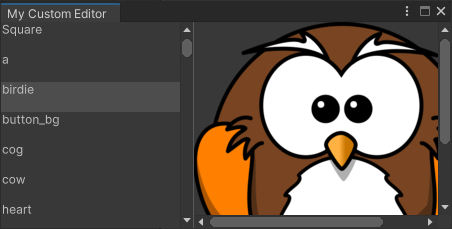
在编辑器中测试你的精灵浏览器。下图显示了正在运行的自定义编辑器窗口。
使 UI 可调整大小
编辑器窗口可在其允许的最小和最大尺寸内调整大小。创建窗口时,可以通过写入 EditorWindow.minSize 和 EditorWindow.maxSize 属性在 C# 中设置这些维度。若要防止调整窗口大小,请为这两个属性指定相同的维度。
通过在函数底部添加以下行来限制自定义编辑器窗口的大小:ShowMyEditor()
[MenuItem("Tools/My Custom Editor")]
public static void ShowMyEditor()
{
  // This method is called when the user selects the menu item in the Editor
  EditorWindow wnd = GetWindow<MyCustomEditor>();
  wnd.titleContent = new GUIContent("My Custom Editor");

  // Limit size of the window
  wnd.minSize = new Vector2(450, 200);
  wnd.maxSize = new Vector2(1920, 720);
}
对于窗口尺寸太小而无法显示整个 UI 的情况,必须使用元素为窗口提供滚动,否则内容可能无法访问。ScrollView
左窗格使用的是内部,但右窗格是常规的。将其更改为控件会在窗口太小而无法以原始大小容纳整个图像时自动显示滚动条。ListViewScrollViewVisualElementScrollView
将右窗格换成具有双向滚动的 。VisualElementScrollView
public void CreateGUI()
{
  ...

  m_RightPane = new ScrollView(ScrollViewMode.VerticalAndHorizontal);
  splitView.Add(m_RightPane);

  ...
}
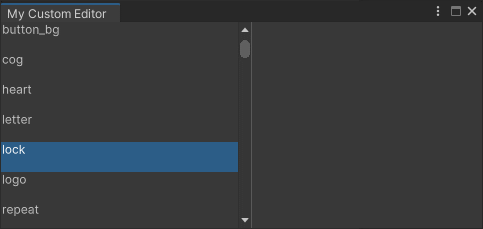
下图显示了带有滚动条的精灵浏览器窗口。
关闭并重新打开自定义编辑器窗口以测试新的大小限制。
| 注意 |
|---|
在 Unity 2021.2 及更高版本中,Unity 在窗口停靠时不尊重 and 属性。这允许用户不受限制地调整停靠区域的大小。考虑创建 a 作为顶级元素之一,并将所有 UI 放在其中,以使 UI 尽可能具有响应能力。minSizemaxSizeScrollView |
支持编辑器热重载
适当的编辑器窗口必须与 Unity 编辑器中发生的热重载工作流程配合使用。当脚本重新编译或编辑器进入运行模式时,会发生 C# 域重新加载。可以在脚本序列化页上了解有关本主题的详细信息。
要在刚刚创建的编辑器窗口中查看此操作,请打开精灵浏览器,选择一个精灵,然后进入播放模式。窗口将重置,所选内容将消失。
由于对象不可序列化,因此每次在 Unity 中重新加载时都必须重新创建 UI。这意味着在重新加载完成后调用该方法。这使您可以通过在类中存储必要的数据来还原重新加载之前的 UI 状态。VisualElementCreateGUI()EditorWindow
添加成员变量,将所选索引保存在精灵列表中。
public class MyCustomEditor : EditorWindow
{
    [SerializeField] private int m_SelectedIndex = -1;

    ....
}
进行选择时,列表视图的新选择索引可以存储在此成员变量中。您可以在函数内创建 UI 期间还原选择索引。CreateGUI()
将代码添加到函数的末尾以存储和还原选定的列表索引。CreateGUI()
public void CreateGUI()
{
  ...

  // Restore the selection index from before the hot reload
  leftPane.selectedIndex = m_SelectedIndex;

  // Store the selection index when the selection changes
  leftPane.onSelectionChange += (items) => { m_SelectedIndex = leftPane.selectedIndex; };
}
从列表中选择一个精灵,进入播放模式以测试热重装。
编辑器窗口脚本
下面的代码是在本指南中创建的编辑器窗口的最终脚本。您可以将代码直接粘贴到资源/编辑器文件夹中调用的文件中,以便在 Unity 编辑器中查看它。MyCustomEditor.cs
using System.Collections.Generic;
using System.Linq;
using UnityEditor;
using UnityEngine;
using UnityEngine.UIElements;

public class MyCustomEditor : EditorWindow
{
  [SerializeField] private int m_SelectedIndex = -1;
  private VisualElement m_RightPane;

  [MenuItem("Tools/My Custom Editor")]
  public static void ShowMyEditor()
  {
    // This method is called when the user selects the menu item in the Editor
    EditorWindow wnd = GetWindow<MyCustomEditor>();
    wnd.titleContent = new GUIContent("My Custom Editor");

    // Limit size of the window
    wnd.minSize = new Vector2(450, 200);
    wnd.maxSize = new Vector2(1920, 720);
  }

  public void CreateGUI()
  {
    // Get a list of all sprites in the project
    var allObjectGuids = AssetDatabase.FindAssets("t:Sprite");
    var allObjects = new List<Sprite>();
    foreach (var guid in allObjectGuids)
    {
      allObjects.Add(AssetDatabase.LoadAssetAtPath<Sprite>(AssetDatabase.GUIDToAssetPath(guid)));
    }

    // Create a two-pane view with the left pane being fixed with
    var splitView = new TwoPaneSplitView(0, 250, TwoPaneSplitViewOrientation.Horizontal);

    // Add the panel to the visual tree by adding it as a child to the root element
    rootVisualElement.Add(splitView);

    // A TwoPaneSplitView always needs exactly two child elements
    var leftPane = new ListView();
    splitView.Add(leftPane);
    m_RightPane = new ScrollView(ScrollViewMode.VerticalAndHorizontal);
    splitView.Add(m_RightPane);

    // Initialize the list view with all sprites' names
    leftPane.makeItem = () => new Label();
    leftPane.bindItem = (item, index) => { (item as Label).text = allObjects[index].name; };
    leftPane.itemsSource = allObjects;

    // React to the user's selection
    leftPane.onSelectionChange += OnSpriteSelectionChange;

    // Restore the selection index from before the hot reload
    leftPane.selectedIndex = m_SelectedIndex;

    // Store the selection index when the selection changes
    leftPane.onSelectionChange += (items) => { m_SelectedIndex = leftPane.selectedIndex; };
  }

  private void OnSpriteSelectionChange(IEnumerable<object> selectedItems)
  {
    // Clear all previous content from the pane
    m_RightPane.Clear();

    // Get the selected sprite
    var selectedSprite = selectedItems.First() as Sprite;
    if (selectedSprite == null)
      return;

    // Add a new Image control and display the sprite
    var spriteImage = new Image();
    spriteImage.scaleMode = ScaleMode.ScaleToFit;
    spriteImage.sprite = selectedSprite;

    // Add the Image control to the right-hand pane
    m_RightPane.Add(spriteImage);
  }
}由3D建模学习工作室整理翻译,转载请注明出处!