Unity3D :创建自定义检查器

推荐:将NSDT场景编辑器加入你的3D工具链
3D工具集:NSDT简石数字孪生
创建自定义检查器
虽然 Unity 生成默认值检查员
对于您的 MonoBehaviors 和 ScriptableObjects,有充分的理由编写自定义检查器,例如:
- 创建更加用户友好的脚本属性表示形式。
- 将属性组织和分组在一起。
- 显示或隐藏部分用户界面
取决于用户的选择。 - 提供有关各个设置和属性的含义的其他信息。
使用 UI 工具包创建自定义检查器类似于使用即时模式 GUI (IMGUI),但 UI 工具包具有多个优点,例如自动数据绑定和自动撤消支持。IMGUI完全通过脚本为检查器创建UI,而UI Toolkit允许您通过脚本,在UI Builder中直观地构建UI,或两者的组合。
您可以在本页底部找到本指南的最终源代码 此处.
在本指南中,您将使用 MonoBehavior 类创建自定义检查器,同时使用两者脚本
和 UXML(使用 UI 生成器)来创建 UI。自定义检查器还将具有自定义功能属性抽屉
.
先决条件
本指南面向熟悉 Unity 但不熟悉 UI 工具包的开发人员。建议对 Unity 和 C# 脚本有基本的了解。
本指南还引用了以下概念:
- 可视化树
- 序列化对象数据绑定
内容
主题:
- 用户界面生成器
- 插页
- 属性字段
- 属性抽屉
- 检查器元素
在本指南中,您将执行以下操作:
- 创建新的单体行为
- 创建自定义检查器脚本
- 在自定义检查器中使用 UXML
- 撤消和数据绑定
- 创建默认检查器
- 属性字段
- 创建自定义属性抽屉
创建新的单体行为
首先,您需要创建一个可以为其创建自定义检查器的自定义类,该类可以是 .本指南使用一个脚本,该脚本表示具有属性(如型号和颜色)的简单汽车。MonoBehaviourScriptableObjectMonoBehaviour
在资产/脚本中创建一个新的脚本文件,并将以下代码复制到其中。Car.cs
using UnityEngine;

public class Car : MonoBehaviour
{
  public string m_Make = "Toyota";
  public int m_YearBuilt = 1980;
  public Color m_Color = Color.black;
}
创建一个新的游戏对象
在现场
并将脚本组件附加到其中。Car

创建自定义检查器脚本
若要为任何序列化对象创建自定义检查器,需要创建一个派生自 Editor 基类的类,并向其添加 CustomEditor 属性。此属性让 Unity 知道此自定义检查器代表哪个类。UI 工具包中的工作流与即时模式 GUI (IMGUI) 中的工作流相同。
在资产/脚本/编辑器中创建一个文件,并将以下代码复制到其中。Car_Inspector.cs
using UnityEditor;
using UnityEditor.UIElements;
using UnityEngine.UIElements;

[CustomEditor(typeof(Car))]
public class Car_Inspector : Editor
{
}
| 注意 |
|---|
自定义检查器文件必须位于文件夹内或仅编辑器程序集定义中。尝试创建独立构建将失败,因为 UnityEditor 命名空间不可用。Editor |
如果此时选择包含组件的游戏对象,Unity 仍将显示默认检查器。您需要覆盖类中的 CreateInspectorGUI() 来替换默认检查器。CarCar_Inspector
该函数为检查器构建可视化树。该函数需要返回包含 UI 的可视元素。下面的实现创建一个空白的新可视元素并向其添加标签。CreateInspectorGUI()CreateInspectorGUI()
覆盖脚本中的函数并复制下面的代码。CreateInspectorGUI()Car_Inspector
public override VisualElement CreateInspectorGUI()
{
  // Create a new VisualElement to be the root of our inspector UI
  VisualElement myInspector = new VisualElement();

  // Add a simple label
  myInspector.Add(new Label("This is a custom inspector"));

  // Return the finished inspector UI
  return myInspector;
}

在自定义检查器中使用 UXML
UI 工具包允许您通过两种方式添加 UI 控件:
- 实现脚本
- 加载包含预制 UI 树的 UXML 文件。
本部分将使用 UI 生成器创建包含 UI 的 UXML 文件,并使用代码从 UXML 文件加载和实例化 UI。
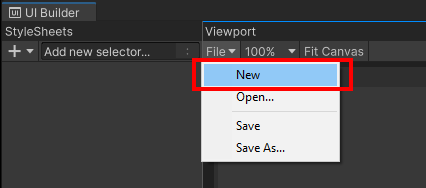
通过菜单窗口> UI 工具包> UI 生成器打开 UI 生成器,并使用 UI 生成器中的“文件>新建”菜单项创建新的可视化树资产。
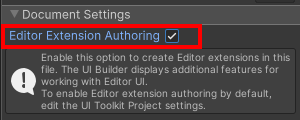
UI 工具包在你使用它创建编辑器窗口和自定义检查器时提供了其他控件类型。默认情况下,这些仅编辑器控件在 UI 生成器中不可见。要使其可用,您需要启用复选框编辑器扩展创作。
在 UI 构建器的“层次结构”视图中选择 ,然后启用“编辑器扩展创作”复选框。<unsaved file>*.uxml
| 注意 |
|---|
| 如果使用 UI 工具包创建编辑器窗口和自定义检查器,则可以在 UI 生成器>“项目设置”中默认启用此设置。 |
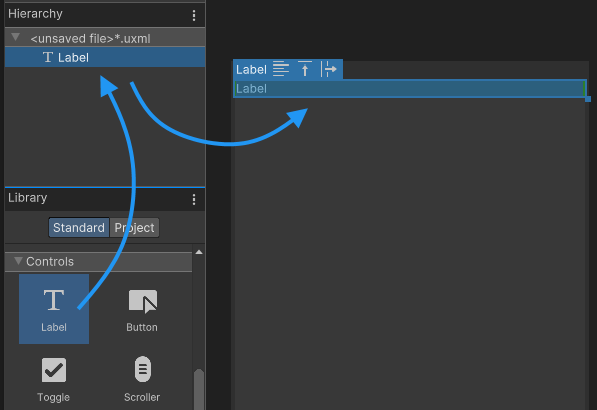
若要将控件添加到 UI,请从库中选择它,然后将其拖到上面的层次结构中。除非要修改自动布局,否则无需调整新控件的位置或大小。默认情况下,标签使用可用面板的整个宽度,高度调整为所选字体大小。
通过将标签控件从库拖动到层次结构,将标签控件添加到可视化树。
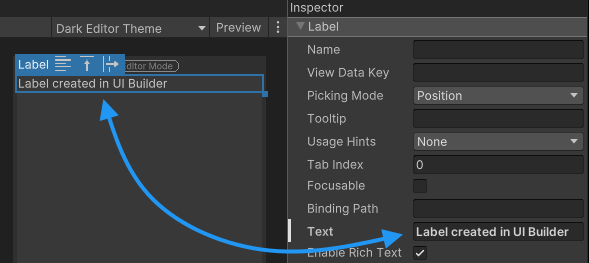
您可以通过选择标签并在 UI 生成器编辑器右侧的元素检查器中更改文本来更改标签内的文本。
当 UI 生成器保存可视化树时,它会将其另存为 UXML 格式的可视化树资产。您可以在 UXML 文档页面上了解有关此内容的更多信息。
下面的 UXML 显示了 UI 生成器在前面的步骤中生成的代码:
<ui:UXML xmlns:ui="UnityEngine.UIElements" xmlns:uie="UnityEditor.UIElements" editor-extension-mode="True">
    <ui:Label text="Label created in UI Builder" />
</ui:UXML>
使用 UI 生成器中的“文件”菜单,将您在“资源>脚本>编辑器”下创建的可视化树另存为 。Car_Inspector_UXML.uxml
要使用在自定义检查器中创建的 UXML 文件,您需要在函数中加载并克隆该文件,并将其添加到可视化树中。为此,请使用克隆树方法。您可以将 any 作为参数传递,以充当所创建元素的父元素。CreateInspectorGUI()VisualElement
修改函数以克隆 UXML 文件中的可视化树,并在自定义检查器中使用它。CreateInspectorGUI()
public override VisualElement CreateInspectorGUI()
{
  // Create a new VisualElement to be the root of our inspector UI
  VisualElement myInspector = new VisualElement();

  // Add a simple label
  myInspector.Add(new Label("This is a custom inspector"));

  // Load and clone a visual tree from UXML
  VisualTreeAsset visualTree = AssetDatabase.LoadAssetAtPath<VisualTreeAsset>("Assets/Scripts/Editor/Car_Inspector_UXML.uxml");
  visualTree.CloneTree(myInspector);

  // Return the finished inspector UI
  return myInspector;
}
组件的检查器现在显示两个创建的标签:一个通过脚本,一个通过UI Builder/UXML。car

代码必须加载可视化树资产 (UXML) 文件才能克隆可视化树,并使用硬编码的路径和文件名。但是,不建议使用硬编码文件,因为如果文件属性(如文件路径或名称)发生更改,则可能会使代码无效。
访问可视化树资产的更好解决方案是使用对资产文件的引用。图元文件中的 GUID 存储文件引用。如果重命名或移动文件,GUID 将保持不变,Unity 仍能够从新位置查找和加载文件。
为预制件
和脚本化对象,您可以在编辑器中指定对其他文件的引用。对于脚本文件,Unity 允许设置 .如果在窗口类中声明类型的公共字段,则检查器提供了将引用拖到相应对象字段上的功能。这意味着类的任何新实例都会填充对相应对象的引用集。这是将 UXML 文件分配给自定义检查器和编辑器窗口脚本的推荐方法。Default ReferenceVisualTreeAssetCar_InspectorVisualTreeAsset
在脚本中为 a 创建一个公共变量,并在编辑器中将该文件指定为默认引用。VisualTreeAssetCar_Inspector_UXML.uxml
public VisualTreeAsset m_InspectorXML;
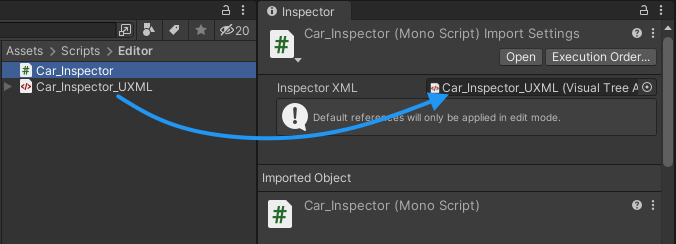
| 注意 |
|---|
| 默认引用仅在编辑器中工作。它们不适用于使用 AddComponent() 方法的独立构建中的运行时组件。 |
使用默认引用集,您不再需要使用该函数加载 。相反,您可以直接在对 UXML 文件的引用上使用克隆树。VisualTreeAssetLoadAssetAtPath
这会将方法中的代码减少到 3 行。CreateInspectorGUI()
public VisualTreeAsset m_InspectorXML;

public override VisualElement CreateInspectorGUI()
{
  // Create a new VisualElement to be the root of our inspector UI
  VisualElement myInspector = new VisualElement();

  // Load from default reference
  m_InspectorXML.CloneTree(myInspector);

  // Return the finished inspector UI
  return myInspector;
}
撤消和数据绑定
此自定义检查器的用途是显示类的所有属性。当用户修改任何 UI 控件时,类实例中的值也应更改。为此,您需要将 UI 控件添加到可视化树,并将它们连接到类的各个属性。CarCar
UI 工具包支持将 UI 控件链接到具有序列化对象数据绑定的序列化属性。绑定到序列化属性的控件显示属性的当前值,如果用户在 UI 中更改属性值,则更新属性值。您不必编写从控件检索值并将其写回属性的代码。
使用 UI 生成器将汽车属性的控件添加到检查器。TextFieldm_Make
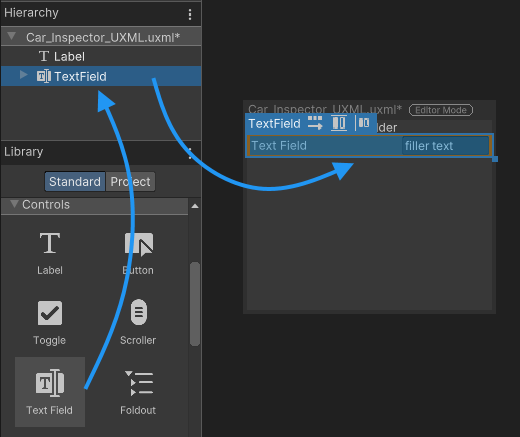
若要将控件绑定到序列化属性,请将该属性分配给控件的字段。您可以在代码,UXML或UI Builder中执行此操作。该属性按名称匹配,因此请务必检查拼写。binding-path
将新属性绑定到 UI 生成器中的属性。TextFieldm_Make
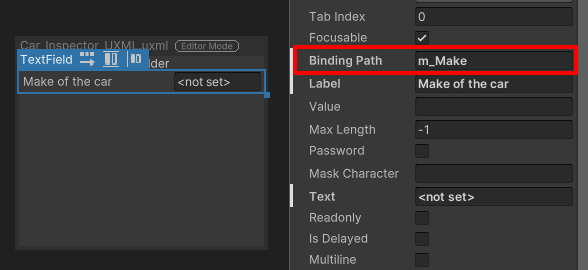
下面是检查器 UI 的 UXML 代码,包括数据绑定属性。
<ui:UXML xmlns:ui="UnityEngine.UIElements" xmlns:uie="UnityEditor.UIElements" editor-extension-mode="True">
<ui:TextField label="Make of the car" text="<not set>" binding-path="m_Make" />
</ui:UXML>
设置控件的绑定路径时,告知控件它应链接到的序列化属性的名称。但控件仍需要接收属性所属的序列化对象的实例。可以使用 VisualElement.Bind 方法将序列化对象(如 )绑定到整个可视化树,各个控件将绑定到该对象的相应属性。MonoBehaviour
编写自定义检查器时,绑定是自动的。 在返回可视化树后执行隐式绑定。若要了解详细信息,请参阅序列化对象数据绑定。CreateInspectorGUI()

由于 UI 工具包使用序列化属性,因此无需其他代码即可支持撤消/重做功能。它自动受支持。
属性字段
若要显示类的属性,必须为每个字段添加一个控件。控件必须与属性类型匹配,以便可以绑定它。例如,应绑定到整数字段或整数滑块。Carint
除了基于属性类型添加特定控件外,还可以使用泛型 PropertyField 控件。此控件适用于大多数类型的序列化属性,并为此属性类型生成默认检查器 UI。
为 和 类的属性添加一个控件。为每个绑定路径分配绑定路径并填写文本。PropertyFieldm_YearBuiltm_ColorCarLabel
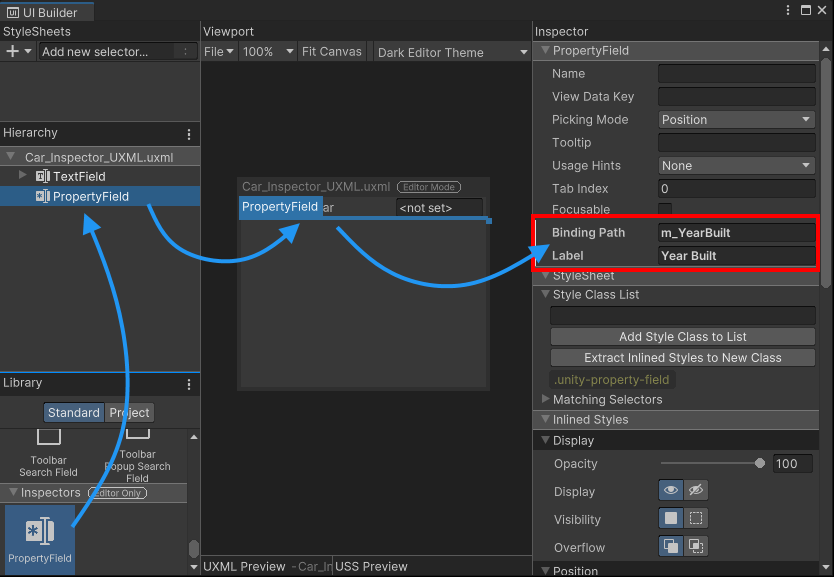
a 的优点是,当您更改脚本中的变量类型时,检查器 UI 将自动调整。但是,无法在 UI 生成器中预览控件,因为在可视化树绑定到序列化对象之前,所需的控件类型是未知的,并且 UI 工具包可以确定属性类型。PropertyField

创建自定义属性抽屉
自定义属性抽屉是自定义可序列化类的自定义检查器 UI。如果该可序列化类是另一个序列化对象的一部分,则自定义 UI 会在检查器中显示该属性。在 UI 工具包中,该控件显示字段的自定义属性抽屉(如果存在)。PropertyField
在资产/脚本中创建新脚本,并将以下代码复制到文件中:Tire.cs
[System.Serializable]
public class Tire
{
  public float m_AirPressure = 21.5f;
  public int m_ProfileDepth = 4;
}
将 的列表添加到类中,如下面的代码所示:TireCar
public class Car : MonoBehaviour
{
  public string m_Make = "Toyota";
  public int m_YearBuilt = 1980;
  public Color m_Color = Color.black;

  // This car has four tires
  public Tire[] m_Tires = new Tire[4];
}
该控件适用于所有标准属性类型,但它也支持自定义可序列化的类和数组。要显示汽车轮胎的属性,请在 UI 生成器中添加另一个轮胎并将其绑定到 .PropertyFieldPropertyFieldm_Tires
为属性添加控件。PropertyFieldm_Tires
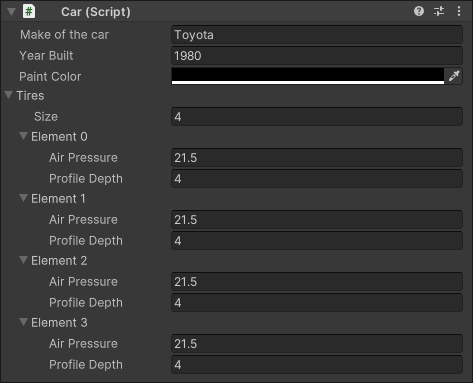
您可以在下面找到为当前检查器 UI 生成的 UXML 代码:Car_Inspector_UXML.uxml
<ui:UXML xmlns:ui="UnityEngine.UIElements" xmlns:uie="UnityEditor.UIElements" editor-extension-mode="True">
<ui:TextField label="Make of the car" text="<not set>" binding-path="m_Make" />
<uie:PropertyField label="Year Built" binding-path="m_YearBuilt" />
<uie:PropertyField binding-path="m_Color" label="Paint Color" />
<uie:PropertyField binding-path="m_Tires" label="Tires" />
</ui:UXML>
自定义属性抽屉允许您自定义列表中各个元素的外观。自定义属性抽屉不是从基类派生,而是从 PropertyDrawer 类派生。若要为自定义属性创建 UI,需要重写 CreatePropertyGUI 方法。TireEditor
在资产/脚本/编辑器文件夹中创建一个新脚本,并将以下代码复制到其中。Tire_PropertyDrawer.cs
using UnityEditor;
using UnityEditor.UIElements;
using UnityEngine.UIElements;

[CustomPropertyDrawer(typeof(Tire))]
public class Tire_PropertyDrawer : PropertyDrawer
{
  public override VisualElement CreatePropertyGUI(SerializedProperty property)
  {
    // Create a new VisualElement to be the root the property UI
    var container = new VisualElement();

    // Create drawer UI using C#
    // ...

    // Return the finished UI
    return container;
  }
}
可以使用代码和 UXML 为属性创建 UI,就像在自定义检查器中一样。此示例使用代码创建自定义 UI。
通过扩展方法为类属性抽屉创建自定义 UI,如下所示。TireCreatePropertyGUI
public override VisualElement CreatePropertyGUI(SerializedProperty property)
{
  // Create a new VisualElement to be the root the property UI
  var container = new VisualElement();

  // Create drawer UI using C#
  var popup = new UnityEngine.UIElements.PopupWindow();
  popup.text = "Tire Details";
  popup.Add(new PropertyField(property.FindPropertyRelative("m_AirPressure"), "Air Pressure (psi)"));
  popup.Add(new PropertyField(property.FindPropertyRelative("m_ProfileDepth"), "Profile Depth (mm)"));
  container.Add(popup);

  // Return the finished UI
  return container;
}
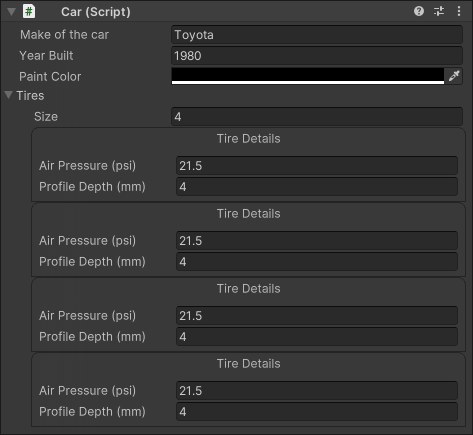
有关属性抽屉的更多信息,请参阅属性抽屉的文档。
注意:Unity 不支持在默认检查器中使用自定义属性抽屉,因为 Unity 使用 IMGUI 制作默认检查器。如果要创建自定义属性抽屉,还必须为使用该属性的类创建自定义检查器,如本指南对 和 所做的那样。TireCar
创建默认检查器
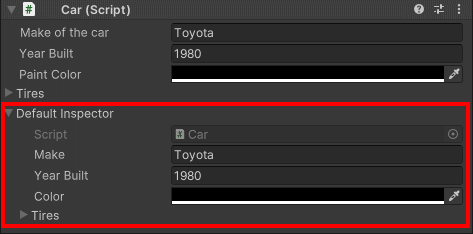
在开发自定义检查器期间,保留对默认检查器的访问权限很有帮助。使用 UI 工具包,可以轻松地将默认检查器 UI 添加到自定义 UI。
在 UI 生成器中向 UI 添加一个控件,将其命名为 Default_Inspector 并分配标签文本:Foldout
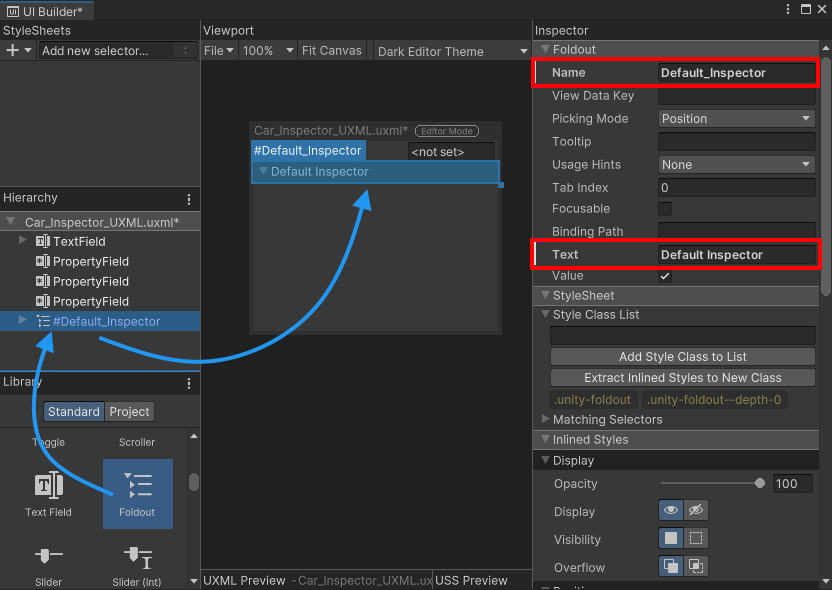
您将使用 UI 生成器创建折叠,但不使用检查器。默认检查器的内容在检查器脚本内生成,并通过代码附加到折叠控件。
要将默认检查器 UI 附加到在 UI 生成器中创建的折叠页,必须获取对该折叠的引用。您可以检索视觉元素
检查器的可视化树中的折叠。这是使用 UQuery 系列 API 完成的。可以按名称、USS 类或类型或这些属性的组合检索 UI 中的各个元素。
使用在 UI 生成器中设置的名称获取对方法中控件的引用。FoldoutCreateInspectorGUI
// Get a reference to the default inspector foldout control
VisualElement inspectorFoldout = myInspector.Q("Default_Inspector");
InspectorElement 的 FillDefaultInspector 方法创建一个可视化树,其中包含给定序列化对象的默认检查器,并将其附加到作为参数传递到该方法中的父可视元素。
使用以下代码创建默认检查器并将其附加到折叠图:
// Attach a default inspector to the foldout
InspectorElement.FillDefaultInspector(inspectorFoldout, serializedObject, this);
最终脚本
您可以在下面找到本指南中创建的所有文件的完整源代码。
车.cs
using UnityEngine;

public class Car : MonoBehaviour
{
  public string m_Make = "Toyota";
  public int m_YearBuilt = 1980;
  public Color m_Color = Color.black;

  // This car has four tires
  public Tire[] m_Tires = new Tire[4];
}
Car_Inspector.cs
using UnityEditor;
using UnityEditor.UIElements;
using UnityEngine.UIElements;

[CustomEditor(typeof(Car))]
public class Car_Inspector : Editor
{
  public VisualTreeAsset m_InspectorXML;

  public override VisualElement CreateInspectorGUI()
  {
    // Create a new VisualElement to be the root of our inspector UI
    VisualElement myInspector = new VisualElement();

    // Load from default reference
    m_InspectorXML.CloneTree(myInspector);

    // Get a reference to the default inspector foldout control
    VisualElement inspectorFoldout = myInspector.Q("Default_Inspector");

    // Attach a default inspector to the foldout
    InspectorElement.FillDefaultInspector(inspectorFoldout, serializedObject, this);

    // Return the finished inspector UI
    return myInspector;
  }
}
Car_Inspector_UXML.uxml
<ui:UXML xmlns:ui="UnityEngine.UIElements" xmlns:uie="UnityEditor.UIElements" editor-extension-mode="True">
<ui:TextField label="Make of the car" text="<not set>" binding-path="m_Make" />
<uie:PropertyField label="Year Built" binding-path="m_YearBuilt" />
<uie:PropertyField binding-path="m_Color" label="Paint Color" />
<uie:PropertyField binding-path="m_Tires" label="Tires" />
<ui:Foldout text="Default Inspector" name="Default_Inspector" />
</ui:UXML>
轮胎.cs
[System.Serializable]
public class Tire
{
  public float m_AirPressure = 21.5f;
  public int m_ProfileDepth = 4;
}
Tire_Property.cs
using UnityEditor;
using UnityEditor.UIElements;
using UnityEngine.UIElements;

[CustomPropertyDrawer(typeof(Tire))]
public class Tire_PropertyDrawer : PropertyDrawer
{
  public override VisualElement CreatePropertyGUI(SerializedProperty property)
  {
    // Create a new VisualElement to be the root the property UI
    var container = new VisualElement();

    // Create drawer UI using C#
    var popup = new UnityEngine.UIElements.PopupWindow();
    popup.text = "Tire Details";
    popup.Add(new PropertyField(property.FindPropertyRelative("m_AirPressure"), "Air Pressure (psi)"));
    popup.Add(new PropertyField(property.FindPropertyRelative("m_ProfileDepth"), "Profile Depth (mm)"));
    container.Add(popup);

    // Return the finished UI
    return container;
  }
}由3D建模学习工作室整理翻译,转载请注明出处!