Unity3D :相对和绝对定位
推荐:将NSDT场景编辑器加入你的3D工具链
3D工具集:NSDT简石数字孪生
相对和绝对定位
此示例演示了相对定位和绝对定位之间的差异。此示例还演示了如何使用 C# 和 UXML/USS 进行添加和样式设置。用户界面
控制。
示例概述
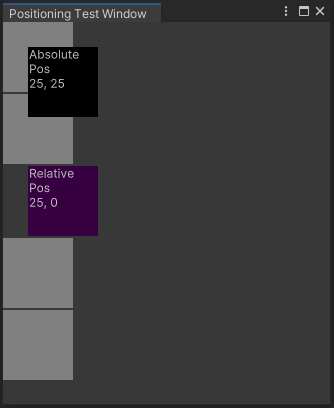
该示例使用自动布局系统将框添加到编辑器和运行时 UI。一个框演示 的相对偏移量,而另一个框演示 的绝对位置。25 px25 px, 25 px
该示例使用 C# 脚本构造编辑器 UI,使用 UXML 和 CSS 构造运行时 UI。
您可以在此 GitHub 存储库中找到此示例创建的已完成文件。
先决条件
本指南适用于熟悉 Unity 编辑器、UI 工具包和 C# 脚本的开发人员。在开始之前,请熟悉以下内容:
- 可视化树
- 坐标和定位系统
- 用户体验
- TS2
为编辑器 UI 创建示例
创建自定义编辑器窗口并使用 C# 脚本添加所有框:四个灰色背景框用于比较;一个黑色背景的盒子,使用绝对位置放置设置;一个紫色背景的框,使用相对位置放置进行设置。
- 使用任何模板创建 Unity 项目。
- 在“项目”窗口中单击鼠标右键,然后选择“>编辑器窗口创建 UI 工具包>”。
- 在“UI 工具包编辑器窗口创建程序”窗口的“C#”框中,输入 。
PositioningTestWindow - 清除 UXML 和 USS 复选框。
- 选择“确认”。这将创建一个名为 的 C# 文件。
PositioningTestWindow.cs - 替换为以下内容:
PositioningTestWindow.cs
using UnityEditor;
using UnityEngine;
using UnityEngine.UIElements;
public class PositioningTestWindow : EditorWindow
{
[MenuItem("Window/UI Toolkit/Positioning Test Window")]
public static void ShowExample()
{
var wnd = GetWindow
wnd.titleContent = new GUIContent("Positioning Test Window");
}
public void CreateGUI()
{
    for (int i = 0; i < 2; i++)
    {
        var temp = new VisualElement();
        temp.style.width = 70;
        temp.style.height = 70;
        temp.style.marginBottom = 2;
        temp.style.backgroundColor = Color.gray;
        rootVisualElement.Add(temp);
    }

    // Relative positioning
    var relative = new Label("Relative\nPos\n25, 0");
    relative.style.width = 70;
    relative.style.height = 70;
    relative.style.left = 25;
    relative.style.marginBottom = 2;
    relative.style.backgroundColor = new Color.purple;
    rootVisualElement.Add(relative);

    for (int i = 0; i < 2; i++)
    {
        var temp = new VisualElement();
        temp.style.width = 70;
        temp.style.height = 70;
        temp.style.marginBottom = 2;
        temp.style.backgroundColor = Color.gray;
        ui.rootVisualElement.Add(temp);
    }

    // Absolute positioning
    var absolutePositionElement = new Label("Absolute\nPos\n25, 25");
    absolutePositionElement.style.position = Position.Absolute;
    absolutePositionElement.style.top = 25;
    absolutePositionElement.style.left = 25;
    absolutePositionElement.style.width = 70;
    absolutePositionElement.style.height = 70;
    absolutePositionElement.style.backgroundColor = Color.black;
    rootVisualElement.Add(absolutePositionElement);
}
}
7. 若要查看示例,请从菜单中选择“窗口> UI 工具包”>“定位测试窗口”。
为运行时 UI 创建示例
- 创建一个以以下内容命名的 USS 文件:
PositioningTest.uss
.box {
height: 70px;
width: 70px;
margin-bottom: 2px;
background-color: gray;
}
relative{
width: 70px;
height: 70px;
background-color: purple;
left: 25px;
margin-bottom: 2px;
position:relative;
}
absolutePositionElement{
left: 25px;
top: 25px;
width: 70px;
height: 70px;
background-color: black;
position: absolute;
}
2. 创建以以下内容命名的 UXML 文档:PositioningTest.uxml
<ui:UXML xmlns:ui="UnityEngine.UIElements" xmlns:uie="UnityEditor.UIElements"
xsi="http://www.w3.org/2001/XMLSchema-instance" engine="UnityEngine.UIElements"
editor="UnityEditor.UIElements" noNamespaceSchemaLocation="../UIElementsSchema/UIElements.xsd"
editor-extension-mode="False">
<ui:VisualElement class="box"/>
<ui:VisualElement class="box"/>
<ui:Label text="Relative\nPos\n25, 0" name="relative" />
<ui:VisualElement class="box"/>
<ui:VisualElement class="box"/>
<ui:Label text="Absolute\nPos\n25, 25" name="absolutePositionElement" />
</ui:UXML>
3. 创建以以下内容命名的 C# 脚本:PositioningTestRuntime.cs
4. 右键单击“层次结构”窗口,然后选择“UI 工具包”>“UI 文档”。
5. 在 UI 文档的“检查器”窗口中,选择“UI 文档”>“源资产”>“定位测试”。
6. 在 UI 文档的“检查器”窗口中,选择“添加组件>定位测试运行时”。
7. 进入播放模式并根据需要调整分辨率以查看结果。
由3D建模学习工作室整理翻译,转载请注明出处!