3ds Max实战图文件教程:雷蛇刀锋游戏笔记本电脑宣传广告动画制作-第2部分
在第二部分中,您将使用 3ds Max 完成笔记本电脑型号的工作。本课程包括将剩余细节添加到端口、构建笔记本电脑的铰链和构建显示器。在系列的下一部分进入Cinema 4D进行动画之前所需的最后步骤。
![3ds Max实战图文件教程:雷蛇刀锋游戏笔记本电脑宣传广告动画制作-第2部分](/content/images/size/w2000/2023/07/7-6.jpg)
推荐:使用NSDT场景编辑器助你快速搭建可二次开发的3D应用场景
项目概述:
在这个由七部分组成的系列中,您将从头开始指导您完成为 Razer 游戏笔记本电脑创建高质量广告位的整个过程。从 3D Studio Max 开始,前两部分将向您展示如何使用各种建模技术创建高分辨率笔记本电脑模型。从那里进入Cinema 4D的第三部分,第四部分和第五部分,在那里您将处理材料,纹理,照明并为最终的广告位设置一系列不同的摄像机动画。
在动画锁定并准备就绪后,Stefan 将指导您完成为每个摄像机角度设置多通道渲染的过程,然后进入 After Effects 进行最后两部分的合成、色彩校正和后期效果,这些部分将发布在我们的姊妹网站 Aetuts+ 上。
从第 1 部分继续:
步骤 71
创建一个框并在前面多边形上应用一个拉伸,在 Y 轴上缩放它,然后如图所示将其向下移动一点。
![Cgtuts+ Tutorial Razer Blade Gaming Laptop Ad with 3D Studio Max, Cinema 4D & AE](https://cdn.tutsplus.com/cdn-cgi/image/width=639/cg/authors/chris-tate/Laptop_PT2__640px_72.jpg)
步骤 72
在长度上添加 8 个环,在宽度上添加 2 个环。
![Cgtuts+ Tutorial Razer Blade Gaming Laptop Ad with 3D Studio Max, Cinema 4D & AE](https://cdn.tutsplus.com/cdn-cgi/image/width=639/cg/authors/chris-tate/Laptop_PT2__640px_73.jpg)
步骤 73
在底部的 8 个(交替)多边形上应用“拉伸”,然后选择前边缘并上移。
![Cgtuts+ Tutorial Razer Blade Gaming Laptop Ad with 3D Studio Max, Cinema 4D & AE](https://cdn.tutsplus.com/cdn-cgi/image/width=639/cg/authors/chris-tate/Laptop_PT2__640px_74.jpg)
步骤 74
在拐角边缘附近添加环,如下所示。
![Cgtuts+ Tutorial Razer Blade Gaming Laptop Ad with 3D Studio Max, Cinema 4D & AE](https://cdn.tutsplus.com/cdn-cgi/image/width=639/cg/authors/chris-tate/Laptop_PT2__640px_75.jpg)
步骤 75
然后在元素的底部添加更多循环,以支持拉伸形状。
![Cgtuts+ Tutorial Razer Blade Gaming Laptop Ad with 3D Studio Max, Cinema 4D & AE](https://cdn.tutsplus.com/cdn-cgi/image/width=639/cg/authors/chris-tate/Laptop_PT2__640px_76.jpg)
步骤 76
将 Turbosmooth 应用于第一个元素,并将迭代设置为 2。然后将涡轮平滑添加到第二个元素,迭代设置为 1。
![Cgtuts+ Tutorial Razer Blade Gaming Laptop Ad with 3D Studio Max, Cinema 4D & AE](https://cdn.tutsplus.com/cdn-cgi/image/width=639/cg/authors/chris-tate/Laptop_PT2__640px_77.jpg)
步骤 77
复制对象 3 次并正确定位它们。
![Cgtuts+ Tutorial Razer Blade Gaming Laptop Ad with 3D Studio Max, Cinema 4D & AE](https://cdn.tutsplus.com/cdn-cgi/image/width=639/cg/authors/chris-tate/Laptop_PT2__640px_78.jpg)
步骤 78
创建一个新框并将其转换为可编辑多边形。选择前多边形并添加“内陷”,然后添加“负拉伸”,然后在中心添加一个新环,并在 Y 轴上缩放底部顶点。
![Cgtuts+ Tutorial Razer Blade Gaming Laptop Ad with 3D Studio Max, Cinema 4D & AE](https://cdn.tutsplus.com/cdn-cgi/image/width=639/cg/authors/chris-tate/Laptop_PT2__640px_79.jpg)
步骤 79
在底部添加 2 个水平环,然后在内部垂直添加 3 个。
![Cgtuts+ Tutorial Razer Blade Gaming Laptop Ad with 3D Studio Max, Cinema 4D & AE](https://cdn.tutsplus.com/cdn-cgi/image/width=639/cg/authors/chris-tate/Laptop_PT2__640px_80.jpg)
步骤 80
接下来,在里面再添加 6 个循环,然后纵向添加 4 个循环。
![Cgtuts+ Tutorial Razer Blade Gaming Laptop Ad with 3D Studio Max, Cinema 4D & AE](https://cdn.tutsplus.com/cdn-cgi/image/width=639/cg/authors/chris-tate/Laptop_PT2__640px_81.jpg)
步骤 81
将拉伸应用于所选多边形 3 次,第一个和第三个拉伸必须具有较低的高度量。
![Cgtuts+ Tutorial Razer Blade Gaming Laptop Ad with 3D Studio Max, Cinema 4D & AE](https://cdn.tutsplus.com/cdn-cgi/image/width=639/cg/authors/chris-tate/Laptop_PT2__640px_82.jpg)
步骤 82
在边缘周围添加环,如图所示。
![Cgtuts+ Tutorial Razer Blade Gaming Laptop Ad with 3D Studio Max, Cinema 4D & AE](https://cdn.tutsplus.com/cdn-cgi/image/width=639/cg/authors/chris-tate/Laptop_PT2__640px_83.jpg)
步骤 83
选择下面突出显示的边缘,然后向后移动它们。
![Cgtuts+ Tutorial Razer Blade Gaming Laptop Ad with 3D Studio Max, Cinema 4D & AE](https://cdn.tutsplus.com/cdn-cgi/image/width=639/cg/authors/chris-tate/Laptop_PT2__640px_84.jpg)
步骤 84
在前部添加 2 个彼此非常接近的环,然后在具有 2 段的中间环上应用倒角。
![Cgtuts+ Tutorial Razer Blade Gaming Laptop Ad with 3D Studio Max, Cinema 4D & AE](https://cdn.tutsplus.com/cdn-cgi/image/width=639/cg/authors/chris-tate/Laptop_PT2__640px_85.jpg)
步骤 85
现在选择中间的 10 个顶点并将它们向内移动以创建圆形。
![Cgtuts+ Tutorial Razer Blade Gaming Laptop Ad with 3D Studio Max, Cinema 4D & AE](https://cdn.tutsplus.com/cdn-cgi/image/width=639/cg/authors/chris-tate/Laptop_PT2__640px_86.jpg)
步骤 86
在顶部多边形上应用拉伸(如下所示),然后将所选折点移回。
![Cgtuts+ Tutorial Razer Blade Gaming Laptop Ad with 3D Studio Max, Cinema 4D & AE](https://cdn.tutsplus.com/cdn-cgi/image/width=639/cg/authors/chris-tate/Laptop_PT2__640px_87.jpg)
步骤 87
向上移动前顶点并添加几个新循环,如图所示。
![Cgtuts+ Tutorial Razer Blade Gaming Laptop Ad with 3D Studio Max, Cinema 4D & AE](https://cdn.tutsplus.com/cdn-cgi/image/width=639/cg/authors/chris-tate/Laptop_PT2__640px_88.jpg)
步骤 88
在靠近外边缘的地方添加更多环。
![Cgtuts+ Tutorial Razer Blade Gaming Laptop Ad with 3D Studio Max, Cinema 4D & AE](https://cdn.tutsplus.com/cdn-cgi/image/width=639/cg/authors/chris-tate/Laptop_PT2__640px_89.jpg)
步骤 89
创建一个新框并将拉伸应用于底部多边形,然后在 Y 轴上缩放它。
![Cgtuts+ Tutorial Razer Blade Gaming Laptop Ad with 3D Studio Max, Cinema 4D & AE](https://cdn.tutsplus.com/cdn-cgi/image/width=639/cg/authors/chris-tate/Laptop_PT2__640px_90.jpg)
步骤 90
在每个边缘附近添加循环,并将 Turbosmooth 与 2 次迭代应用于元素。
![Cgtuts+ Tutorial Razer Blade Gaming Laptop Ad with 3D Studio Max, Cinema 4D & AE](https://cdn.tutsplus.com/cdn-cgi/image/width=639/cg/authors/chris-tate/Laptop_PT2__640px_91.jpg)
步骤 91
创建一个宽度和高度与我们之前创建的孔相同的新盒子,并添加 2 个与笔记本电脑机身边缘匹配的环。
![Cgtuts+ Tutorial Razer Blade Gaming Laptop Ad with 3D Studio Max, Cinema 4D & AE](https://cdn.tutsplus.com/cdn-cgi/image/width=639/cg/authors/chris-tate/Laptop_PT2__640px_92.jpg)
步骤 92
之后,将拉伸应用于顶部多边形,向前移动元素并将插入应用于前面多边形。
![Cgtuts+ Tutorial Razer Blade Gaming Laptop Ad with 3D Studio Max, Cinema 4D & AE](https://cdn.tutsplus.com/cdn-cgi/image/width=639/cg/authors/chris-tate/Laptop_PT2__640px_93.jpg)
步骤 93
进入隔离模式 (ALT+Q) 并添加环路,如图所示。
![Cgtuts+ Tutorial Razer Blade Gaming Laptop Ad with 3D Studio Max, Cinema 4D & AE](https://cdn.tutsplus.com/cdn-cgi/image/width=639/cg/authors/chris-tate/Laptop_PT2__640px_94.jpg)
步骤 94
在前面多边形上应用高度为负的拉伸,然后添加 3 个环,这些环与外部的环位于同一位置,如图所示。
![Cgtuts+ Tutorial Razer Blade Gaming Laptop Ad with 3D Studio Max, Cinema 4D & AE](https://cdn.tutsplus.com/cdn-cgi/image/width=639/cg/authors/chris-tate/Laptop_PT2__640px_95.jpg)
步骤 95
删除中间的 3 个多边形,然后使用 Bridge 连接边。
![Cgtuts+ Tutorial Razer Blade Gaming Laptop Ad with 3D Studio Max, Cinema 4D & AE](https://cdn.tutsplus.com/cdn-cgi/image/width=639/cg/authors/chris-tate/Laptop_PT2__640px_96.jpg)
步骤 96
在元素中间添加 2 个环并删除多边形以在每侧创建一个孔。并再次使用桥连接边缘。
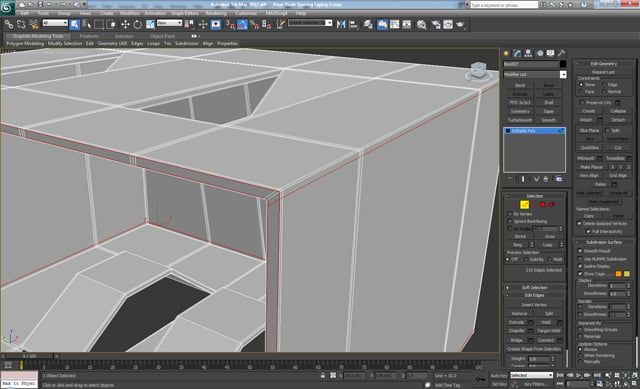
![Cgtuts+ Tutorial Razer Blade Gaming Laptop Ad with 3D Studio Max, Cinema 4D & AE](https://cdn.tutsplus.com/cdn-cgi/image/width=639/cg/authors/chris-tate/Laptop_PT2__640px_97.jpg)
步骤 97
像我们之前一样在每侧制作板,并在中间添加 12 个环,在元素的背面添加一个环。
![Cgtuts+ Tutorial Razer Blade Gaming Laptop Ad with 3D Studio Max, Cinema 4D & AE](https://cdn.tutsplus.com/cdn-cgi/image/width=639/cg/authors/chris-tate/Laptop_PT2__640px_98.jpg)
步骤 98
将“拉伸”应用于显示的多边形,然后向下移动所选多边形。
![Cgtuts+ Tutorial Razer Blade Gaming Laptop Ad with 3D Studio Max, Cinema 4D & AE](https://cdn.tutsplus.com/cdn-cgi/image/width=639/cg/authors/chris-tate/Laptop_PT2__640px_99.jpg)
步骤 99
就像以前一样,在拐角边缘附近添加额外的环。
![Cgtuts+ Tutorial Razer Blade Gaming Laptop Ad with 3D Studio Max, Cinema 4D & AE](https://cdn.tutsplus.com/cdn-cgi/image/width=639/cg/authors/chris-tate/Laptop_PT2__640px_100.jpg)
步骤 100
在上一步中拉伸的多边形上添加循环,并在它们之间添加多个循环。最后添加一个涡轮平滑 – 迭代次数:2。
![Cgtuts+ Tutorial Razer Blade Gaming Laptop Ad with 3D Studio Max, Cinema 4D & AE](https://cdn.tutsplus.com/cdn-cgi/image/width=639/cg/authors/chris-tate/Laptop_PT2__640px_101.jpg)
步骤 101
创建一个具有 8 个边的圆柱体,然后单击键盘上的“S”以打开捕捉切换。
![Cgtuts+ Tutorial Razer Blade Gaming Laptop Ad with 3D Studio Max, Cinema 4D & AE](https://cdn.tutsplus.com/cdn-cgi/image/width=639/cg/authors/chris-tate/Laptop_PT2__640px_102.jpg)
步骤 102
使用剪切工具遵循圆柱体的轮廓。
![Cgtuts+ Tutorial Razer Blade Gaming Laptop Ad with 3D Studio Max, Cinema 4D & AE](https://cdn.tutsplus.com/cdn-cgi/image/width=639/cg/authors/chris-tate/Laptop_PT2__640px_103.jpg)
步骤 103
删除圆柱体,然后将旧顶点定向焊接到新顶点。
![Cgtuts+ Tutorial Razer Blade Gaming Laptop Ad with 3D Studio Max, Cinema 4D & AE](https://cdn.tutsplus.com/cdn-cgi/image/width=639/cg/authors/chris-tate/Laptop_PT2__640px_104.jpg)
步骤 104
然后使用剪切工具连接选定的顶点。
![Cgtuts+ Tutorial Razer Blade Gaming Laptop Ad with 3D Studio Max, Cinema 4D & AE](https://cdn.tutsplus.com/cdn-cgi/image/width=639/cg/authors/chris-tate/Laptop_PT2__640px_105.jpg)
步骤 105
将拉伸应用于具有负高度的中心面 2 次(第一次应使用较低的高度以使支撑环靠近边),然后删除多边形。
![Cgtuts+ Tutorial Razer Blade Gaming Laptop Ad with 3D Studio Max, Cinema 4D & AE](https://cdn.tutsplus.com/cdn-cgi/image/width=639/cg/authors/chris-tate/Laptop_PT2__640px_106.jpg)
步骤 106
现在添加一个靠近外边缘的环。
![Cgtuts+ Tutorial Razer Blade Gaming Laptop Ad with 3D Studio Max, Cinema 4D & AE](https://cdn.tutsplus.com/cdn-cgi/image/width=639/cg/authors/chris-tate/Laptop_PT2__640px_107.jpg)
步骤 107
创建一个有 8 条边的圆柱体,并删除除前多边形之外的所有多边形。在该多边形上,应用“内边距”、“具有负高度的拉伸”,然后再次应用“内陷”。
![Cgtuts+ Tutorial Razer Blade Gaming Laptop Ad with 3D Studio Max, Cinema 4D & AE](https://cdn.tutsplus.com/cdn-cgi/image/width=639/cg/authors/chris-tate/Laptop_PT2__640px_108.jpg)
步骤 108
拉伸具有正高度的中心面,然后拉伸斜面和倒角。
![Cgtuts+ Tutorial Razer Blade Gaming Laptop Ad with 3D Studio Max, Cinema 4D & AE](https://cdn.tutsplus.com/cdn-cgi/image/width=639/cg/authors/chris-tate/Laptop_PT2__640px_109.jpg)
步骤 109
在选定的环上应用倒角。
![Cgtuts+ Tutorial Razer Blade Gaming Laptop Ad with 3D Studio Max, Cinema 4D & AE](https://cdn.tutsplus.com/cdn-cgi/image/width=639/cg/authors/chris-tate/Laptop_PT2__640px_110.jpg)
步骤 110
最后应用涡轮平滑 – 迭代次数:2。
![Cgtuts+ Tutorial Razer Blade Gaming Laptop Ad with 3D Studio Max, Cinema 4D & AE](https://cdn.tutsplus.com/cdn-cgi/image/width=639/cg/authors/chris-tate/Laptop_PT2__640px_111.jpg)
步骤 111
在所选多边形上添加 2 次插图(第一次应该使用非常低的数量。
![Cgtuts+ Tutorial Razer Blade Gaming Laptop Ad with 3D Studio Max, Cinema 4D & AE](https://cdn.tutsplus.com/cdn-cgi/image/width=639/cg/authors/chris-tate/Laptop_PT2__640px_112.jpg)
步骤 112
选择我们从第一个插图中收到的循环,然后打开石墨建模工具,循环菜单,然后选择循环工具并单击圆。然后点击 放松 按钮几次。
![Cgtuts+ Tutorial Razer Blade Gaming Laptop Ad with 3D Studio Max, Cinema 4D & AE](https://cdn.tutsplus.com/cdn-cgi/image/width=639/cg/authors/chris-tate/Laptop_PT2__640px_113.jpg)
步骤 113
像之前一样,选择多边形并应用拉伸 2 次,删除它们并添加靠近外边缘的循环。
![Cgtuts+ Tutorial Razer Blade Gaming Laptop Ad with 3D Studio Max, Cinema 4D & AE](https://cdn.tutsplus.com/cdn-cgi/image/width=639/cg/authors/chris-tate/Laptop_PT2__640px_114.jpg)
步骤 114
创建一个具有 8 条边的圆柱体,并仅删除背面多边形。在前面多边形上应用一个内陷,一个具有负高度的拉伸,一个具有较低数量的插入,然后应用一个拉伸。
![Cgtuts+ Tutorial Razer Blade Gaming Laptop Ad with 3D Studio Max, Cinema 4D & AE](https://cdn.tutsplus.com/cdn-cgi/image/width=639/cg/authors/chris-tate/Laptop_PT2__640px_115.jpg)
步骤 115
在选定的环上应用倒角。
![Cgtuts+ Tutorial Razer Blade Gaming Laptop Ad with 3D Studio Max, Cinema 4D & AE](https://cdn.tutsplus.com/cdn-cgi/image/width=639/cg/authors/chris-tate/Laptop_PT2__640px_116.jpg)
步骤 116
最后将涡轮平滑应用于身体和元素 – 迭代次数:2
![Cgtuts+ Tutorial Razer Blade Gaming Laptop Ad with 3D Studio Max, Cinema 4D & AE](https://cdn.tutsplus.com/cdn-cgi/image/width=639/cg/authors/chris-tate/Laptop_PT2__640px_117.jpg)
步骤 117
对于监视器,创建一个与主体大小相同的框,并将倒角应用于拐角边缘。然后在底部多边形上,应用具有负高度的“内陷”和“拉伸”,如图所示。
![Cgtuts+ Tutorial Razer Blade Gaming Laptop Ad with 3D Studio Max, Cinema 4D & AE](https://cdn.tutsplus.com/cdn-cgi/image/width=639/cg/authors/chris-tate/Laptop_PT2__640px_118.jpg)
步骤 118
在顶部多边形上应用斜角 2 次,然后使用剪切工具连接显示的顶点。
![Cgtuts+ Tutorial Razer Blade Gaming Laptop Ad with 3D Studio Max, Cinema 4D & AE](https://cdn.tutsplus.com/cdn-cgi/image/width=639/cg/authors/chris-tate/Laptop_PT2__640px_119.jpg)
步骤 119
向元素的长度添加一个循环,并将 4 个顶点向上移动一点。
![Cgtuts+ Tutorial Razer Blade Gaming Laptop Ad with 3D Studio Max, Cinema 4D & AE](https://cdn.tutsplus.com/cdn-cgi/image/width=639/cg/authors/chris-tate/Laptop_PT2__640px_120.jpg)
步骤 120
向“长度和宽度”再添加 2 个环,并向上移动所选顶点以创建圆角曲面。
![Cgtuts+ Tutorial Razer Blade Gaming Laptop Ad with 3D Studio Max, Cinema 4D & AE](https://cdn.tutsplus.com/cdn-cgi/image/width=639/cg/authors/chris-tate/Laptop_PT2__640px_121.jpg)
步骤 121
再次添加 2 个循环并向上移动所选顶点,如图所示。
![Cgtuts+ Tutorial Razer Blade Gaming Laptop Ad with 3D Studio Max, Cinema 4D & AE](https://cdn.tutsplus.com/cdn-cgi/image/width=639/cg/authors/chris-tate/Laptop_PT2__640px_122.jpg)
步骤 122
在底部多边形上应用插入并删除它。之后,用显示的顶点做一个直角。
![Cgtuts+ Tutorial Razer Blade Gaming Laptop Ad with 3D Studio Max, Cinema 4D & AE](https://cdn.tutsplus.com/cdn-cgi/image/width=639/cg/authors/chris-tate/Laptop_PT2__640px_123.jpg)
步骤 123
现在添加 2 个额外的循环,选择边缘旁边的 5 个多边形并删除它们。
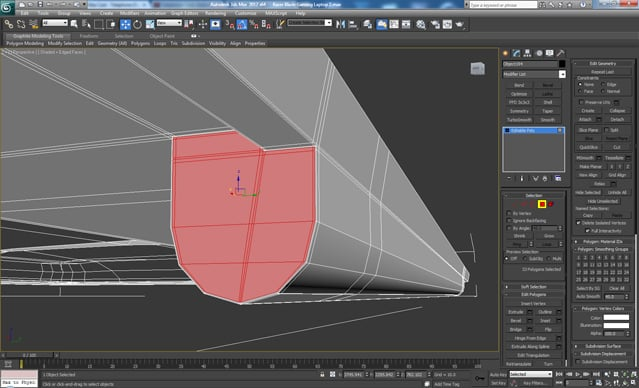
![Cgtuts+ Tutorial Razer Blade Gaming Laptop Ad with 3D Studio Max, Cinema 4D & AE](https://cdn.tutsplus.com/cdn-cgi/image/width=639/cg/authors/chris-tate/Laptop_PT2__640px_124.jpg)
步骤 124
选择接下来的 5 个多边形并如图所示拉伸它们,然后从另一侧(隐藏在图像中)删除多边形。
![Cgtuts+ Tutorial Razer Blade Gaming Laptop Ad with 3D Studio Max, Cinema 4D & AE](https://cdn.tutsplus.com/cdn-cgi/image/width=639/cg/authors/chris-tate/Laptop_PT2__640px_125.jpg)
步骤 125
选择两侧的 2 个顶点并焊接它们。
![Cgtuts+ Tutorial Razer Blade Gaming Laptop Ad with 3D Studio Max, Cinema 4D & AE](https://cdn.tutsplus.com/cdn-cgi/image/width=639/cg/authors/chris-tate/Laptop_PT2__640px_126.jpg)
步骤 126
删除顶部多边形,并创建一个具有 12 条边且高度与其下方孔的长度相匹配的圆柱体。之后,将其转换为可编辑的多边形并删除末端和底部 6 的多边形。最后,添加与监视器上的环位于相同位置的环,然后将其附加到监视器网格。
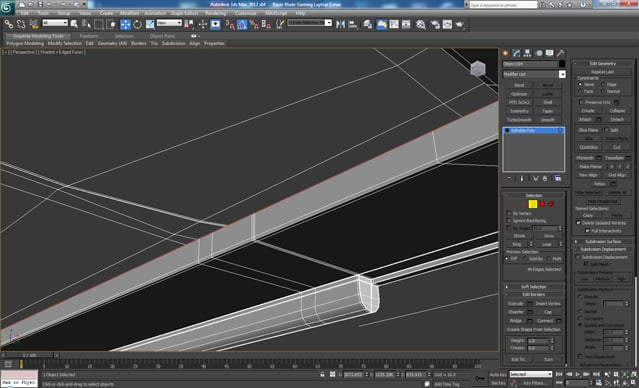
![Cgtuts+ Tutorial Razer Blade Gaming Laptop Ad with 3D Studio Max, Cinema 4D & AE](https://cdn.tutsplus.com/cdn-cgi/image/width=639/cg/authors/chris-tate/Laptop_PT2__640px_127.jpg)
步骤 127
使用桥接,连接侧面的边以填充间隙。
![Cgtuts+ Tutorial Razer Blade Gaming Laptop Ad with 3D Studio Max, Cinema 4D & AE](https://cdn.tutsplus.com/cdn-cgi/image/width=639/cg/authors/chris-tate/Laptop_PT2__640px_128.jpg)
步骤 128
在其余的孔上应用一个帽,然后在边缘附近添加一个环,然后使用切割工具,如图所示连接顶点。
![Cgtuts+ Tutorial Razer Blade Gaming Laptop Ad with 3D Studio Max, Cinema 4D & AE](https://cdn.tutsplus.com/cdn-cgi/image/width=639/cg/authors/chris-tate/Laptop_PT2__640px_129.jpg)
步骤 129
再次使用剪切工具连接显示的顶点。
![Cgtuts+ Tutorial Razer Blade Gaming Laptop Ad with 3D Studio Max, Cinema 4D & AE](https://cdn.tutsplus.com/cdn-cgi/image/width=639/cg/authors/chris-tate/Laptop_PT2__640px_130.jpg)
步骤 130
添加靠近每个边的环。
![Cgtuts+ Tutorial Razer Blade Gaming Laptop Ad with 3D Studio Max, Cinema 4D & AE](https://cdn.tutsplus.com/cdn-cgi/image/width=639/cg/authors/chris-tate/Laptop_PT2__640px_131.jpg)
步骤 131
在两侧(末端)选择多边形并应用低量的内陷。
![](https://www.mvrlink.com/content/images/2023/07/image-249.png)
步骤 132
使用边框选择监视器孔,并在按住 Shift 的同时,将其向上拖动 2 次,然后在闭合孔中添加一个 Cap。
![](https://www.mvrlink.com/content/images/2023/07/image-248.png)
步骤 133
接下来,选择显示多边形并将其分离。
![Cgtuts+ Tutorial Razer Blade Gaming Laptop Ad with 3D Studio Max, Cinema 4D & AE](https://cdn.tutsplus.com/cdn-cgi/image/width=639/cg/authors/chris-tate/Laptop_PT2__640px_134.jpg)
步骤 134
最后应用涡轮平滑 2 次迭代,以完成模型。
![Cgtuts+ Tutorial Razer Blade Gaming Laptop Ad with 3D Studio Max, Cinema 4D & AE](https://cdn.tutsplus.com/cdn-cgi/image/width=639/cg/authors/chris-tate/Laptop_PT2__640px_135.jpg)
我们发布了一些您可能也感兴趣的相关教程:
由3D建模学习工作室 整理翻译,转载请注明出处!