Unity3D :简单的 UI 工具包工作流
推荐:将NSDT场景编辑器加入你的3D工具链
3D工具集:NSDT简石数字孪生
简单的 UI 工具包工作流
如果您经常执行特定任务,则可以使用 UI 工具包为其创建专用 UI。例如,您可以创建自定义编辑器窗口。
本指南以自定义编辑器窗口为例介绍基本的 UI 工具包工作流。该示例演示如何使用 UI 生成器、UXML 和 C# 脚本创建自定义编辑器窗口并将 UI 控件添加到自定义编辑器窗口中。
您可以在此 GitHub 存储库中找到此示例创建的已完成文件。
先决条件
本指南适用于熟悉 Unity 编辑器和 C# 脚本但不熟悉 UI 工具包的开发人员。Unity 建议您对以下概念有基本的了解:
- 用户界面生成器
- 用户体验
- 可视化树
- 控制:
- 标签
- 按钮
- 切换
创建自定义编辑器窗口
- 在“项目”窗口中,右键单击并选择“>编辑器窗口创建 UI 工具包>”。
- 在 UI 工具包编辑器窗口创建器中,输入并禁用 USS。
MyCustomEditor - 单击确认。
这将创建一个具有两个标签的自定义编辑器窗口。您可以从菜单(> MyCustomEditor > UI 工具包窗口)打开编辑器窗口。您可以在文件夹中找到它的源文件。Asset/Editor
向窗口添加 UI 控件
可以通过以下方式将 UI 控件添加到窗口中:
- 使用 UI 生成器直观地添加 UI 控件
- 使用类似 XML 的文本文件 (UXML) 添加 UI 控件
- 使用 C# 脚本添加 UI 控件
您可以单独使用这些方法中的任何一种,也可以组合使用。下面的示例使用这些方法的组合创建三组标签、按钮和切换开关。
使用 UI 生成器添加 UI 控件
若要直观地将 UI 控件添加到窗口中,请使用 UI 生成器。以下示例演示了除了默认标签之外,如何在自定义编辑器窗口中添加一个按钮和一个切换开关。
- 在该文件夹中,双击以打开 UI 生成器。
EditorMyCustomEditor.uxml - 在 UI 生成器中,将“按钮”和“切换”从“库”>“控件”拖动到“层次结构”或视口中的窗口预览中。
3. 在“层次结构”中,向控件添加一些属性:
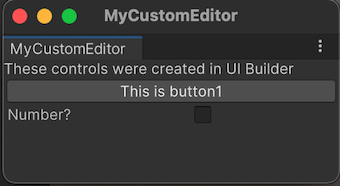
- 单击标签,然后在检查器的“文本”栏中,将默认文本更改为 。
These controls were created in UI Builder - 单击该按钮,然后在检查器的“文本”栏中输入 。在检查器的“名称”字段中,输入 。
This is button1button1 - 单击切换开关,然后在检查器的“标签”栏中输入 。在检查器的“名称”字段中,输入 。
Number?toggle1
4. 保存并关闭 UI 生成器窗口。
5. 打开自定义编辑器窗口。您应该会看到刚刚在窗口中添加的按钮和切换。
使用 UXML 添加 UI 控件
如果您希望在文本文件中定义 UI,可以编辑 UXML 以添加 UI 控件。该示例在窗口中添加另一组标签、按钮和切换开关。
- 在该文件夹中,单击“资产”>“创建> UI 工具包”>“UI 文档”以创建名为 的 UXML 文件。
EditorMyCustomEditor_UXML.uxml
2. 在文本编辑器上打开。MyCustomEditor_UXML.uxml
提示: 为此,请单击“项目”窗口中的箭头,然后双击 。MyCustomEditor_UXML.uxmlinlineStyle
3. 默认情况下,UXML 文档显示带有标记的单个元素。这是 XML 树的根元素。在此元素中,可以添加 UI 控件及其属性。engine:UXML
完成的文件应如下所示:MyCustomEditor_UXML.uxml
<engine:UXML
xmlns:xsi="http://www.w3.org/2001/XMLSchema-instance"
xmlns:engine="UnityEngine.UIElements"
xmlns:editor="UnityEditor.UIElements"
xsi:noNamespaceSchemaLocation="../../UIElementsSchema/UIElements.xsd"
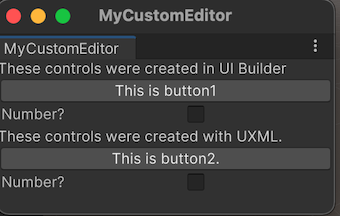
<engine:Label text="These controls were created with UXML." />
<engine:Button text="This is button2." name="button2"/>
<engine:Toggle label="Number?" name="toggle2"/>
</engine:UXML>
4. 打开。MyCustomEditor.cs
5. 添加调用到类的私有字段。将属性放在其上方:VisualTreeAssetm_UXMLTreeMyCustomEditor[SerializeField]
[SerializeField]
private VisualTreeAsset m_UXMLTree;
6. 将以下代码行添加到 的末尾。CreateGUI()
rootVisualElement.Add(m_UXMLTree.Instantiate());7. 在“项目”窗口中,选择 。MyCustomEditor.cs
8. 从“项目”窗口拖到检查器中的“UXML 树”栏中。这会将 UXML 分配给可视化树。MyCustomEditor_UXML.uxml
9. 打开自定义编辑器窗口。您应该会在窗口中看到三个标签、两个按钮和两个切换开关。
使用 C# 脚本添加 UI 控件
如果您更喜欢编码,可以使用 C# 脚本将 UI 控件添加到窗口中。下面的示例将另一组标签、按钮和切换添加到窗口中。
- 打开。
MyCustomEditor.cs
2. Unity 用于标签、按钮和切换等基本 UI 控件。若要使用 UI 控件,必须添加以下声明(如果尚不存在)。UnityEngine.UIElements
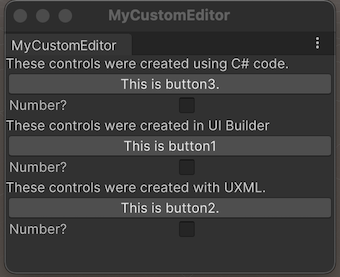
using UnityEngine.UIElements;3. 将现有标签的文本从 更改为 。"Hello World! From C#""These controls were created using C# code."
4. 类有一个名为 的属性。若要将 UI 控件添加到窗口中,请先使用某些属性实例化元素类,然后使用 .rootVisualElementAddrootVisualElement
完成的方法应如下所示:CreateGUI()
public void CreateGUI()
{
// Each editor window contains a root VisualElement object
VisualElement root = rootVisualElement;
// VisualElements objects can contain other VisualElements following a tree hierarchy.
Label label = new Label("These controls were created using C# code.");
root.Add(label);

Button button = new Button();
button.name = "button3";
button.text = "This is button3.";
rootVisualElement.Add(button);

Toggle toggle = new Toggle();
toggle.name = "toggle3";
toggle.label = "Number?";
rootVisualElement.Add(toggle);

// Import UXML
var visualTree = AssetDatabase.LoadAssetAtPath<VisualTreeAsset>("Assets/Editor/MyCustomEditor.uxml");
VisualElement labelFromUXML = visualTree.Instantiate();
root.Add(labelFromUXML);

rootVisualElement.Add(m_UXMLTree.Instantiate());
}
5. 转到编辑器并打开自定义编辑器窗口。您应该会在窗口中看到三个标签、三个按钮和三个切换开关。
定义 UI 控件的行为
可以为 UI 控件设置事件处理程序,以便在单击按钮并选择或清除切换开关时,UI 控件将执行某些任务。
下面的代码显示了执行以下操作的示例事件处理程序:
- 单击按钮时,编辑器控制台将显示一条消息。
- 选择切换开关后,控制台将显示按钮被单击的次数。
using UnityEditor;
using UnityEngine;
using UnityEngine.UIElements;

public class MyCustomEditor : EditorWindow
{
    [MenuItem("Window/UI Toolkit/MyCustomEditor")]
    public static void ShowExample()
    {
        MyCustomEditor wnd = GetWindow<MyCustomEditor>();
        wnd.titleContent = new GUIContent("MyCustomEditor");
    }

    [SerializeField]
    private VisualTreeAsset m_UXMLTree;

    private int m_ClickCount = 0;

    private const string m_ButtonPrefix = "button";

    public void CreateGUI()
    {
        // Each editor window contains a root VisualElement object
        VisualElement root = rootVisualElement;

        // VisualElements objects can contain other VisualElements following a tree hierarchy.
        Label label = new Label("These controls were created using C# code.");
        root.Add(label);

        Button button = new Button();
        button.name = "button3";
        button.text = "This is button3.";
        rootVisualElement.Add(button);

        Toggle toggle = new Toggle();
        toggle.name = "toggle3";
        toggle.label = "Number?";
        rootVisualElement.Add(toggle);

        // Import UXML
        var visualTree = AssetDatabase.LoadAssetAtPath<VisualTreeAsset>("Assets/Editor/MyCustomEditor.uxml");
        VisualElement labelFromUXML = visualTree.Instantiate();
        root.Add(labelFromUXML);

        rootVisualElement.Add(m_UXMLTree.Instantiate());

        //Call the event handler
        SetupButtonHandler();
    }

    //Functions as the event handlers for your button click and number counts
    private void SetupButtonHandler()
    {
        var buttons = rootVisualElement.Query<Button>();
        buttons.ForEach(RegisterHandler);
    }

    private void RegisterHandler(Button button)
    {
        button.RegisterCallback<ClickEvent>(PrintClickMessage);
    }

    private void PrintClickMessage(ClickEvent evt)
    {
        ++m_ClickCount;

        //Because of the names we gave the buttons and toggles, we can use the
        //button name to find the toggle name.
        Button button = evt.currentTarget as Button;
        string buttonNumber = button.name.Substring(m_ButtonPrefix.Length);
        string toggleName = "toggle" + buttonNumber;
        Toggle toggle = rootVisualElement.Q<Toggle>(toggleName);

        Debug.Log("Button was clicked!" +
            (toggle.value ? " Count: " + m_ClickCount : ""));
    }
}
由3D建模学习工作室整理翻译,转载请注明出处!