Unity3D :属性绘制器
推荐:将NSDT场景编辑器加入你的3D工具链
3D工具集:NSDT简石数字孪生
属性绘制器
借助属性绘制器,可以通过使用脚本上的特性或通过控制特定 Serializable 类的外观来自定义 __Inspector 窗口__中某些控件的外观。
属性绘制器有两种用途:
- 自定义 Serializable 类的每个实例的 GUI。
- 通过自定义的__属性特性__来自定义脚本成员的 GUI。
自定义 Serializable 类的 GUI
如果有自定义的 Serializable 类,可以使用__属性绘制器__来控制该类在 Inspector 中的外观。请参考以下脚本示例中的 Serializable 类 Ingredient(注意:这些不是编辑器脚本。属性特性类应放在常规脚本文件中):
C#(示例):
using System;
using UnityEngine;

enum IngredientUnit { Spoon, Cup, Bowl, Piece }

// 自定义 Serializable 类
[Serializable]
public class Ingredient
{
    public string name;
    public int amount = 1;
    public IngredientUnit unit;
}

public class Recipe : MonoBehaviour
{
    public Ingredient potionResult;
    public Ingredient[] potionIngredients;
}
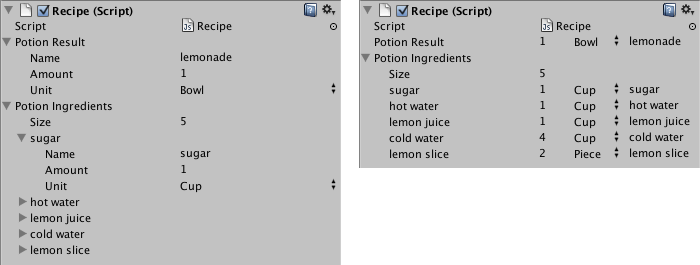
可以使用自定义属性绘制器来更改 Inspector 中 Ingredient 类的每个外观。比较不带有和带有自定义属性绘制器的 Inspector 中 Ingredient 属性的外观:

可以使用 CustomPropertyDrawer 属性将属性绘制器附加到 Serializable 类,然后传入属性绘制器所针对的 Serializable 类的类型。
C#(示例):
using UnityEditor;
using UnityEngine;

// IngredientDrawer
[CustomPropertyDrawer(typeof(Ingredient))]
public class IngredientDrawer : PropertyDrawer
{
    // 在给定的矩形内绘制属性
    public override void OnGUI(Rect position, SerializedProperty property, GUIContent label)
    {
        // 在父属性上使用 BeginProperty/EndProperty 意味着
        // 预制件重写逻辑作用于整个属性。
        EditorGUI.BeginProperty(position, label, property);

        //绘制标签
        position = EditorGUI.PrefixLabel(position, GUIUtility.GetControlID(FocusType.Passive), label);

        // 不要让子字段缩进
        var indent = EditorGUI.indentLevel;
        EditorGUI.indentLevel = 0;

        // 计算矩形
        var amountRect = new Rect(position.x, position.y, 30, position.height);
        var unitRect = new Rect(position.x + 35, position.y, 50, position.height);
        var nameRect = new Rect(position.x + 90, position.y, position.width - 90, position.height);

        // 绘制字段 - 将 GUIContent.none 传入每个字段,从而可以不使用标签来绘制字段
        EditorGUI.PropertyField(amountRect, property.FindPropertyRelative("amount"), GUIContent.none);
        EditorGUI.PropertyField(unitRect, property.FindPropertyRelative("unit"), GUIContent.none);
        EditorGUI.PropertyField(nameRect, property.FindPropertyRelative("name"), GUIContent.none);

        // 将缩进恢复原样
        EditorGUI.indentLevel = indent;

        EditorGUI.EndProperty();
    }
}
使用属性特性来自定义脚本成员的 GUI
属性绘制器__的另一用途是更改脚本中具有自定义__属性特性__的成员的外观。假设要将脚本中的浮点数或整数限制在特定范围内,并在 Inspector__ 中将其显示为滑动条。那么,可以使用内置的 PropertyAttribute__(称为 RangeAttribute__)来执行此操作:
C#(示例):
// 在 Inspector 中将此浮点数显示为 0 到 10 之间的滑动条
[Range(0f, 10f)]
float myFloat = 0f;
还可以创建自己的 PropertyAttribute。我们将以 RangeAttribute 的代码为例。该属性必须扩展 PropertyAttribute 类。如果需要,属性可以使用参数并将它们存储为公共成员变量。
C#(示例):
using UnityEngine;

public class MyRangeAttribute : PropertyAttribute
{
        readonly float min;
        readonly float max;

        void MyRangeAttribute(float min, float max)
        {
            this.min = min;
            this.max = max;
        }
}
拥有该特性之后,就需要创建一个__属性绘制器__来绘制具有该特性的属性。该绘制器必须扩展 PropertyDrawer 类,且必须具有 CustomPropertyDrawer 特性来说明绘制器所针对的特性。
属性绘制器类应放在编辑器脚本中,该脚本位于称为 Editor 的文件夹内。
C#(示例):
using UnityEditor;
using UnityEngine;

// 告知 MyRangeDrawer 这是针对具有 MyRangeAttribute 的属性的绘制器。
[CustomPropertyDrawer(typeof(MyRangeAttribute))]
public class RangeDrawer : PropertyDrawer
{
    // 在给定的矩形内绘制属性
    void OnGUI(Rect position, SerializedProperty property, GUIContent label)
    {
        //首先获取该特性,因为它包含滑动条的范围
        MyRangeAttribute range = (MyRangeAttribute)attribute;

        // 现在根据属性是浮点值还是整数来确定将属性绘制为 Slider 还是 IntSlider。
        if (property.propertyType == SerializedPropertyType.Float)
            EditorGUI.Slider(position, property, range.min, range.max, label);
        else if (property.propertyType == SerializedPropertyType.Integer)
            EditorGUI.IntSlider(position, property, (int) range.min, (int) range.max, label);
        else
            EditorGUI.LabelField(position, label.text, "Use MyRange with float or int.");
    }
}
请注意,出于性能原因,EditorGUILayout 函数不能用于属性绘制器。
由3D建模学习工作室整理翻译,转载请注明出处!