Unity3D :创建径向进度指示器
推荐:将NSDT场景编辑器就加入你的3D工具链
3D工具集:NSDT简石数字孪生
创建径向进度指示器
版本: 2021.2+
此示例演示如何创建显示介于 0 和 100 之间的浮点数的自定义控件。您可以使用它来显示进度,作为加载栏的替代方法。
示例概述
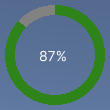
本示例创建一个径向进度元素。它在显示百分比的标签周围的部分填充环中显示进度值。它支持 0 到 100 之间的值,该值确定环的填充量。
您可以在此 GitHub 存储库中找到此示例创建的已完成文件。
先决条件
对于熟悉 Unity 编辑器、UI 工具包和 C# 脚本的开发人员来说,这是一个高级示例。建议您对以下概念有基本的了解:
- 用户界面生成器
- 可视化树
- 用户体验
- USS
- 处理事件
创建径向进度控件及其自定义网格
创建 C# 脚本以定义可视元素,并创建 C# 脚本以定义自定义网格。使用 USS 文件设置视觉元素的样式。RadialProgress
- 使用任何模板创建 Unity 项目。
- 创建一个名为用于存储文件的文件夹。
radial-progress
在该文件夹中,创建一个名为的 C# 脚本,并将其内容替换为以下内容:RadialProgressRadialProgress.cs
using Unity.Collections;
using UnityEngine;
using UnityEngine.UIElements;

namespace MyUILibrary
{

    // An element that displays progress inside a partially filled circle
    public class RadialProgress : VisualElement
    {
        public new class UxmlTraits : VisualElement.UxmlTraits
        {
            // The progress property is exposed to UXML.
            UxmlFloatAttributeDescription m_ProgressAttribute = new UxmlFloatAttributeDescription()
            {
                name = "progress"
            };

            // The Init method is used to assign to the C# progress property from the value of the progress UXML
            // attribute.
            public override void Init(VisualElement ve, IUxmlAttributes bag, CreationContext cc)
            {
                base.Init(ve, bag, cc);

                (ve as RadialProgress).progress = m_ProgressAttribute.GetValueFromBag(bag, cc);
            }
        }

        // A Factory class is needed to expose this control to UXML.
        public new class UxmlFactory : UxmlFactory<RadialProgress, UxmlTraits> { }

        // These are USS class names for the control overall and the label.
        public static readonly string ussClassName = "radial-progress";
        public static readonly string ussLabelClassName = "radial-progress__label";

        // These objects allow C# code to access custom USS properties.
        static CustomStyleProperty<Color> s_TrackColor = new CustomStyleProperty<Color>("--track-color");
        static CustomStyleProperty<Color> s_ProgressColor = new CustomStyleProperty<Color>("--progress-color");

        // These are the meshes this control uses.
        EllipseMesh m_TrackMesh;
        EllipseMesh m_ProgressMesh;

        // This is the label that displays the percentage.
        Label m_Label;

        // This is the number of outer vertices to generate the circle.
        const int k_NumSteps = 200;

        // This is the number that the Label displays as a percentage.
        float m_Progress;

        /// <summary>
        /// A value between 0 and 100
        /// </summary>
        public float progress
        {
            // The progress property is exposed in C#.
            get => m_Progress;
            set
            {
                // Whenever the progress property changes, MarkDirtyRepaint() is named. This causes a call to the
                // generateVisualContents callback.
                m_Progress = value;
                m_Label.text = Mathf.Clamp(Mathf.Round(value), 0, 100) + "%";
                MarkDirtyRepaint();
            }
        }

        // This default constructor is RadialProgress's only constructor.
        public RadialProgress()
        {
            // Create a Label, add a USS class name, and add it to this visual tree.
            m_Label = new Label();
            m_Label.AddToClassList(ussLabelClassName);
            Add(m_Label);

            // Create meshes for the track and the progress.
            m_ProgressMesh = new EllipseMesh(k_NumSteps);
            m_TrackMesh = new EllipseMesh(k_NumSteps);

            // Add the USS class name for the overall control.
            AddToClassList(ussClassName);

            // Register a callback after custom style resolution.
            RegisterCallback<CustomStyleResolvedEvent>(evt => CustomStylesResolved(evt));

            // Register a callback to generate the visual content of the control.
            generateVisualContent += context => GenerateVisualContent(context);

            progress = 0.0f;
        }

        static void CustomStylesResolved(CustomStyleResolvedEvent evt)
        {
            RadialProgress element = (RadialProgress)evt.currentTarget;
            element.UpdateCustomStyles();
        }

        // After the custom colors are resolved, this method uses them to color the meshes and (if necessary) repaint
        // the control.
        void UpdateCustomStyles()
        {
            if (customStyle.TryGetValue(s_ProgressColor, out var progressColor))
            {
                m_ProgressMesh.color = progressColor;
            }

            if (customStyle.TryGetValue(s_TrackColor, out var trackColor))
            {
                m_TrackMesh.color = trackColor;
            }

            if (m_ProgressMesh.isDirty || m_TrackMesh.isDirty)
                MarkDirtyRepaint();
        }

        // The GenerateVisualContent() callback method calls DrawMeshes().
        static void GenerateVisualContent(MeshGenerationContext context)
        {
            RadialProgress element = (RadialProgress)context.visualElement;
            element.DrawMeshes(context);
        }

        // DrawMeshes() uses the EllipseMesh utility class to generate an array of vertices and indices, for both the
        // "track" ring (in grey) and the progress ring (in green). It then passes the geometry to the MeshWriteData
        // object, as returned by the MeshGenerationContext.Allocate() method. For the "progress" mesh, only a slice of
        // the index arrays is used to progressively reveal parts of the mesh.
        void DrawMeshes(MeshGenerationContext context)
        {
            float halfWidth = contentRect.width * 0.5f;
            float halfHeight = contentRect.height * 0.5f;

            if (halfWidth < 2.0f || halfHeight < 2.0f)
                return;

            m_ProgressMesh.width = halfWidth;
            m_ProgressMesh.height = halfHeight;
            m_ProgressMesh.borderSize = 10;
            m_ProgressMesh.UpdateMesh();

            m_TrackMesh.width = halfWidth;
            m_TrackMesh.height = halfHeight;
            m_TrackMesh.borderSize = 10;
            m_TrackMesh.UpdateMesh();

            // Draw track mesh first
            var trackMeshWriteData = context.Allocate(m_TrackMesh.vertices.Length, m_TrackMesh.indices.Length);
            trackMeshWriteData.SetAllVertices(m_TrackMesh.vertices);
            trackMeshWriteData.SetAllIndices(m_TrackMesh.indices);

            // Keep progress between 0 and 100
            float clampedProgress = Mathf.Clamp(m_Progress, 0.0f, 100.0f);

            // Determine how many triangles are used to depending on progress, to achieve a partially filled circle
            int sliceSize = Mathf.FloorToInt((k_NumSteps * clampedProgress) / 100.0f);

            if (sliceSize == 0)
                return;

            // Every step is 6 indices in the corresponding array
            sliceSize *= 6;

            var progressMeshWriteData = context.Allocate(m_ProgressMesh.vertices.Length, sliceSize);
            progressMeshWriteData.SetAllVertices(m_ProgressMesh.vertices);

            var tempIndicesArray = new NativeArray<ushort>(m_ProgressMesh.indices, Allocator.Temp);
            progressMeshWriteData.SetAllIndices(tempIndicesArray.Slice(0, sliceSize));
            tempIndicesArray.Dispose();
        }

    }
}
4. 创建一个名为的 C# 脚本,并将其内容替换为以下内容:EllipseMesh.cs
using UnityEngine;
using UnityEngine.UIElements;

namespace MyUILibrary
{
    public class EllipseMesh
    {
        int m_NumSteps;
        float m_Width;
        float m_Height;
        Color m_Color;
        float m_BorderSize;
        bool m_IsDirty;
        public Vertex[] vertices { get; private set; }
        public ushort[] indices { get; private set; }

        public EllipseMesh(int numSteps)
        {
            m_NumSteps = numSteps;
            m_IsDirty = true;
        }

        public void UpdateMesh()
        {
            if (!m_IsDirty)
                return;

            int numVertices = numSteps * 2;
            int numIndices = numVertices * 6;

            if (vertices == null || vertices.Length != numVertices)
                vertices = new Vertex[numVertices];

            if (indices == null || indices.Length != numIndices)
                indices = new ushort[numIndices];

            float stepSize = 360.0f / (float)numSteps;
            float angle = -180.0f;

            for (int i = 0; i < numSteps; ++i)
            {
                angle -= stepSize;
                float radians = Mathf.Deg2Rad * angle;

                float outerX = Mathf.Sin(radians) * width;
                float outerY = Mathf.Cos(radians) * height;
                Vertex outerVertex = new Vertex();
                outerVertex.position = new Vector3(width + outerX, height + outerY, Vertex.nearZ);
                outerVertex.tint = color;
                vertices[i * 2] = outerVertex;

                float innerX = Mathf.Sin(radians) * (width - borderSize);
                float innerY = Mathf.Cos(radians) * (height - borderSize);
                Vertex innerVertex = new Vertex();
                innerVertex.position = new Vector3(width + innerX, height + innerY, Vertex.nearZ);
                innerVertex.tint = color;
                vertices[i * 2 + 1] = innerVertex;

                indices[i * 6] = (ushort)((i == 0) ? vertices.Length - 2 : (i - 1) * 2); // previous outer vertex
                indices[i * 6 + 1] = (ushort)(i * 2); // current outer vertex
                indices[i * 6 + 2] = (ushort)(i * 2 + 1); // current inner vertex

                indices[i * 6 + 3] = (ushort)((i == 0) ? vertices.Length - 2 : (i - 1) * 2); // previous outer vertex
                indices[i * 6 + 4] = (ushort)(i * 2 + 1); // current inner vertex
                indices[i * 6 + 5] = (ushort)((i == 0) ? vertices.Length - 1 : (i - 1) * 2 + 1); // previous inner vertex
            }

            m_IsDirty = false;
        }

        public bool isDirty => m_IsDirty;

        void CompareAndWrite(ref float field, float newValue)
        {
            if (Mathf.Abs(field - newValue) > float.Epsilon)
            {
                m_IsDirty = true;
                field = newValue;
            }
        }

        public int numSteps
        {
            get => m_NumSteps;
            set
            {
                m_IsDirty = value != m_NumSteps;
                m_NumSteps = value;
            }
        }

        public float width
        {
            get => m_Width;
            set => CompareAndWrite(ref m_Width, value);
        }

        public float height
        {
            get => m_Height;
            set => CompareAndWrite(ref m_Height, value);
        }

        public Color color
        {
            get => m_Color;
            set
            {
                m_IsDirty = value != m_Color;
                m_Color = value;
            }
        }

        public float borderSize
        {
            get => m_BorderSize;
            set => CompareAndWrite(ref m_BorderSize, value);
        }

    }
}
创建一个名为 USS 的文件,并将其内容替换为以下内容:RadialProgress.uss
.radial-progress {
    min-width: 26px;
    min-height: 20px;
    --track-color: rgb(130, 130, 130);
    --progress-color: rgb(46, 132, 24);
    --percentage-color: white;
    margin-left: 5px;
    margin-right: 5px;
    margin-top: 5px;
    margin-bottom: 5px;
    flex-direction: row;
    justify-content: center;
}

.radial-progress__label {
    -unity-text-align: middle-left;
    color: var(--percentage-color);
}
使用 UI 生成器将径向进度控件添加到 UXML 文件
利用 UI 文档中的自定义控件并进行测试
- 创建一个名为的 UI 文档,并将其内容替换为以下内容:
RadialProgressExample.uxml
<ui:UXML xmlns:ui="UnityEngine.UIElements" xmlns:uie="UnityEditor.UIElements" editor-extension-mode="False">
    <ui:VisualElement style="align-items: center;">
        <MyUILibrary.RadialProgress progress="87.1" style="width: 100px; height: 100px;" />
    </ui:VisualElement>
</ui:UXML>
2. 在 Unity 中,在 UI 生成器中打开。RadialProgressExample.uxml
3. 在 UI 生成器的样式表部分中,添加为现有 USS。RadialProgress.uss
4. 在“层次结构”窗口中选择径向进度。如果在检查器的“进度”框中输入不同的值,视口中的百分比会更改,并且绿色进度环会调整大小。
由3D建模学习工作室整理翻译,转载请注明出处!