PyTorch 中具有交叉熵损失的训练逻辑回归
在 PyTorch 系列的上一节中,我们演示了当使用均方误差 (MSE) 损失时,初始化权重会如何影响分类模型的准确性。我们注意到模型在训练过程中没有收敛,其准确性也显着降低。 在下文中,您将看到如果随机初始化权重并使用交叉熵作为模型训练的损失函数会发生什么。此损失函数更适合逻辑回归和其他分类分类问题。因此,交叉熵损失用于当今的大多数分类问题。
推荐:将NSDT场景编辑器加入你的3D工具链
3D工具集:NSDT简石数字孪生
PyTorch 中具有交叉熵损失的训练逻辑回归
在本教程中,您将使用交叉熵损失训练逻辑回归模型,并对测试数据进行预测。特别是,您将学习:
- 如何在 Pytorch 中训练具有交叉熵损失的逻辑回归模型。
- 交叉熵损失如何影响模型精度。
用我的书《Deep Learning with PyTorch》开始你的项目。它提供了带有工作代码的自学教程。
让我们开始吧。

概述
本教程分为三个部分;他们是
- 准备数据和构建模型
- 使用交叉熵进行模型训练
- 使用测试数据进行验证
准备数据和模型
与前面的教程一样,你将生成一个类来获取数据集以执行试验。此数据集将拆分为训练样本和测试样本。测试样本是用于测量训练模型性能的看不见的数据。
首先,我们创建一个类:Dataset
1 2 3 4 5 6 7 8 9 10 11 12 13 14 15 16 17 | import torch from torch.utils.data import Dataset # Creating the dataset class class Data(Dataset): # Constructor def __init__(self): self.x = torch.arange(-2, 2, 0.1).view(-1, 1) self.y = torch.zeros(self.x.shape[0], 1) self.y[self.x[:, 0] > 0.2] = 1 self.len = self.x.shape[0] # Getter def __getitem__(self, idx): return self.x[idx], self.y[idx] # getting data length def __len__(self): return self.len |
然后,实例化数据集对象。
1 2 | # Creating dataset object data_set = Data() |
接下来,您将为我们的逻辑回归模型构建一个自定义模块。它将基于PyTorch的属性和方法。该软件包允许我们为深度学习模型构建复杂的自定义模块,并使整个过程变得更加容易。nn.Module
该模块仅由一个线性层组成,如下所示:
1 2 3 4 5 6 7 8 9 10 | # build custom module for logistic regression class LogisticRegression(torch.nn.Module): # build the constructor def __init__(self, n_inputs): super().__init__() self.linear = torch.nn.Linear(n_inputs, 1) # make predictions def forward(self, x): y_pred = torch.sigmoid(self.linear(x)) return y_pred |
让我们创建模型对象。
1 | log_regr = LogisticRegression(1) |
此模型应具有随机权重。您可以通过打印其状态来检查这一点:
1 | print("checking parameters: ", log_regr.state_dict()) |
您可能会看到:
1 | checking parameters: OrderedDict([('linear.weight', tensor([[-0.0075]])), ('linear.bias', tensor([0.5364]))]) |
想开始使用 PyTorch 进行深度学习吗?
立即参加我的免费电子邮件速成课程(带有示例代码)。
单击以注册并获得该课程的免费PDF电子书版本。
下载您的免费迷你课程
使用交叉熵进行模型训练
回想一下,在上一教程中将这些参数值与 MSE 损失一起使用时,此模型未收敛。让我们看看使用交叉熵损失时会发生什么。
由于您正在对一个输出执行逻辑回归,因此这是一个包含两个类的分类问题。换句话说,这是一个二元分类问题,因此我们使用二元交叉熵。您可以按如下方式设置优化器和损失函数。
1 2 3 4 | ... optimizer = torch.optim.SGD(log_regr.parameters(), lr=2) # binary cross-entropy criterion = torch.nn.BCELoss() |
接下来,我们准备一个并训练 50 个 epoch 的模型。DataLoader
1 2 3 4 5 6 7 8 9 10 11 12 13 14 15 | # load data into the dataloader train_loader = DataLoader(dataset=data_set, batch_size=2) # Train the model Loss = [] epochs = 50 for epoch in range(epochs): for x,y in train_loader: y_pred = log_regr(x) loss = criterion(y_pred, y) Loss.append(loss.item()) optimizer.zero_grad() loss.backward() optimizer.step() print(f"epoch = {epoch}, loss = {loss}") print("Done!") |
训练期间的输出如下所示:
1 | checking weights: OrderedDict([('linear.weight', tensor([[-5.]])), ('linear.bias', tensor([-10.]))]) |
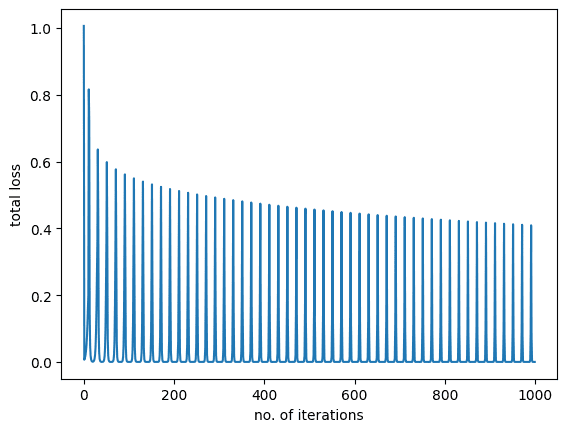
如您所见,损失在训练期间减少并收敛到最小。让我们也绘制训练图。
1 2 3 4 5 6 | import matplotlib.pyplot as plt plt.plot(Loss) plt.xlabel("no. of iterations") plt.ylabel("total loss") plt.show() |
您将看到以下内容:
使用测试数据进行验证
上图显示模型在训练数据上学习得很好。最后,让我们检查一下模型在看不见的数据上的表现。
1 2 3 4 5 | # get the model predictions on test data y_pred = log_regr(data_set.x) label = y_pred > 0.5 # setting the threshold between zero and one. print("model accuracy on test data: ", torch.mean((label == data_set.y.type(torch.ByteTensor)).type(torch.float))) |
这给了
1 | model accuracy on test data: tensor(1.) |
当模型在MSE损失上训练时,它表现不佳。以前准确率约为 57%。但在这里,我们得到了一个完美的预测。部分原因是该模型很简单,是一个单变量对数函数。部分原因是我们正确设置了培训。因此,正如我们在实验中证明的那样,交叉熵损失显着提高了MSE损失的模型精度。
将所有内容放在一起,以下是完整的代码:
1 2 3 4 5 6 7 8 9 10 11 12 13 14 15 16 17 18 19 20 21 22 23 24 25 26 27 28 29 30 31 32 33 34 35 36 37 38 39 40 41 42 43 44 45 46 47 48 49 50 51 52 53 54 55 56 57 58 59 60 61 62 63 64 65 66 | import matplotlib.pyplot as plt import torch from torch.utils.data import Dataset, DataLoader torch.manual_seed(0) # Creating the dataset class class Data(Dataset): def __init__(self): self.x = torch.arange(-2, 2, 0.1).view(-1, 1) self.y = torch.zeros(self.x.shape[0], 1) self.y[self.x[:, 0] > 0.2] = 1 self.len = self.x.shape[0] def __getitem__(self, idx): return self.x[idx], self.y[idx] def __len__(self): return self.len # building dataset object data_set = Data() # build custom module for logistic regression class LogisticRegression(torch.nn.Module): # build the constructor def __init__(self, n_inputs): super().__init__() self.linear = torch.nn.Linear(n_inputs, 1) # make predictions def forward(self, x): y_pred = torch.sigmoid(self.linear(x)) return y_pred log_regr = LogisticRegression(1) print("checking parameters: ", log_regr.state_dict()) optimizer = torch.optim.SGD(log_regr.parameters(), lr=2) # binary cross-entropy criterion = torch.nn.BCELoss() # load data into the dataloader train_loader = DataLoader(dataset=data_set, batch_size=2) # Train the model Loss = [] epochs = 50 for epoch in range(epochs): for x,y in train_loader: y_pred = log_regr(x) loss = criterion(y_pred, y) Loss.append(loss.item()) optimizer.zero_grad() loss.backward() optimizer.step() print(f"epoch = {epoch}, loss = {loss}") print("Done!") plt.plot(Loss) plt.xlabel("no. of iterations") plt.ylabel("total loss") plt.show() # get the model predictions on test data y_pred = log_regr(data_set.x) label = y_pred > 0.5 # setting the threshold between zero and one. print("model accuracy on test data: ", torch.mean((label == data_set.y.type(torch.ByteTensor)).type(torch.float))) |
总结
在本教程中,您了解了交叉熵损失如何影响分类模型的性能。特别是,您学到了:
- 如何在 Pytorch 中训练具有交叉熵损失的逻辑回归模型。
- 交叉熵损失如何影响模型精度。
由3D建模学习工作室 翻译整理,转载请注明出处!