Cocos Creator:扩展构建过程

推荐:将NSDT场景编辑器加入你的3D工具链
3D工具集:NSDT简石数字孪生
扩展构建过程
要构建平台插件,需要通用编辑器插件格式。插件的基本结构请参考 第一个扩展文档 。要扩展构建功能,需要了解构建的整个过程。请阅读构建过程简介和常见问题解答指南文档。
快速入门
单击编辑器菜单栏中的“项目->新建扩展”,然后选择“全局/项目”以创建生成扩展包。
如果选择“全局”,则构建扩展将应用于所有 Cocos Creator 项目。全球的路径是:
- 视窗:
%USERPROFILE%\.CocosCreator\extensions - macOS:
$HOME/.CocosCreator/extensions
如果选择“项目”,则会将构建扩展应用于指定的 Cocos Creator 项目。项目的路径是:
$Your project address/extensions
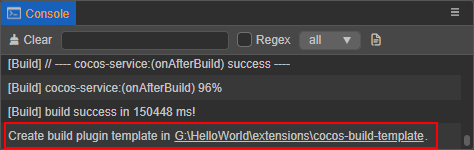
创建构建扩展后,请注意控制台中插件的生成路径。单击路径以在操作系统的文件管理器中打开构建扩展包。
- 在启用构建扩展之前,请在目录中执行以安装一些依赖@types模块以正常编译。编辑器附带的接口定义已在根目录中的@types文件夹下生成。编辑器菜单栏中的 Developer -> Export.d.ts 显示最新的接口定义。
npm install
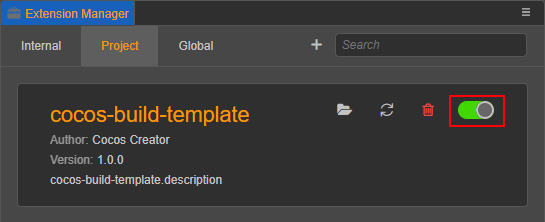
单击编辑器菜单栏中的扩展->扩展管理器,打开扩展管理器面板。然后在扩展管理器中选择“项目/全局”选项卡,然后单击“刷新图标”按钮以查看刚刚添加的生成扩展。然后单击右侧的启用按钮以正常运行插件。
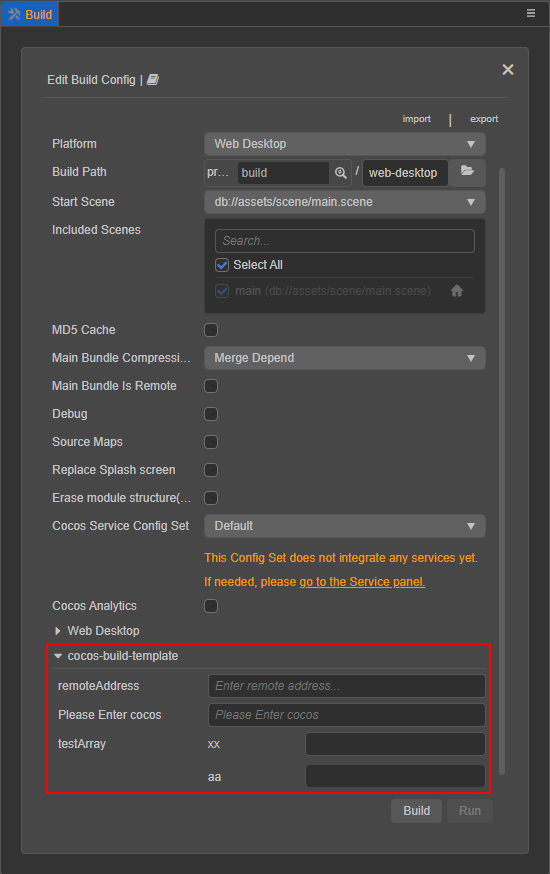
启用构建扩展后,打开构建面板,注意构建扩展插件的展开栏。单击“生成”以加入生成过程。
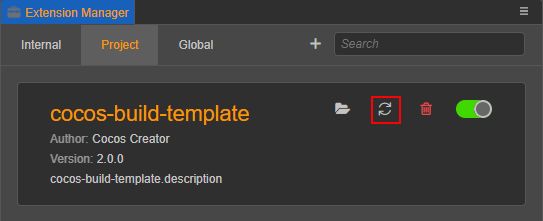
要修改构建扩展的内容,请直接修改目录下的构建扩展包,详情请查看构建扩展包目录中的文件。在扩展管理器中找到对应的构建扩展,然后单击重新加载图标按钮。编辑器中的扩展将使用最新的代码和文件重新运行。extensionsreadme.md
基本配置过程
要扩展插件的构建函数,请将字段添加到 in 中,可以将相应模块的相对路径配置传递给字段中指定的平台。buildercontributionspackage.json
例:package.json
// package.json

{
    "contributions": {
        "builder": "./dist/builder"
    }
}
注意:该字段指定启动脚本是已编译的脚本,启动脚本的源文件位于 中。要配置启动脚本,请在源文件中更改它。builder./dist/builder.js./source/builder.ts启动脚本配置
插件入口配置代码示例如下所示:
// builder.ts

// Allow external developers to replace parts of the build asset handler module. Please refer to the "Custom Texture Compression Processing" section below for details.
export const assetHandlers: string = './asset-handlers';

export const configs: IConfigs = {
    'web-mobile': {
        hooks: './hooks',
        options: {
            remoteAddress: {
                label: 'i18n:xxx',
                render: {
                    ui: 'ui-input',
                    attributes: {
                        placeholder: 'Enter remote address...',
                    },
                },
                // Validation rules, there are currently several commonly used validation rules built in, and the rules that need to be customized can be configured in the "verifyRuleMap" field
                verifyRules: ['require', 'http'],
            },
            enterCocos: {
                    label: 'i18n:cocos-build-template.options.enterCocos',
                    description: 'i18n:cocos-build-template.options.enterCocos',
                    default: '',
                    render: {
                        // Please click "Developer -> UI Components" in the menu bar of the editor to view a list of all supported UI components.
                        ui: 'ui-input',
                        attributes: {
                            placeholder: 'i18n:cocos-build-template.options.enterCocos',
                        },
                    },
                    verifyRules: ['ruleTest']
                }
            },
            verifyRuleMap: {
                ruleTest: {
                    message: 'i18n:cocos-build-template.ruleTest_msg',
                    func(val, option) {
                        if (val === 'cocos') {
                            return true;
                        }
                        return false;
                    }
                }
            }
        },
};
编写启动脚本时,请特别注意以下几点:
- 不同进程中的环境变量会有所不同。启动脚本将由渲染进程和主进程同时加载,不要在启动脚本中使用只存在于单个进程中的编辑器界面。
有两种方法可以配置密钥:config
- 一个用于单个平台配置,密钥填写为平台插件名称(可在编辑器菜单栏扩展 -> 扩展管理器 -> 内部查看平台插件名称)。
一个是所有平台的配置,键填写为。这两种配置方法是互斥的,请不要在同一构建扩展包中使用它们。*
注意:这两种配置方法是互斥的,请不要在同一构建扩展包中使用这两种方法。否则,单个平台的配置(键值)将覆盖所有平台的配置(键值)。platform build plugin name*启动脚本接口定义
详细的接口定义说明如下:
declare type IConfigs = Record<Platform | '*', IPlatformConfig>;
declare interface IBuildPlugin {
    hooks?: string; // Storage path of hook function
    options?: IDisplayOptions; // Platform parameter configuration that needs to be injected
    verifyRuleMap?: IVerificationRuleMap; // Register parameter verification rule function
}
declare type IDisplayOptions = Record<string, IConfigItem>;
declare interface IConfigItem {
    // The default value, the registered default value will be in the "options.[platform].xxx" field in the plugin configuration
    default?: any;

    render: ?{
        // The rules for rendering UI components are consistent with the unified rules at "ui-prop". Only configurations with UI properties specified will be displayed on the Build panel
        ui?: string;
        // The configuration parameters passed to the UI component
        attributes?: IUiOptions;
    };

    // Configure the displayed name, if you need to translate, then pass in "i18n:${key}"
    label?: string;

    // A brief description of the setting, which will be displayed on the title when the mouse hovers over the configuration name.
    description?: string;

    // Type of configuration
    type?: 'array' | 'object';

    // If type is an array, the data will be rendered according to the specified data type and "itemConfigs"
    itemConfigs?: Record<string, IConfigItem> | IConfigItem[];
}

declare interface IUiOptions extends IOptionsBase {
    // Validation rules array, build provides some basic rules, and you can also specify new validation rules through “verifyRuleMap”. Only when pass in “require” will be a valueless checksum, otherwise only when there is a value.
    verifyRules?: string[];
}

declare interface IUiOptions extends IOptionsBase {
    class?: string | string[]; // The name of the style that needs to be set on the current "ui-prop"
}
接口定义请参考 ui-prop 自动渲染规则定义。IOptionsBase
自定义构建挂钩函数代码配置
在条目配置中的钩子字段定义的脚本模块中,可以编写构建生命周期的钩子函数。在不同的钩子函数中,接收的数据会有所不同。所有钩子函数都在构建过程中运行,引擎方法可以直接在构建过程中使用。
公共钩子函数与构建生命周期之间的关系如下图所示:
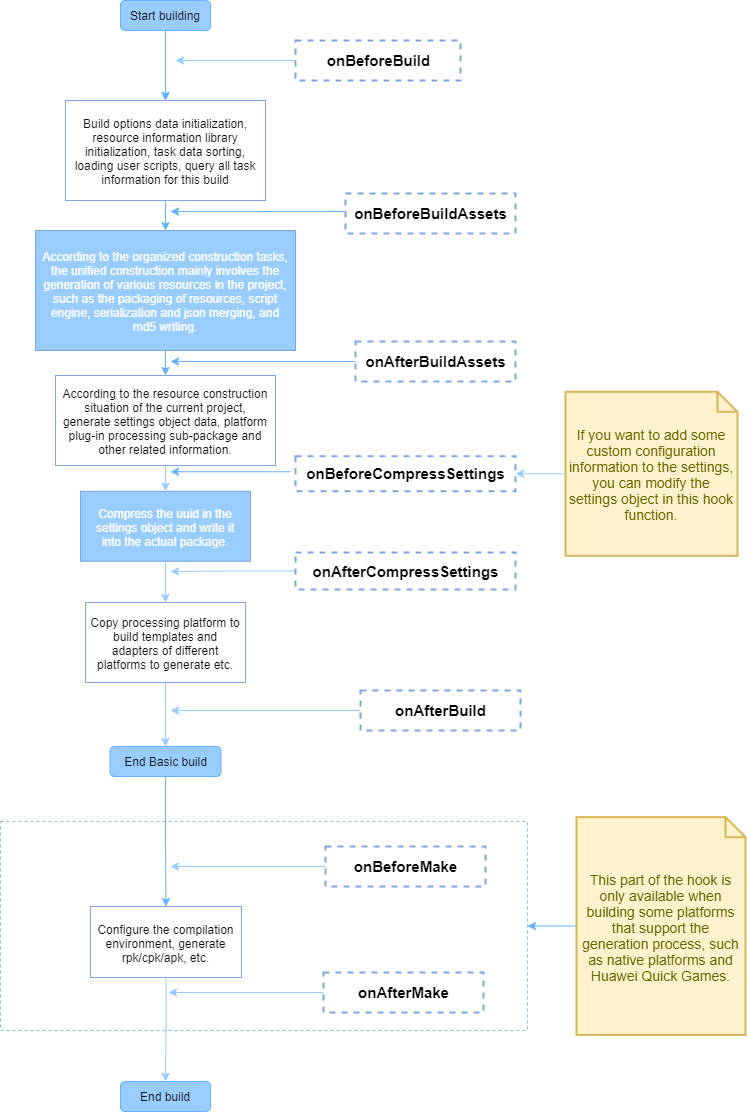
钩子函数的粗略接口定义如下:
declare interface IHook {
    throwError?: boolean; // The hook function injected by the plugin, whether to exit the build process directly and show the build failure when the execution fails.
    // ------------------ hook function --------------------------
    onBeforeBuild?: IBaseHooks;
    onBeforeCompressSettings?: IBaseHooks;
    onAfterCompressSettings?: IBaseHooks;
    onAfterBuild?: IBaseHooks;

    // Compile the generated hook function (only valid if the platform's build process has a "Make" step)
    onBeforeMake?: (root: string, options: IBuildTaskOptions) => void | Promise<void>;
    onAfterMake?: (root: string, options: IBuildTaskOptions) => void | Promise<void>;
}
type IBaseHooks = (options: IBuildTaskOptions, result?: IBuildResult) => void | Promise<void>;
注释:
- 该参数只能在开头访问,传递给 hook 函数的是实际构建过程中使用的副本,仅用作信息获取的参考,因此直接修改它并不真正影响构建过程,尽管可以修改成功。要修改构建参数,请在入口配置代码字段中设置。由于接口定义众多,因此可以参考生成扩展包中的文件夹以获取详细的接口定义。
resultonBeforeCompressSettingsoptionsoptionsoptions@types/packages/builder - 钩子函数被允许为异步函数,默认情况下,构建将等待钩子函数执行完成后再执行下一个进程。
一个简单的例子:
export function onBeforeBuild(options) {
    // Todo some thing...
}
export async function onBeforeCompressSettings(options, result) {
    // Todo some thing...
}
自定义纹理压缩处理
上述启动脚本配置中指定的路径配置允许外部开发人员注册一些资产处理函数,以便在构建部分资产时替换引擎的处理程序模块。目前只有纹理压缩处理程序注册可用。assetHandler
Creator 提供了自己的压缩工具,用于在构建时处理压缩的纹理资源,但不专注于图像压缩,因为它需要与不同的用户环境兼容,并且通常选择压缩工具在大多数计算机上工作,而不是最有效的计算机。因此,Creator 在 v3.4 中开放了插件机制,允许用户直接为对应的纹理资源注册压缩处理函数,在构建时会在适当的处理时间调用。
具体步骤如下:
在启动脚本中,编写模块脚本的相对路径:assetHandlers
export const assetHandlers = './asset-handlers';
在脚本模块中,该函数已开放供开发人员直接在 中编写相应的处理程序函数,该函数将在构建的纹理压缩阶段调用。assetHandlerscompressTexturescompressTextures
处理程序函数采用当前未处理的未处理纹理压缩任务数组,并在处理完成后将它们从原始数组中删除。未移除的纹理压缩任务被视为未处理,并放置在下一个相应的处理函数中,直到所有处理函数都处理完毕,如果仍有未处理的纹理压缩任务,则将其放回 Creator 的原始纹理压缩过程中。
当有多个插件注册到纹理压缩处理程序函数时,它们将按照插件的启动顺序执行。如果上一个插件处理了所有纹理压缩任务,则在处理程序函数中注册的后续插件将不会收到这些任务。
代码示例如下:
 type ITextureCompressType =
     | 'jpg'
     | 'png'
     | 'webp'
     | 'pvrtc_4bits_rgb'
     | 'astc_12x12'; // See interface definition for detailed format
 interface ICompressTasks {
     src: string; // Source file address
     dest: string; // Address of the generated target file (default suffix is PNG, other types need to be changed manually)
     quality: number | IPVRQuality | IASTCQuality | IETCQuality; // Compression quality 0 - 100 or other compression levels
     format: ITextureCompressType; // Compression type
 }
 export async function compressTextures(tasks: ICompressTasks[]) {
         for (let i = 0; i < Array.from(tasks).length; i++) {
         const task = Array.from(tasks)[i];
         if (task.format ! == 'jpg') {
             // Texture compression tasks that are skipped are passed to the next processing function until they finally enter the Creator's original build-time texture compression process
             continue;
         }
         task.dest = task.dest.replace('.png', '.jpg');
         await pngToJPG(task.src, task.dest, task.quality);
         // Remove the finished texture compression task from tasks, so that it will not be processed again when building
         tasks.split(i, 1);
     }
 }
调试构建扩展插件
当构建扩展插件涉及构建过程时,关联的代码在以下三个进程中运行:
- 主进程:执行启动脚本及其依赖资产。
- 渲染过程:将启动脚本中注册的一些字段执行到“构建”面板。
- 构建进程:执行在启动脚本字段中定义的脚本。
hooks
主进程(启动脚本)
主进程主要执行构建扩展插件中使用的启动脚本参与构建过程(字段中指定的脚本),以及插件自己的启动脚本(字段中指定的脚本)。buildermain
当主进程运行的代码被修改时,插件必须重启,然后刷新要更新的进程(这在后面会优化,尝试用单次重启来解决代码更新问题,但刷新仍然是最彻底的重新加载方法)。主进程目前没有比较合适的调试方法,可以使用命令行打开编辑器查看主进程代码日志以辅助调试:
// Mac
/Applications/CocosCreator/Creator/3.0.0/CocosCreator.app/Contents/MacOS/CocosCreator --project projectPath

// Windows
... \CocosCreator.exe --project projectPath
渲染过程(构建面板)
构建扩展插件的启动脚本有一些字段注册到 Build 面板,例如 的显示配置 、字段和脚本本身,这些字段在渲染过程中加载和执行。呈现过程实际上是窗口自己的执行过程。打开开发工具以调试元素、样式、脚本等。在“构建”面板上。optionspanelpaneldom
如果注册到“构建”面板的代码被修改,请刷新面板而不重新启动插件。
打开“生成”面板的渲染过程的开发人员工具
单击“生成”面板,然后按快捷键 Ctrl + Shift + I (Windows) 或 Command + Option + I (Mac) 以打开“生成”面板的 DevTools。
如何重新加载(刷新)面板
单击“生成”面板或“生成”面板中的“开发工具”后按 Ctrl/Command + R。
构建过程(脚本)hooks
构建的实际执行阶段是一个单独的工作进程,确保即使发生异常崩溃,也不会影响其他窗口的正常使用。在启动脚本字段中定义的脚本也在此单独的工作进程中加载和执行。hooks
如果仅修改字段中定义的脚本,则可以在不重新启动插件的情况下刷新构建过程。为此,请在打开生成开发工具后按 Ctrl/Command + R,如上面的“生成”面板中所示。hook
打开生成过程的开发人员工具
这包括以下三种方式:
单击“生成”面板中生成任务窗口右上角的“打开生成开发工具”按钮。
- 单击开发人员 ->在主编辑器菜单中打开构建开发人员工具以将其打开。
在任何插件代码或控制台中,执行以下代码:
Editor.Message.send('builder', 'open-devtools');
Editor.Message可以扩展以满足其他需求。例如,开发人员可以在为构建插件而编写的代码中捕获错误,并在出现异常或类似情况时自动打开 DevTools。
3D建模学习工作室 翻译整理,转载请注明出处