Cocos Creator:自定义渲染管线

推荐:将NSDT场景编辑器加入你的3D工具链
3D工具集:NSDT简石数字孪生
自定义渲染管线(实验性质)
Cocos Creator 3.6中添加了新的 自定义渲染管线。
目前为实验性的前瞻版本,接口、命名尚未稳定,不推荐在正式项目中使用。目前仅支持 Web 端。
自定义渲染管线 的接口位于 cocos/core/pipeline/custom/pipeline.ts
概述
通过 自定义渲染管线(CustomPipeline),用户可以定制 渲染通道(RenderPass),设置输入/输出的 渲染视图(RenderView)、以及每个 渲染通道 需要绘制的 渲染内容(RenderContent)。
渲染内容 可以是 场景、屏幕 矩形,也可以是计算任务的 分发(Dispatch),取决于 渲染通道 的类型。
渲染内容 的绘制顺序,可以通过 渲染队列(RenderQueue)进行调整。
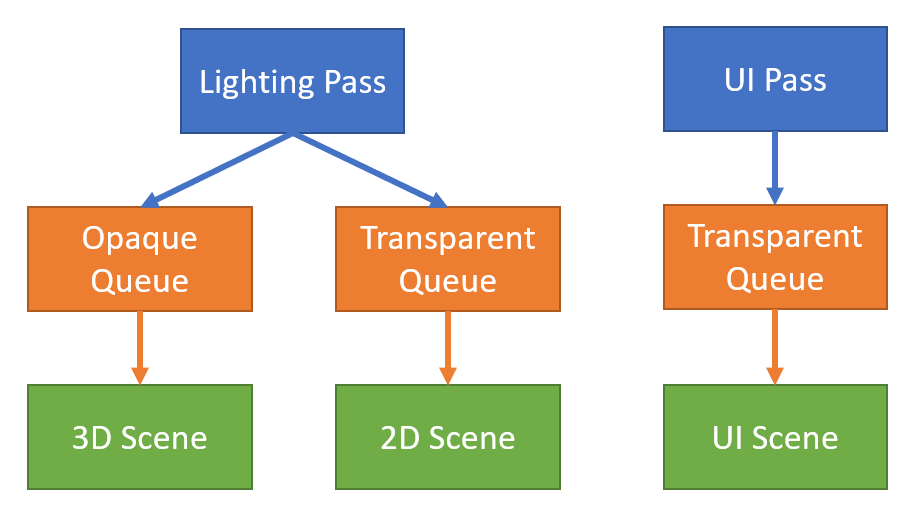
自定义渲染管线 的【渲染通道、渲染队列、渲染内容】构成一个森林:
自定义渲染管线的【渲染通道、渲染视图】构成一个有向无圈图(DAG):
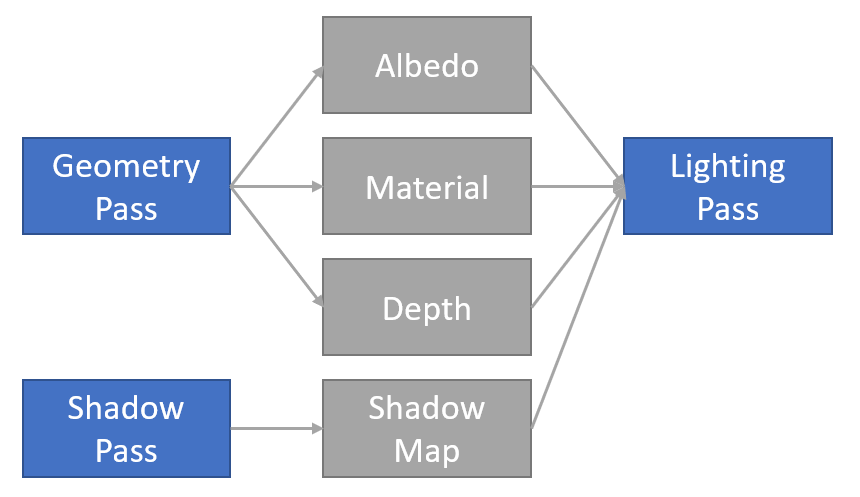
我们可以层叠(Stack)以上两张图,得到 渲染流程图(RenderGraph)。渲染流程图 描述了 自定义渲染管线 的全部流程,引擎会按照用户定制的流程图进行资源分配、流程优化、渲染执行。
渲染通道(RenderPass)
渲染通道 有三种类型:光栅(Raster)、计算(Compute)、资源(Resource)。
每种类型会有各自不同的 渲染通道。
光栅类型(Raster)
光栅类型使用了GPU的光栅化能力(在GraphicsEngine执行)。
1. 光栅化通道(RasterPass)
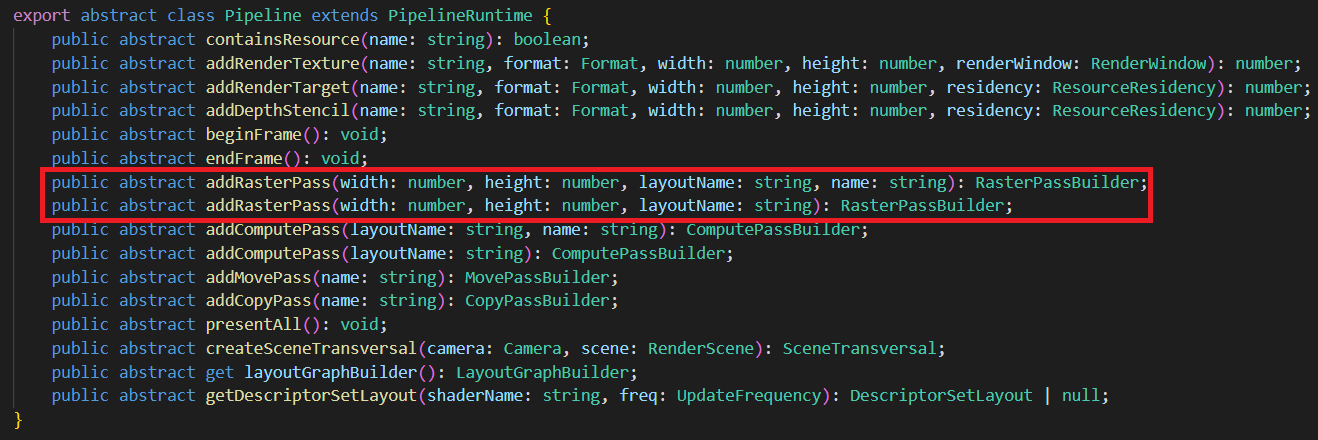
- width、height为输出渲染目标的分辨率。
- layoutName为Effect的Stage名字。
- name为调试(debug)时显示的名字。为空时,系统会赋予默认名字。
2. 光栅化子通道(RasterSubpass)
功能尚未开放。需要GPU分块渲染能力(Tile-based rendering)。
3. 光栅化展示通道(PresentPass)
将画面渲染至屏幕上。
计算类型(Compute)
计算类型使用了GPU的通用计算能力、以及光线追踪能力(可在GraphicsEngine、ComputeEngine执行)。
1. 计算通道(ComputePass)
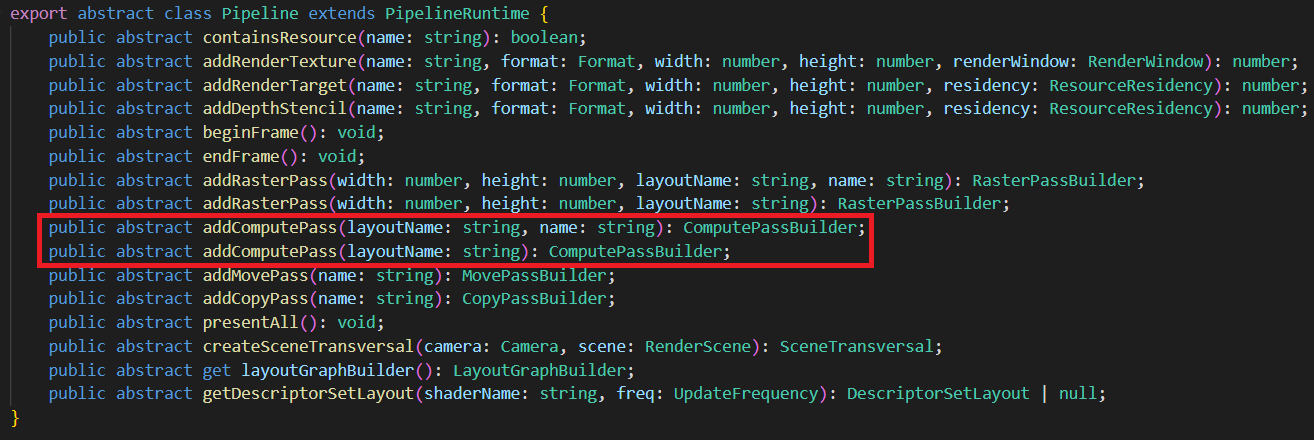
- layoutName为Effect的Pass名字。
- name为调试(debug)时显示的名字。为空时,系统会赋予默认名字。
2. 光线追踪通道(RaytracePass)
功能尚未开放。需要GPU光线追踪能力。
资源类型(Resource)
资源类型使用了 GPU 的资源处理能力(可在GraphicsEngine、ComputeEngine、CopyEngine执行)。
1. 拷贝通道(CopyPass)
负责将资源来源(source)拷贝至目标(target),需要资源格式兼容。
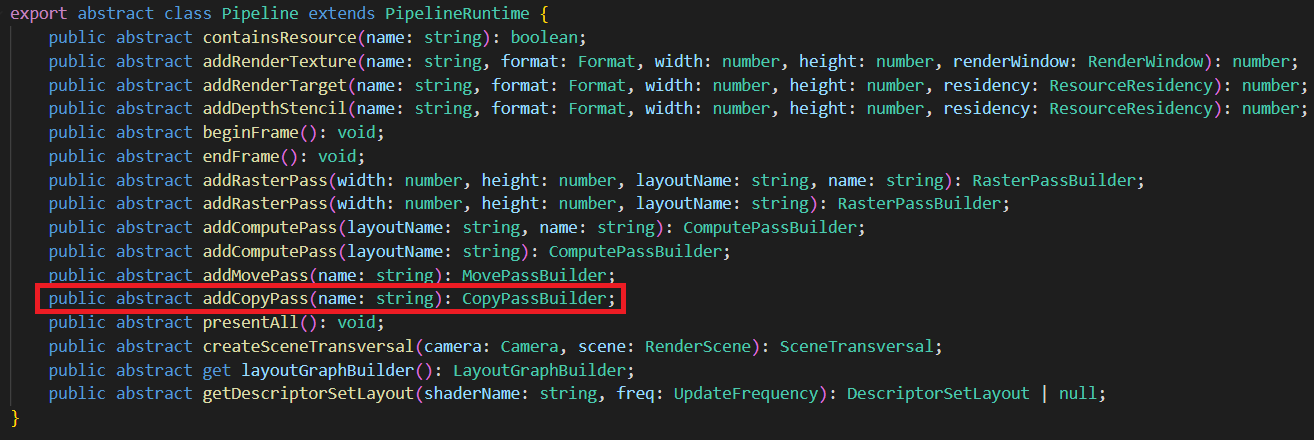
- name 为调试(debug)时显示的名字。为空时,系统会赋予默认名字。
2. 移动通道(MovePass)
负责将资源来源(source)移动至目标(target),需要资源格式全同。
这里的移动是语义上的概念(move semantics):将来源的变量移动至目标变量,作废来源变量。如果资源因某些原因无法移动(比如资源来源正在被读取),则以拷贝方式实现。
移动语义用于管线优化,达到减小带宽的目的。如果不清楚如何正确使用移动通道,可以用拷贝通道替代,不会影响画面表现,调试时较为容易。
渲染视图(RenderView)
RenderView 有两种类型:光栅化视图(RasterView),计算视图(ComputeView)。
光栅化视图(RasterView)
光栅化视图 会被光栅化。有两种子类型:渲染目标(RenderTarget),深度模板(DepthStencil)。
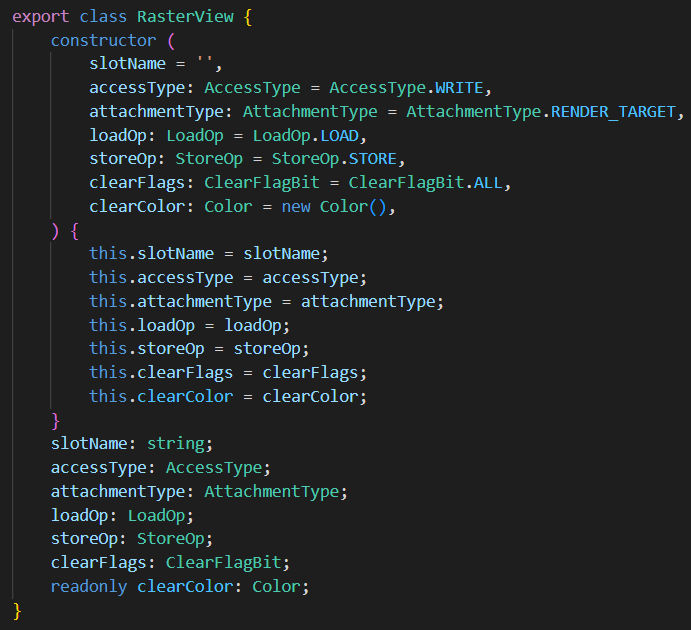
- slotName 为 shader pixel 分量的名字。(比如color、normal等)
- accessType 为绑定类型,可以是 Read、ReadWrite、Write。作为输入(Input)时,为Read;作为输出(Output)时为Write;同时作为输入与输出(Inout),为ReadWrite。【注意】深度模板(DepthStencil)在做深度测试(DepthTest)时,虽然结果不写入视图,但此时作为输出,绑定类型依然为Write。部分平台开启ARM_shader_framebuffer_fetch_depth_stencil扩展时,DepthStencil绑定类型为ReadWrite。DepthStencil的绑定类型不能为Read。
- attachmentType为类型,可以是RenderTarget或者DepthStencil。
- loadOp 是光栅化读取选项,可以是读取(Load)、清除(Clear)、舍弃(Discard)。
- storeOp 是光栅化存储选项,可以是写入(Store)、舍弃(Discard)。
- clearFlags 是清除标志位,如果类型是 RenderTarget,标志位必须是Color。如果类型是 DepthStencil,为 Depth、Stencil、Depth | Stencil三者其一。
- clearColor 为清除颜色,如果类型是 RenderTarget,为 RGBA(Float4)。如果类型为 DepthStencil,为 RG,此时 R 通道存储 Depth(Float)。G 通道存储 Stencil(Uint8)。
计算视图(ComputeView)
计算视图不会被光栅化。常用于采样(Sample)、乱序读写(Unordered Access)。

- name 为 Shader 描述符(Descriptor)的名字。
- accessType 为读写类型。可以是 Read、ReadWrite、Write。
- clearFlags 为资源的清除类型,一般为 None 或者 Color。
- clearColor 为资源的清除颜色,为 Float4 或者 Int4。取决于 clearValueType。
- clearValueType 为资源清除颜色的类型,为 Float 或者 Int。
如果资源标注了清除颜色,那么在执行 计算通道(ComputePass)前,会以 clearColor 清除资源内容。光栅类型的通道(Raster)不清除 计算视图 内容。
渲染视图设置
光栅化通道:

计算通道:

渲染队列(RenderQueue)
渲染队列 是 渲染通道(Render Pass)的子节点,有严格的(渲染)先后顺序。只有一个 渲染队列 的内容完全绘制后,才会绘制下一个 渲染队列 的内容。
渲染队列 有两种类型:光栅化队列、计算队列。分别在 光栅化通道、计算通道 添加。
光栅化队列(RasterQueue)
光栅化队列 执行光栅化任务,一般为绘制 场景、绘制全屏四边形等。光栅化队列 内部为乱序绘制。


- hint 为队列提示,有 None、Opaque、Cutout、Transparent 四种选项。hint 不会影响执行,只用于性能检测。比如在移动平台上,我们往往希望先绘制 Opaque 队列(关闭 AlphaTest),再绘制 Cutout 队列(开启AlphaTest)。如果在 Opaque 队列的绘制内容中,不小心混入了开启 AlphaTest 的物件,会降低图形性能。因此我们会通过队列提示,检查用户的提交是否符合预期。
- name 为调试(debug)时显示的名字。为空时,系统会赋予默认名字。
计算队列(ComputeQueue)
计算队列 只包含 分发(Dispatch),顺序执行。


计算通道 没有队列提示。
渲染内容(RenderContent)
渲染内容 通过 渲染队列 排序、由多种元素组成。
场景(Scene)
需要绘制的2D、3D场景。适用于光栅化队列。

可通过 camera 添加,也可以直接添加。可以附加一定的光照信息。
- sceneFlags一定程度控制 场景 的渲染。比如渲染哪些对象(Opaque、Cutout、Transparent)、是否只渲染阴影投射对象(ShadowCaster)、是否只渲染 UI、光照方式(None、Default、Volumetirc、Clustered、PlanarShadow)、是否渲染 GeometryRenderer、是否渲染 Profiler 等。
矩形(Quad)
全屏/局部的矩形。常用于后期特效渲染。适用于光栅化队列。

分发(Dispatch)
用于计算队列。

动态设置
我们可以动态设置Queue、Pass的一些属性。
比如viewport、clearRenderTarget等。
渲染数据设置
在编写渲染算法时,我们往往需要设置一些数据供Shader使用。
渲染流程图(RenderGraph)在 渲染通道(RenderPass)、渲染队列(RenderQueue)提供了设置数据的接口。
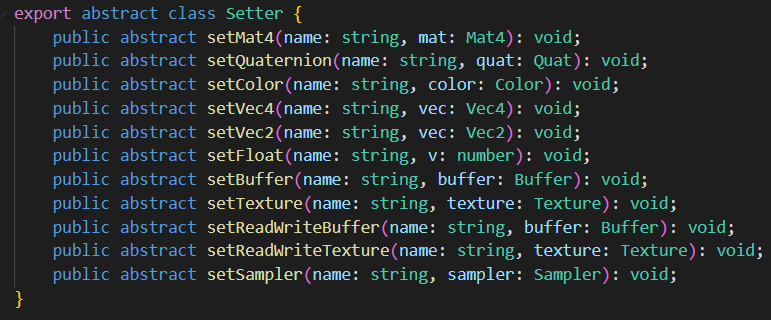
用户可以设置常量(Constant)、缓冲(Buffer)、贴图(Texture)等数据。
这些数据可以是只读的、或者始终处于可读写状态。
对于有读/写状态变化的资源,我们建议用 渲染视图(RenderView)进行跟踪。
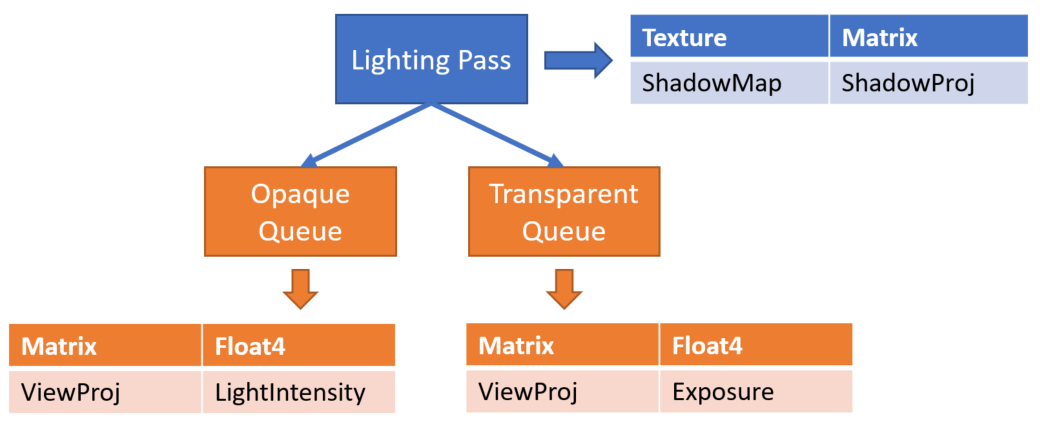
每个 渲染通道、渲染队列 有各自独立的存储。
每个节点有不同的数据更新/上传频率。用户填写的常量、Shader描述符(Descriptor)的更新频率需要与节点的更新频率一致。
- 渲染通道:每 渲染通道 上传一次(PerPass)。
- 渲染队列:每 渲染阶段 上传一次(PerPhase)。
功能开启
勾选 自定义渲染管线。
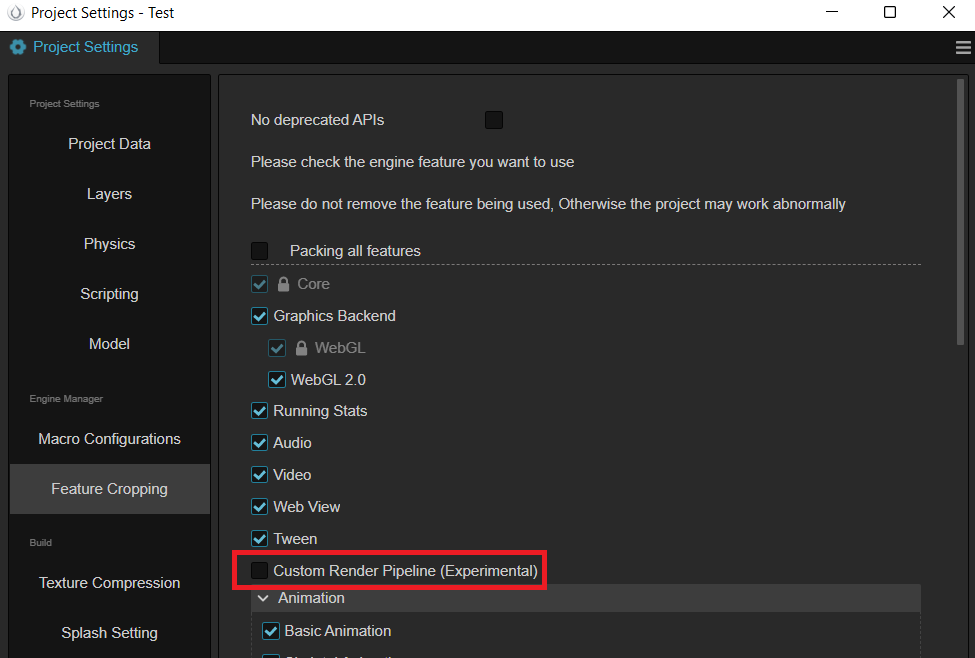
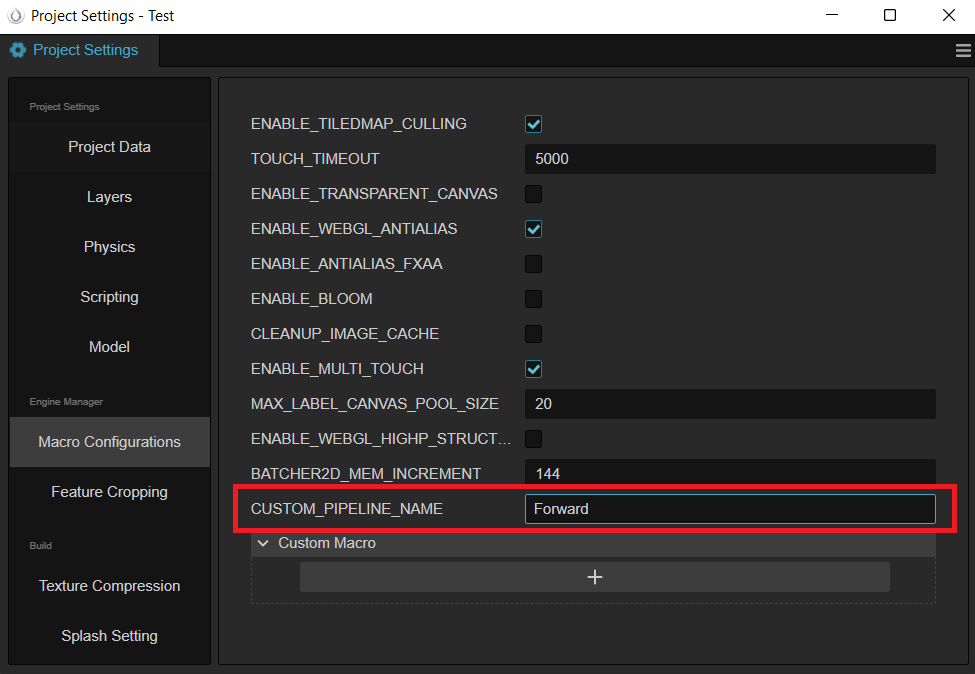
通过填写 自定义管线 的名字,选择注册好的 自定义渲染管线。
- 目前支持 Custom, Forward, Deferred 三种 (其中 Custom 是基于 Forward 基础上添加的 Bloom 后效示例)。
编写自定义渲染管线
新建 TypeScript 文件,定义名为 TestCustomPipeline 类,让该类实现 rendering.PipelineBuilder 接口,通过 rendering.setCustomPipeline 方法把该 pipeline 注册到系统中,如下代码所示。
import { _decorator, rendering, renderer, game, Game } from 'cc';
import { AntiAliasing, buildForwardPass, buildBloomPasses,
    buildFxaaPass, buildPostprocessPass, buildUIPass, isUICamera, decideProfilerCamera } from './PassUtils';

export class TestCustomPipeline implements rendering.PipelineBuilder {
    setup(cameras: renderer.scene.Camera[], pipeline: rendering.Pipeline): void {
        decideProfilerCamera(cameras);
        for (let i = 0; i < cameras.length; i++) {
            const camera = cameras[i];
            if (camera.scene === null) {
                continue;
            }
            const isGameView = camera.cameraUsage === renderer.scene.CameraUsage.GAME
                || camera.cameraUsage === renderer.scene.CameraUsage.GAME_VIEW;
            if (!isGameView) {
                // forward pass
                buildForwardPass(camera, pipeline, isGameView);
                continue;
            }
            // TODO: The actual project is not so simple to determine whether the ui camera, here is just as a demo demonstration.
            if (!isUICamera(camera)) {
                // forward pass
                const forwardInfo = buildForwardPass(camera, pipeline, isGameView);
                // fxaa pass
                const fxaaInfo = buildFxaaPass(camera, pipeline, forwardInfo.rtName);
                // bloom passes
                const bloomInfo = buildBloomPasses(camera, pipeline, fxaaInfo.rtName);
                // Present Pass
                buildPostprocessPass(camera, pipeline, bloomInfo.rtName, AntiAliasing.NONE);
                continue;
            }
            // render ui
            buildUIPass(camera, pipeline);
    }
}
}

game.on(Game.EVENT_RENDERER_INITED, () => {
    rendering.setCustomPipeline('Test', new TestCustomPipeline);
});
可以看到上述代码引用了 PassUtils 脚本文件,该文件通过简单封装常用 RenderPass 的相关逻辑,方便用户直接使用(PassUtils可以在这 下载:https://docs.cocos.com/creator/manual/zh/render-pipeline/code/PassUtils.ts)。
PassUtils有不少函数,我们抽取 buildPostprocessPass 的部分逻辑来介绍:
function buildPostprocessPass (camera,
    ppl,
    inputTex: string,
    antiAliasing: AntiAliasing = AntiAliasing.NONE) {
    // ...
    const postprocessPassRTName = `postprocessPassRTName${cameraID}`;
    const postprocessPassDS = `postprocessPassDS${cameraID}`;
    if (!ppl.containsResource(postprocessPassRTName)) {
        // 注册 color texture 资源,因为当前 pass 是要上屏,所以传递 camera.window 作为上屏信息。如果是离屏的则需要调用 ppl.addRenderTarget 函数即可
        ppl.addRenderTexture(postprocessPassRTName, Format.BGRA8, width, height, camera.window);
        // 注册 depthStencil texture 资源
        ppl.addDepthStencil(postprocessPassDS, Format.DEPTH_STENCIL, width, height, ResourceResidency.MANAGED);
    }
    // 下面两行会更新 color texture 与 depthStencil texture 的注册信息(主要为尺寸大小),同样如果离屏的则调用 'ppl.updateRenderTarget' 函数
    ppl.updateRenderWindow(postprocessPassRTName, camera.window);
    ppl.updateDepthStencil(postprocessPassDS, width, height);
    // 注册一个 RasterPass,它的 layoutName 为 post-process
    const postprocessPass = ppl.addRasterPass(width, height, 'post-process');
    postprocessPass.name = `CameraPostprocessPass${cameraID}`;
    // 设置当前 rasterPass 的 viewport
    postprocessPass.setViewport(new Viewport(area.x, area.y, area.width, area.height));
    // 判断系统中是否有输入纹理的同名信息,并把该输入纹理注入到 outputResultMap的sampler 中
    if (ppl.containsResource(inputTex)) {
        const computeView = new ComputeView();
        computeView.name = 'outputResultMap';
        postprocessPass.addComputeView(inputTex, computeView);
    }
    // 设置 postprocessPass 的 clear color 信息
    const postClearColor = new Color(0, 0, 0, camera.clearColor.w);
    if (camera.clearFlag & ClearFlagBit.COLOR) {
        postClearColor.x = camera.clearColor.x;
        postClearColor.y = camera.clearColor.y;
        postClearColor.z = camera.clearColor.z;
    }
    // 注册 color texture 相关的 pass view
    const postprocessPassView = new RasterView('_',
        AccessType.WRITE, AttachmentType.RENDER_TARGET,
        getLoadOpOfClearFlag(camera.clearFlag, AttachmentType.RENDER_TARGET),
        StoreOp.STORE,
        camera.clearFlag,
        postClearColor);
    // 注册 depth stencil texture 相关的 pass view
    const postprocessPassDSView = new RasterView('_',
        AccessType.WRITE, AttachmentType.DEPTH_STENCIL,
        getLoadOpOfClearFlag(camera.clearFlag, AttachmentType.DEPTH_STENCIL),
        StoreOp.STORE,
        camera.clearFlag,
        new Color(camera.clearDepth, camera.clearStencil, 0, 0));
    // 把 color texture 资源与相关的pass view产生关联(即 renderpass 的 color texture 输出口)
    postprocessPass.addRasterView(postprocessPassRTName, postprocessPassView);
    // 把 depth stencil texture 资源与相关的 pass view 产生关联
    postprocessPass.addRasterView(postprocessPassDS, postprocessPassDSView);
    // 添加具体的渲染队列,拿到 postprocess material 去画一个与屏幕等尺寸的四边形
    postprocessPass.addQueue(QueueHint.NONE).addFullscreenQuad(
        postInfo.postMaterial, 0, SceneFlags.NONE,
    );
    // ...
    if (profilerCamera === camera) {
        // 开启 profiler 渲染
        postprocessPass.showStatistics = true;
    }
    // 把 color texture 与 depth stencil texture 的资源返回,可以用于后续其它 render pass 的数据源
    return { rtName: postprocessPassRTName, dsName: postprocessPassDS };
}
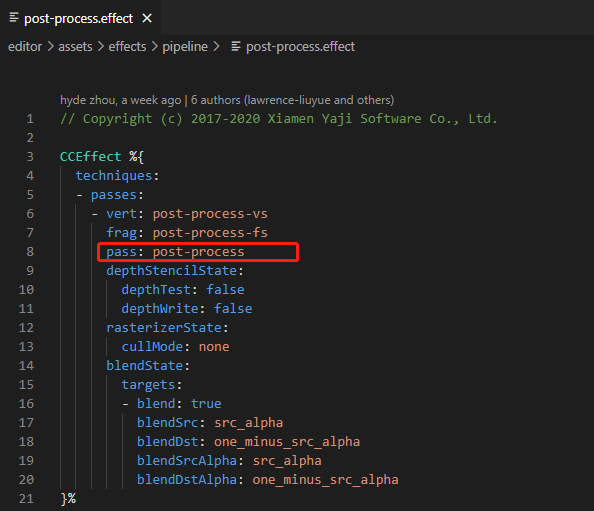
首先我们需要知道 RasterPass 如何配置 layoutName (即上述代码中的 post-process 字符串)。打开 post-process.effect 文件后,可以看到内部定义的 pass 名称就是 post-process ,所以 effect 文件中的 pass name 就是作为 RasterPass 的 layoutName。如果 effect 没有定义 pass name,那么 RasterPass 的 layoutName 就得赋值为 default (forward/gbuffer 相关的 RasterPass 都是通过 default 配置)。所以要配置自己的后处理方案,就需要为自己编写的 effect 文件正确配置 pass name。
另外我们还需要把上一个 pass 的输出纹理作为当前 pass 的输入信息,上面说到需要通过 ComputeView 实现,而这里 ComputeView 的 name 设置为了 outputResultMap,那么该怎么正确配置这个名称?继续对 post-process.effect 文件分析,可以看到下面的代码,ComputeView 的 name 与 post-process-fs 的片元着色器的纹理输入名称一致。
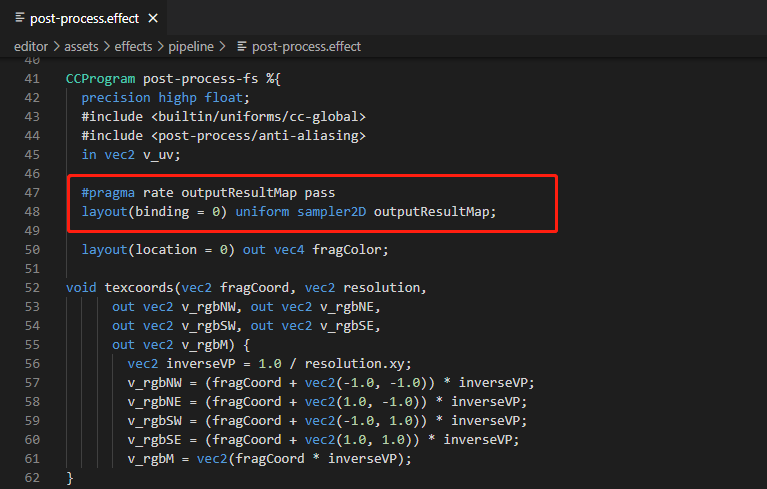
同时我们需要通过下述代码行对 outputResultMap 名称进行声明,表明该输入纹理的使用频率为 Pass level。
#pragma rate outputResultMap pass
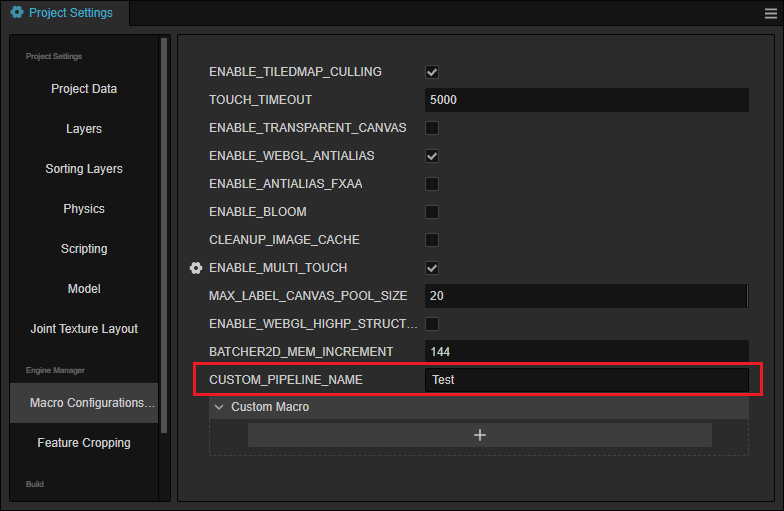
定义完 TestCustomPipeline 后需要通过其它逻辑代码(如:组件等)引入该文件,以便激活 Game.EVENT_RENDERER_INITED 事件监听,之后改变 项目设置 -> 宏配置 -> CUSTOM_PIPELINE_NAME 为 Test:
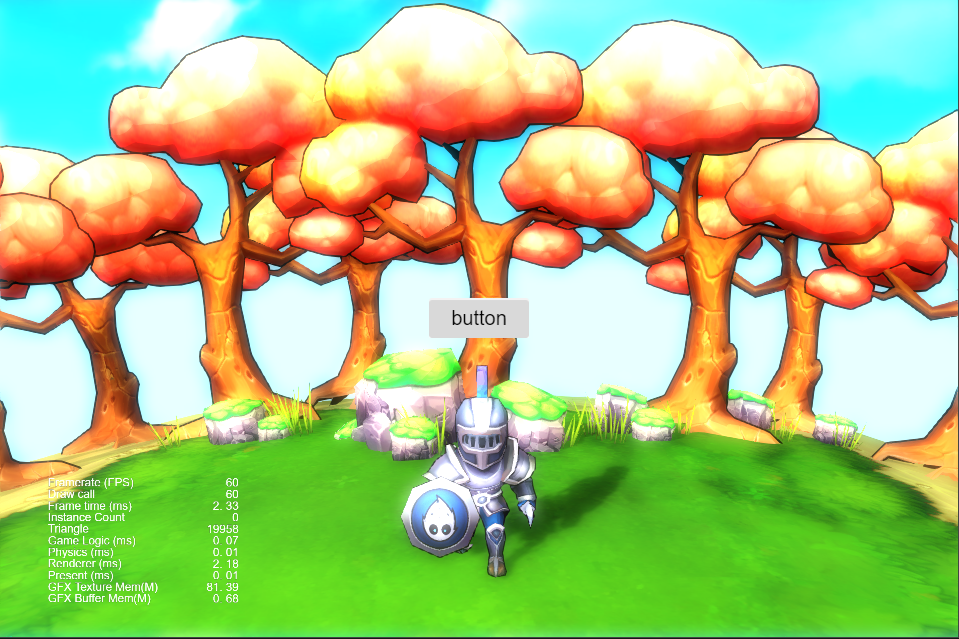
运行后的效果如下所示,它包含了 fxaa 与 bloom 的后效:
这就是定义一个 RenderPass 的流程,PassUtils 还定义了其它 Pass 可以提供用户参考,包括 BloomPasses,FxaaPass 等。这些 RenderPass 提供了调节参数可对输出效果进行调整(如Bloom的曝光强度,迭代次数等),用户可查看相关的代码进行尝试。
由3D建模学习工作室 翻译整理,转载请注明出处!