Cocos Creator:2D 游戏示例

在线工具推荐:3D数字孪生场景编辑器 - GLTF/GLB材质纹理编辑器 - 3D模型在线转换 - Three.js AI自动纹理开发包 - YOLO 虚幻合成数据生成器 - 三维模型预览图生成器
快速入门:制作您的第一个 2D 游戏
平台跳跃游戏是一种非常常见和流行的游戏类型,从原始NES控制台上的简单游戏到现代游戏平台上使用复杂3D技术制作的大型游戏。你总能找到平台跳跃游戏。
在本节中,我们将演示如何使用 Cocos Creator 提供的 2D 功能来创建一个简单的平台跳跃游戏。
环境设置
下载科科斯仪表板
访问 Cocos Creator 官方网站下载最新版本的 Cocos Dashboard,该仪表板允许对 Cocos Creator 版本和您的项目进行统一管理。安装后,打开 Cocos 仪表板。

安装 Cocos Creator
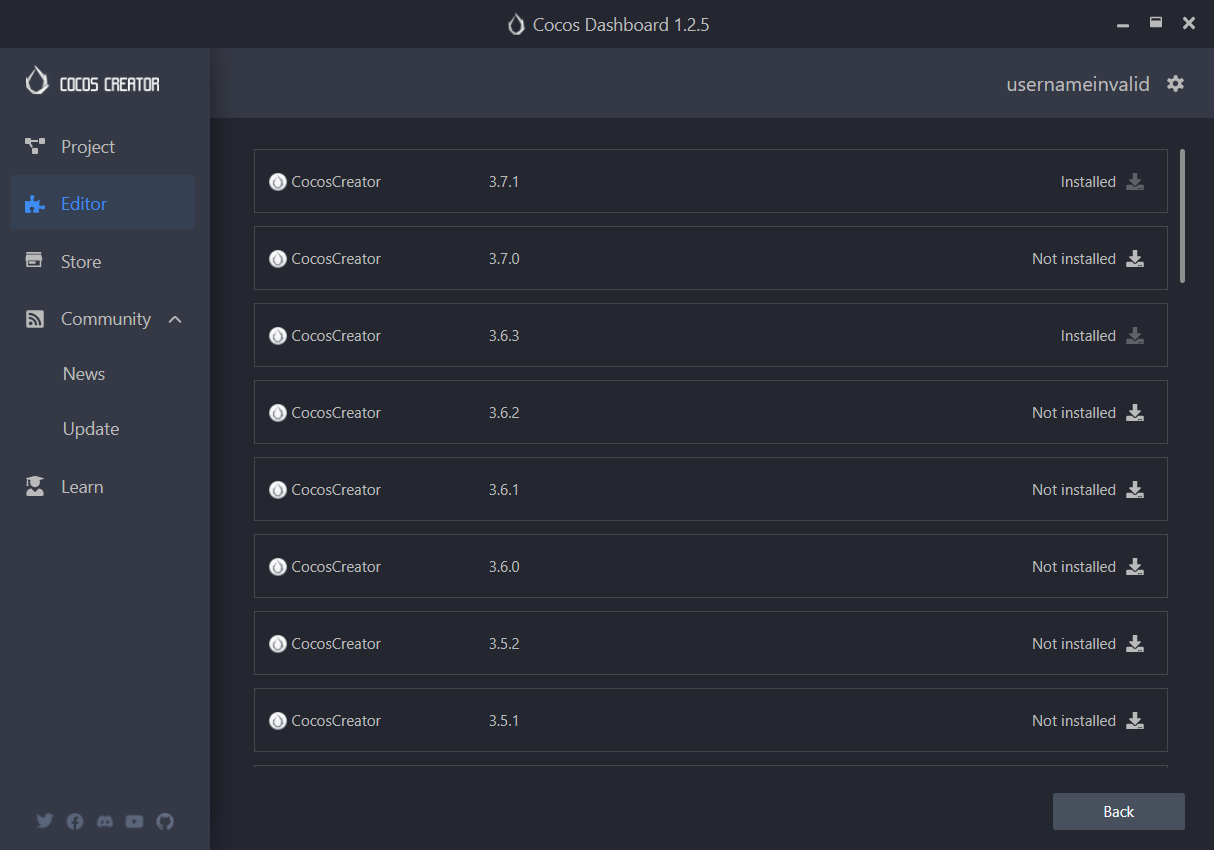
在编辑器选项卡中,单击所需版本的安装按钮以安装编辑器 Cocos Creator。
我们通常建议使用最新版本的 Cocos Creator 来开始使用。它将获得更多功能和支持。
创建项目
在“项目”选项卡中,找到“创建”按钮,选择“空(2D)”。
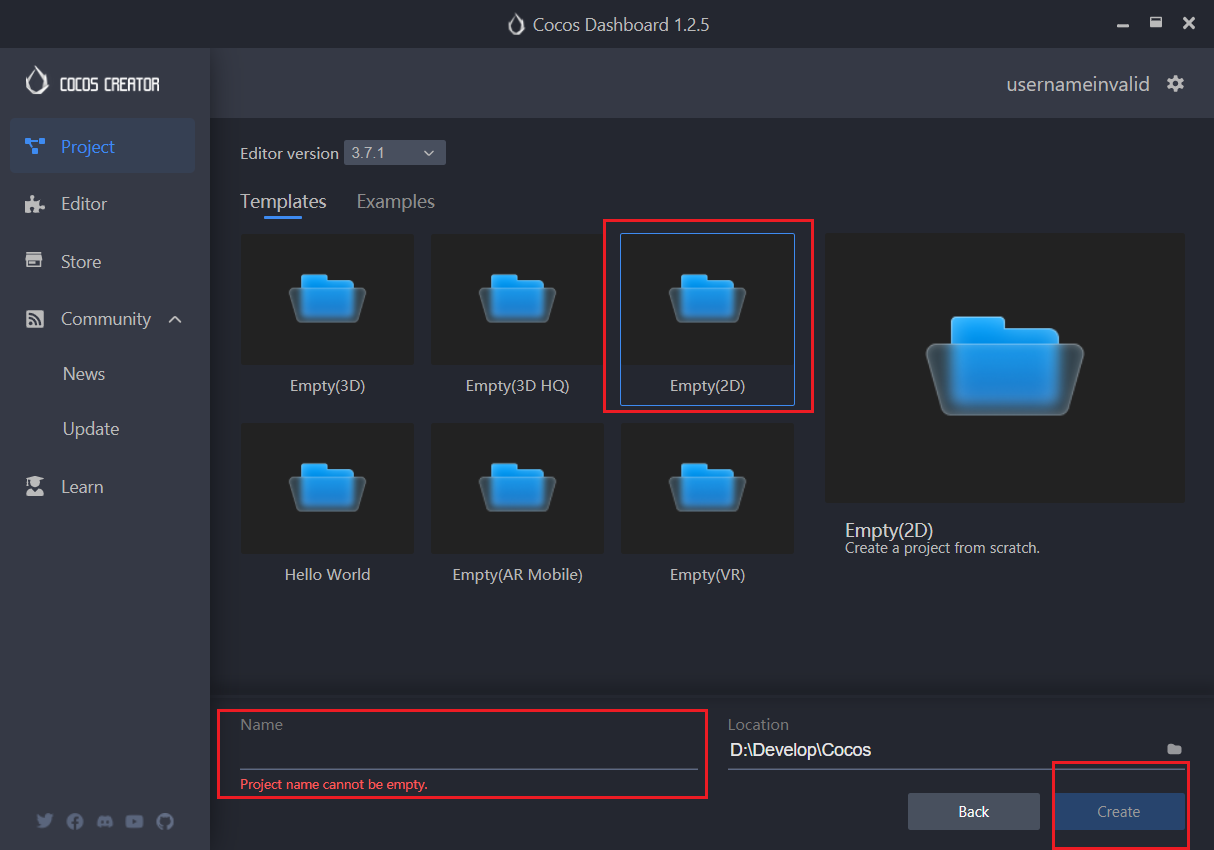
接下来,只需在上图所示的突出显示字段中输入您的项目名称。
例如,您可以输入:cocos-tutorial-mind-your-step-2d。
让我们制作一个类似于快速入门:制作您的第一个 3D 游戏中的游戏。
如果您还没有阅读快速入门:制作您的第一个 3D 游戏,没关系。在本节中,我们假设您以前没有使用过 Cocos Creator,我们将从头开始!
事不宜迟,让我们开始吧。
创建角色
在2D游戏中,所有可见对象都由图像组成,包括角色。
为了简单起见,我们将使用与Cocos Creator捆绑在一起的图像来创建我们的游戏。这些图像可在 中找到。internal/default_ui/
在 Cocos Creator 中,我们使用节点(带有精灵组件的节点)来显示图像。Sprite
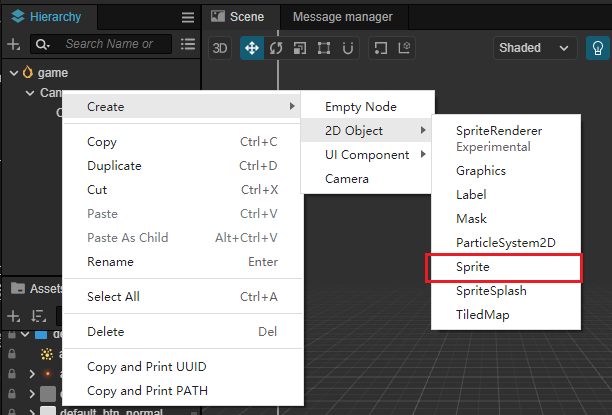
要创建精灵类型的新节点,请在“层次结构”面板中单击鼠标右键,选择“创建”,然后从弹出菜单中选择“2D -> 精灵”。
右键单击层次结构并从弹出菜单中选择“创建”,我们可以看到不同类型的节点。在这里,我们选择“2D ->精灵”来创建一个新节点。Sprite
接下来,我们找到 并将其分配给我们刚刚创建的节点的属性。internal/default_ui/default_btn_normalSprite FrameSprite
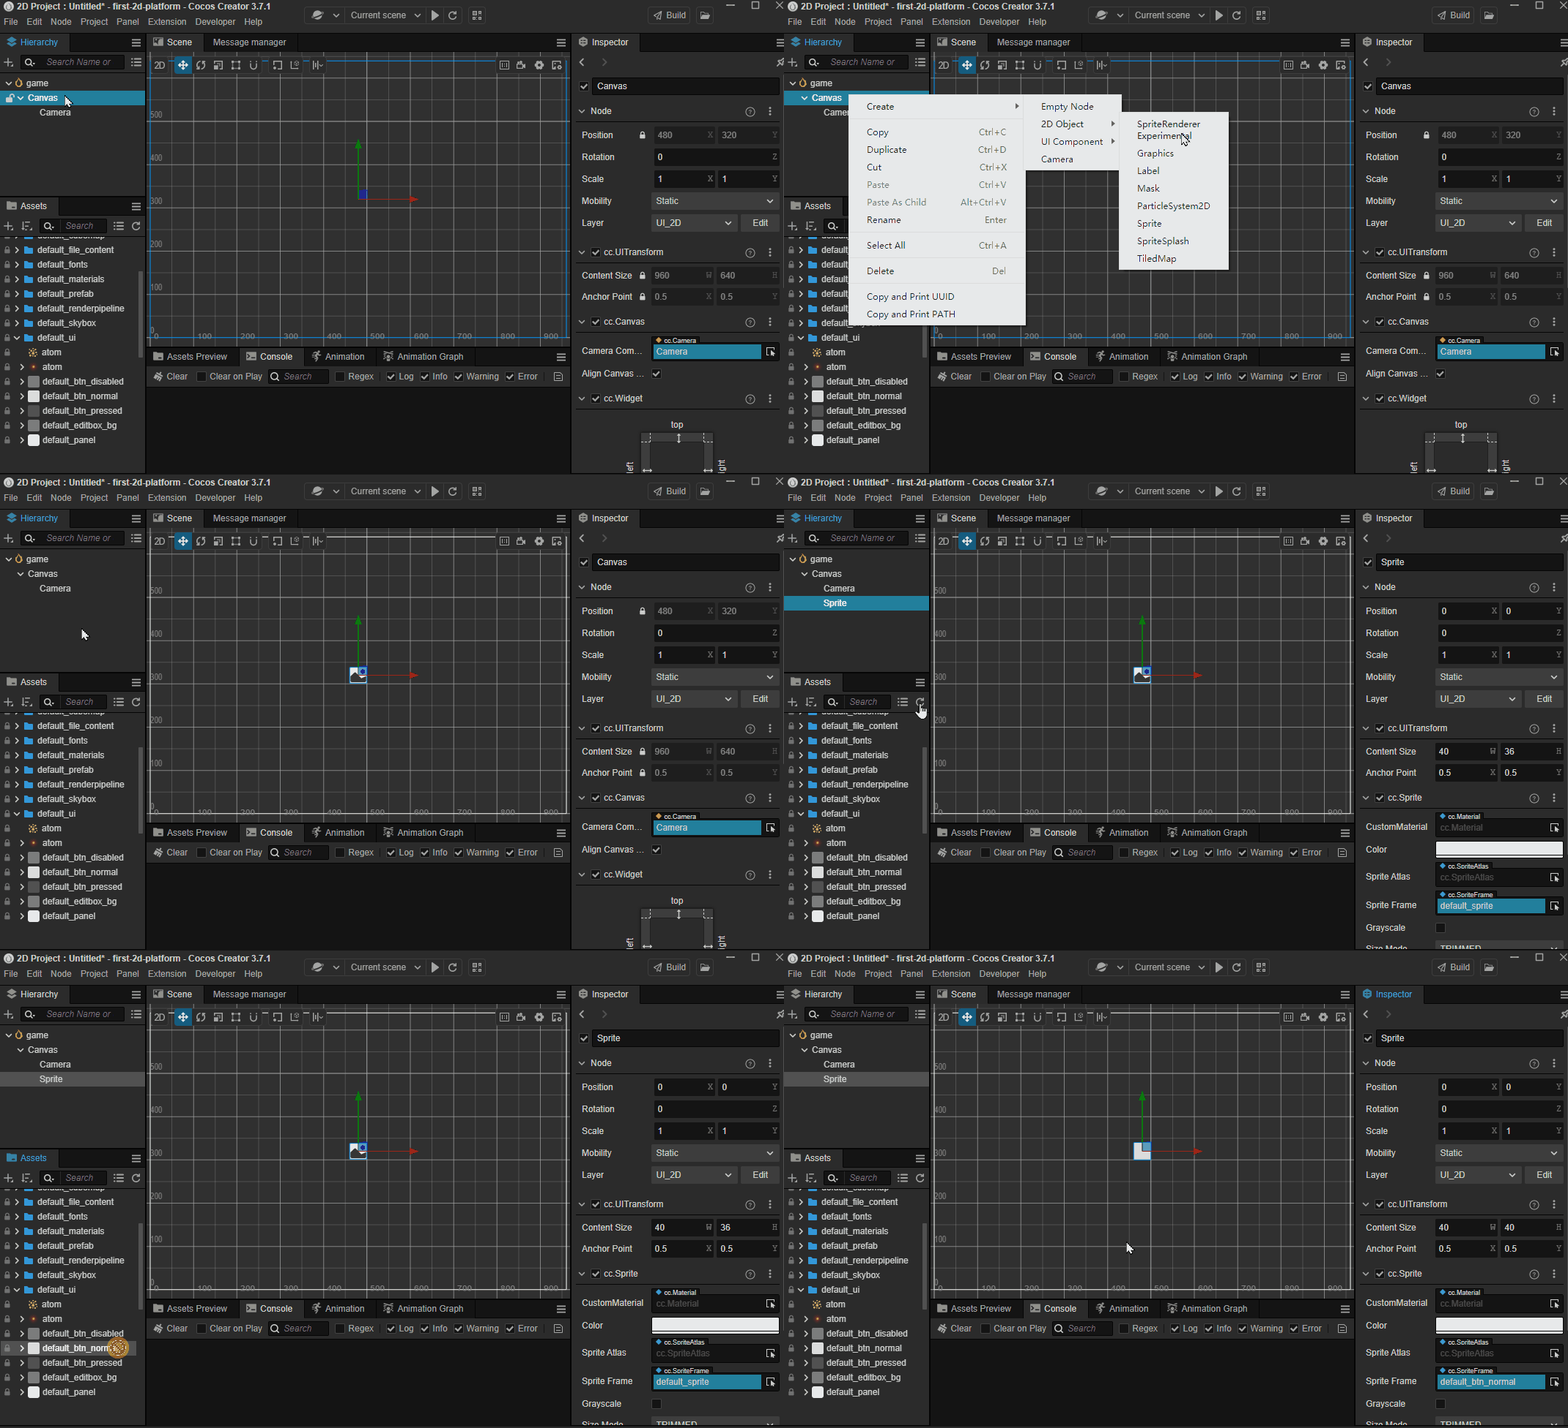
接下来,创建一个节点并将其命名为“玩家”:Empty
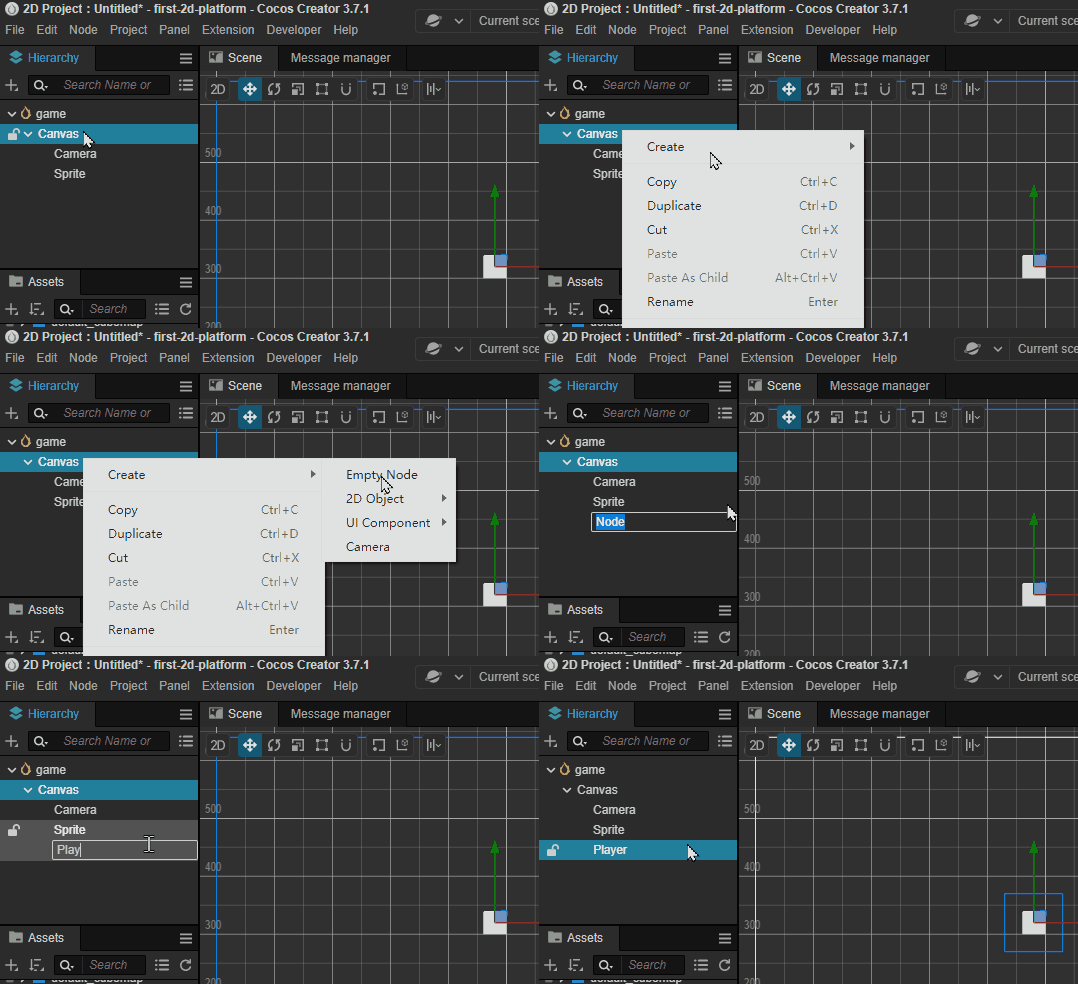
如果在创建节点时未命名节点,则有两种方法可以更改其名称:
- 在“检查器”面板中,找到名称并将其重命名
- 在层次结构中,选择节点,然后按
F2
我们可以通过将节点拖放到层次结构中来调整节点的父子关系。在这里,将节点拖到节点上以使其成为子节点,然后将节点重命名为“正文”。SpritePlayerSprite
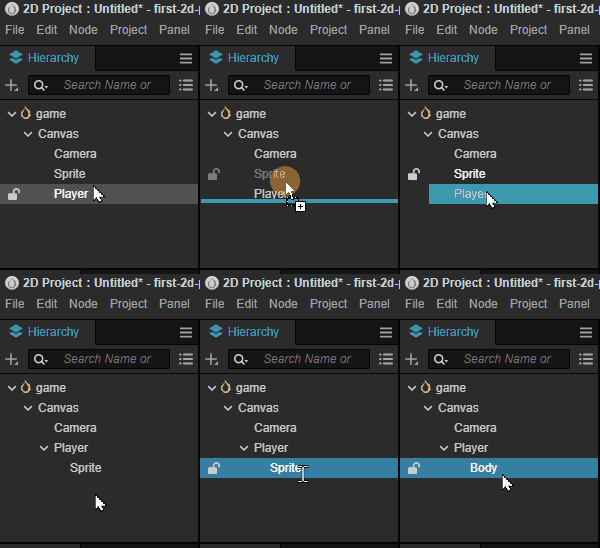
注:
- 层次结构关系决定了呈现顺序。if 可能会导致节点在顺序错误时不可见。
- 2D/UI 元素必须位于节点下才能可见。
Canvas - 2D/UI 元素层必须设置为
UI_2D
接下来,让我们将节点的位置 Y 调整为 40:Body
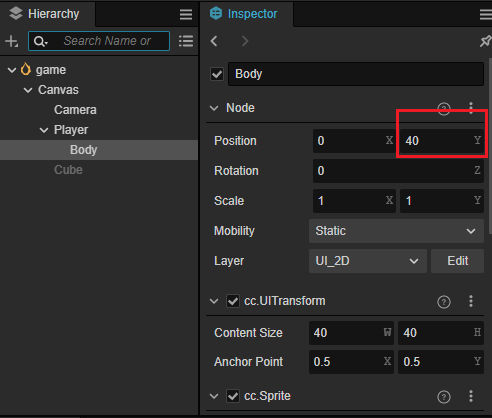
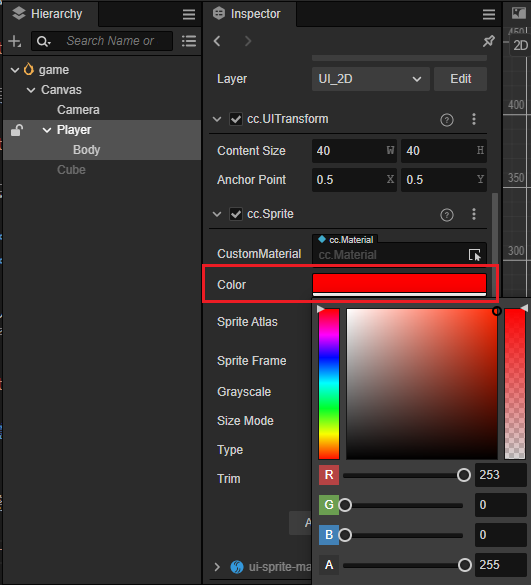
最后,让我们调整 .Body
在“检查器”面板中,找到属性并将其展开,然后将颜色设定为红色。Color
第一个脚本
脚本(也称为代码)用于实现游戏逻辑,例如角色移动、跳跃和其他游戏机制。
Cocos Creator使用TypeScript作为其脚本编程语言。它具有简单易学的语法、庞大的用户群和广泛的应用程序。您可以在 Web 开发、应用程序开发、游戏开发等中遇到它。
在 Cocos Creator 中创建脚本组件非常简单。您需要做的就是在资源管理器窗口中单击鼠标右键,然后选择“创建 -> TypeScript -> NewComponent”选项。
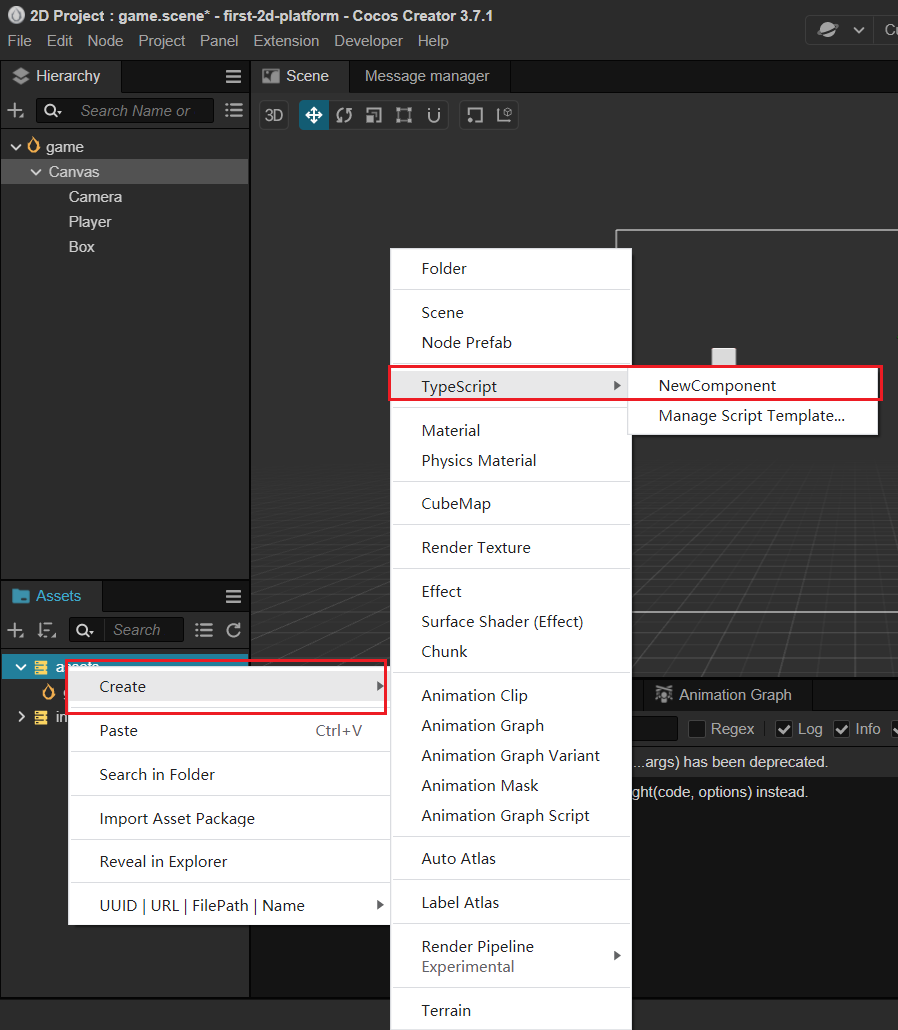
为了便于管理,通常建议创建一个名为“放置所有脚本”的文件夹。Script
接下来,右键单击该文件夹,并创建一个名为用于控制播放器的新脚本组件。ScriptsPlayerController
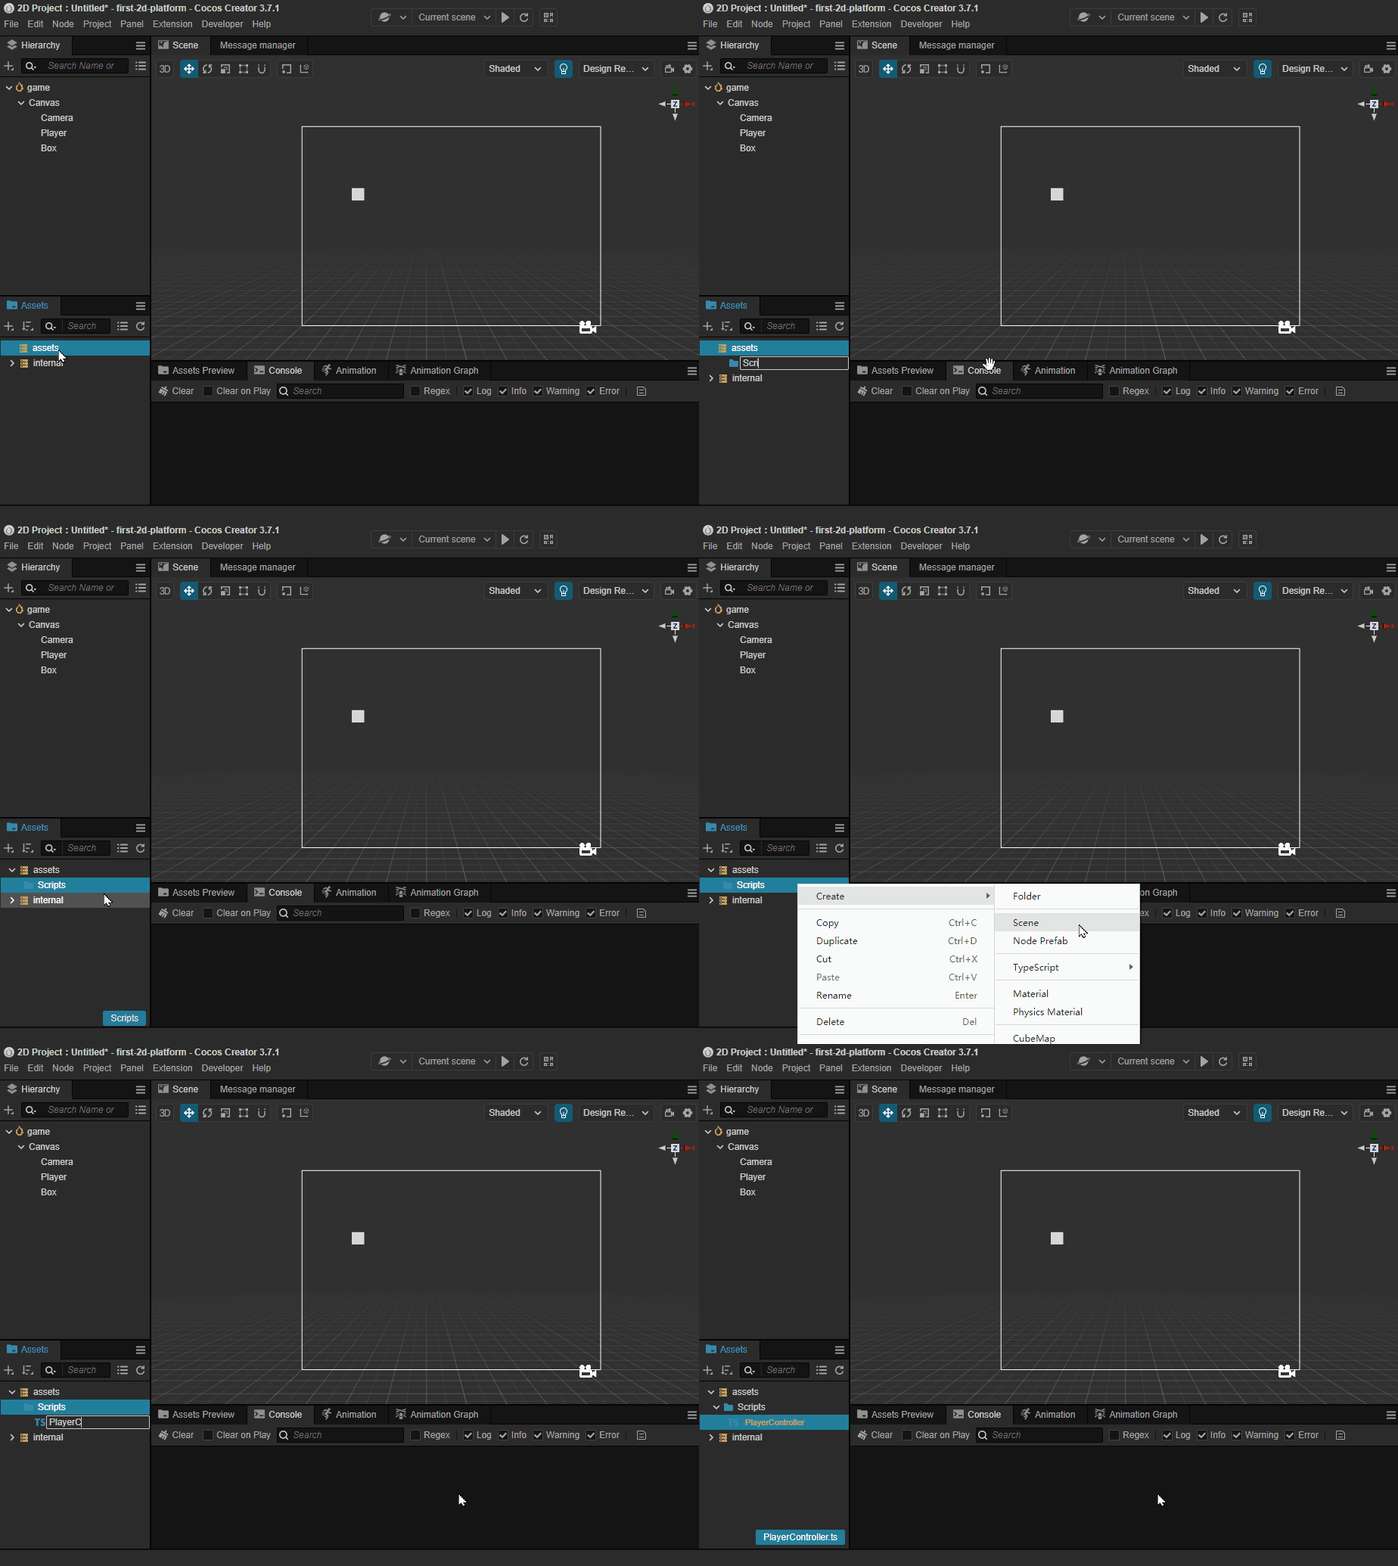
引擎将为我们刚刚创建的脚本组件生成以下代码。
import { _decorator, Component, Node } from 'cc';
const { ccclass, property } = _decorator;

@ccclass('PlayerController')
export class PlayerController extends Component {
    start() {

    }

    update(deltaTime: number) {

    }
}
注意Cocos Creator 使用节点 + 组件架构,这意味着组件必须附加到节点才能运行。Cocos Creator 中的脚本也被设计为组件。
因此,让我们将脚本拖到“播放器检查器”节点上。PlayerController
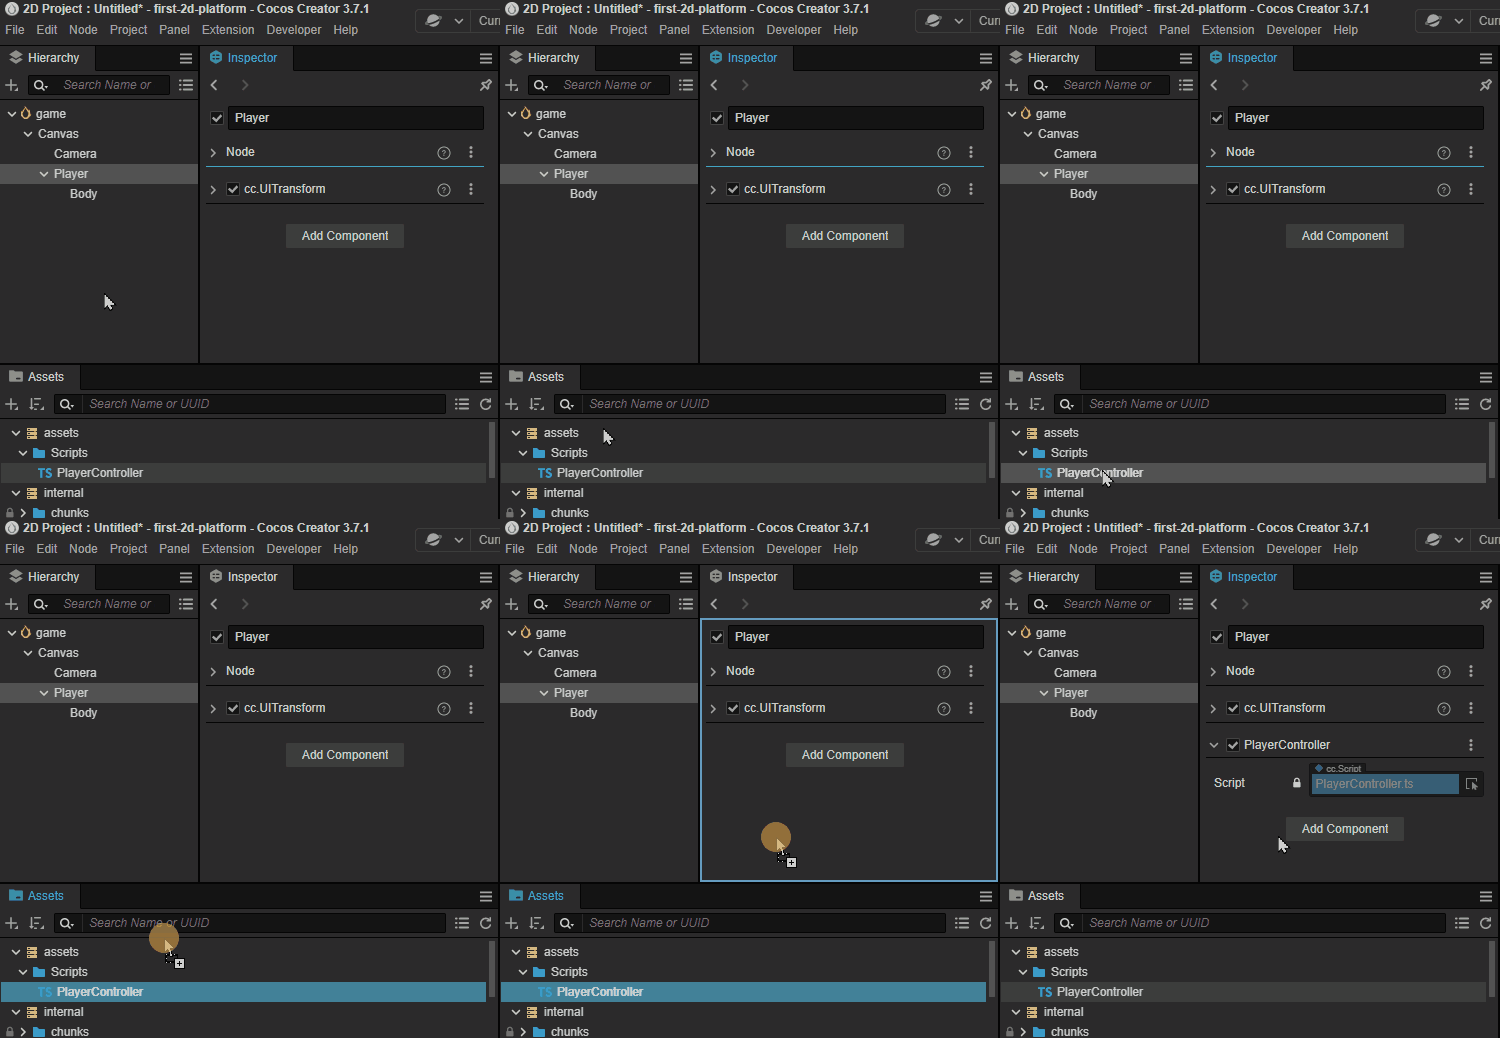
您应该看到一个组件已添加到“播放器”节点。PlayerController
注意:您也可以单击“添加组件”按钮以添加不同类型的组件。import { _decorator, Component, Node } from 'cc'地图
游戏中的地图是您的角色可以在游戏中四处移动和互动的区域。
如前所述,2D游戏中的所有可见对象都由图像组成。地图也不例外。
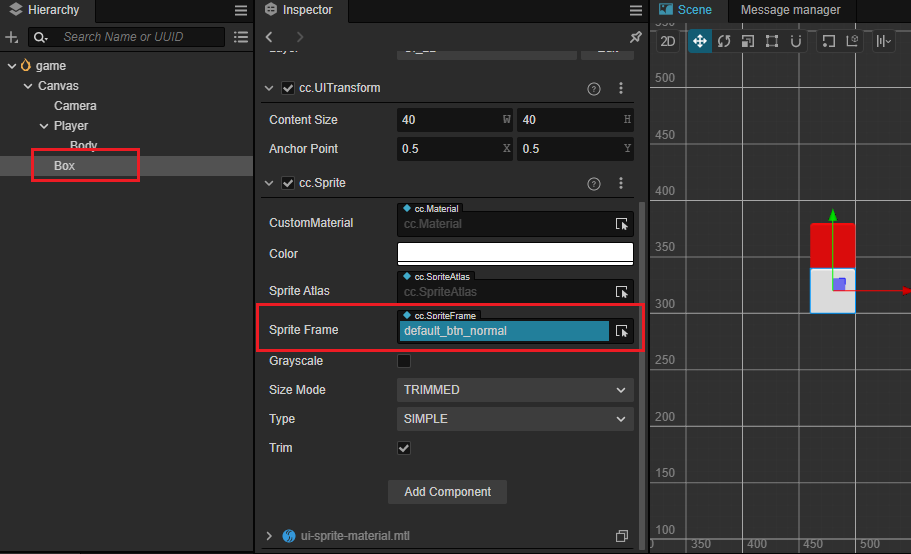
就像我们用于创建节点的步骤一样,我们现在将创建一个名为 该对象,该对象将用于构建映射。BodyBox
- 在层次结构中单击鼠标右键
- 通过弹出式菜单选择“创建 -> 2D 对象 -> 精灵”来创建节点。
Sprite - 将其命名为“盒子”
- 选择“Box”节点,使用
internal/default_ui/default_btn_normal
预 置
预制件是一种特殊类型的资源,可以将节点的信息保存为文件。以便它可以在其他情况下重复使用。
在 Cocos Creator 中,创建预制件非常简单。我们只需要将节点拖到资源管理器窗口中,就会自动生成一个 *.prefab 文件。
现在,让我们在“资源管理器”窗口中创建一个名为“预制件”的文件夹,该文件夹将用于将所有预制件组织在一起。
然后,找到 Box 节点并将其拖到预制件文件夹中,将生成一个名为“Box”的预制件文件。
可以删除层次结构中的 box 节点,因为它在游戏运行时不会使用。相反,我们将使用 Box.prefab 在脚本中创建节点,以便在游戏过程中构建游戏地图。
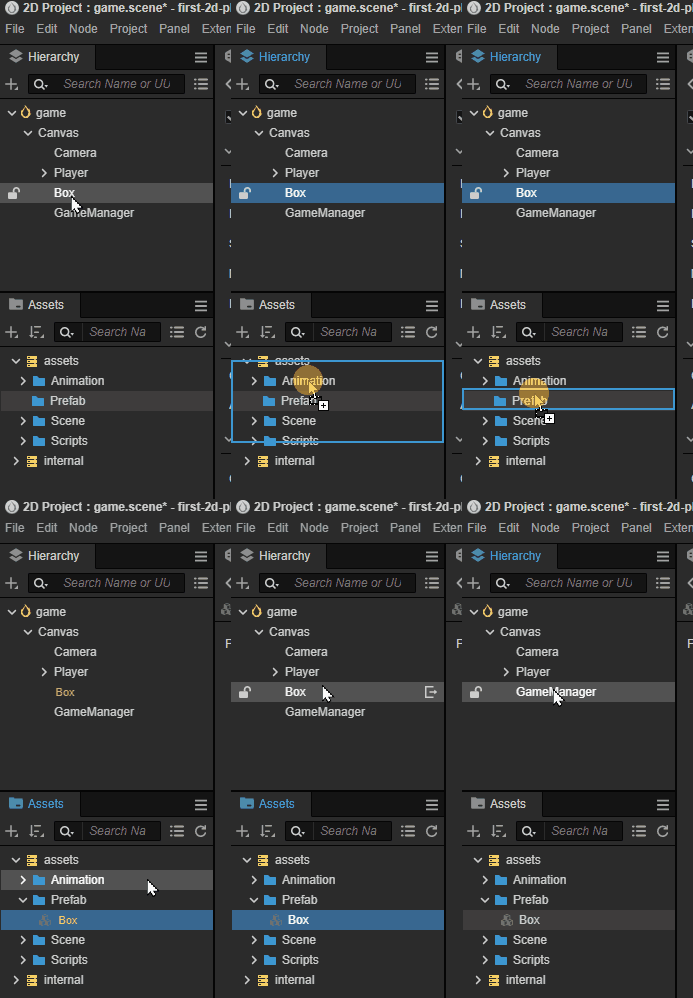
技巧:通常,我们会使用不同的文件夹来管理不同类型的资源。保持项目井井有条是一个好习惯。
现场
在游戏引擎中,场景用于管理所有游戏对象。它包含角色,地图,游戏玩法,用户界面。你在游戏中命名它。
游戏可以根据其功能分为不同的场景。如加载场景、开始菜单场景、游戏场景等。
游戏至少需要一个场景才能开始。
因此,在 Cocos Creator 中,默认情况下会打开一个未保存的空白场景,就像我们当前正在编辑的场景一样。
为了确保我们下次打开 Cocos Creator 时可以找到这个场景,我们需要保存它。
首先,让我们创建一个名为“场景”的文件夹,以将场景保存在“资源管理器”窗口中。
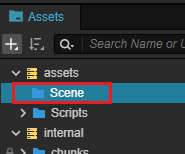
然后,按 + 快捷键。CtrlS
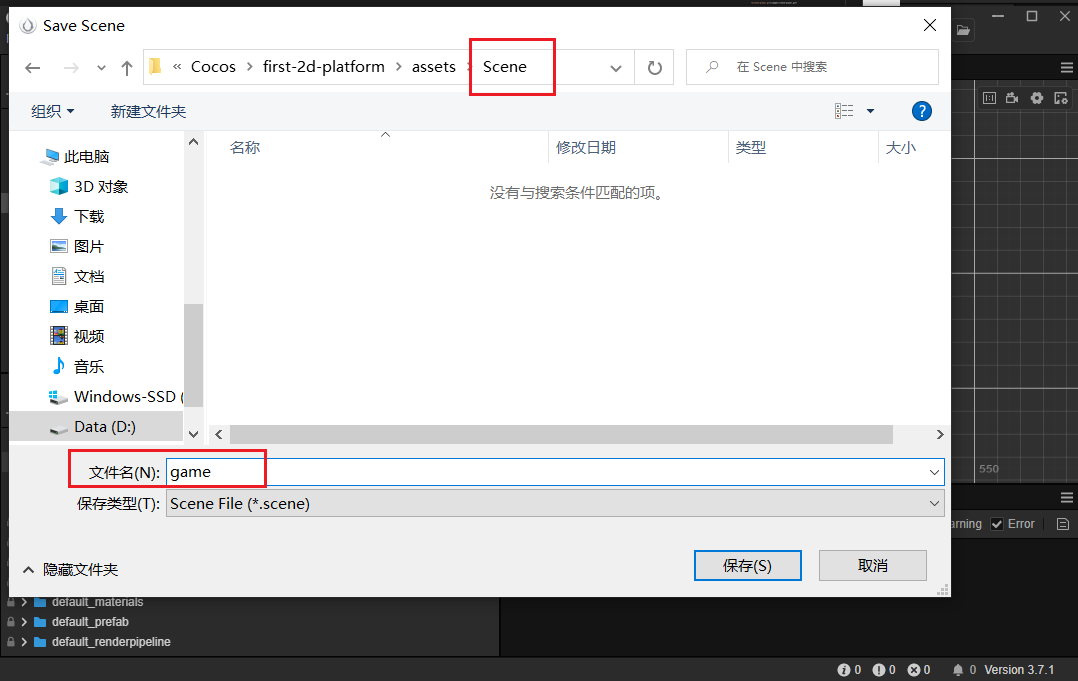
由于这是我们第一次保存此场景,因此会弹出场景保存窗口。
我们选择刚刚创建的“场景”文件夹作为位置,并将其命名为“game.scene”。单击保存。
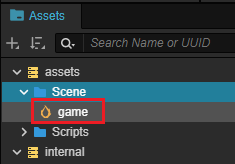
现在场景已保存。我们可以在资源管理器窗口中的资产/场景文件夹下看到一个名为“game”的场景资源文件。
现在可以观察到场景如下,红色方块代表玩家,白色方块代表地面。

不要忘记按 + 快捷键在场景发生更改时保存场景。避免因停电等意外事件而丢失工作进度。CtrlS
让角色移动
我们之前已经创建了“播放器”节点,但它无法移动。
接下来,我们将添加代码和动画来控制其移动并使其移动。
播放器控制器
播放器应具有以下行为:
- 单击鼠标时,它开始跳跃。
- 当它跳跃了一定时间后,跳跃结束。
为了实现上述目标,我们需要在组件中添加一些方法。PlayerController
侦听鼠标单击事件
onMouseUp(event: EventMouse) {}
根据给定的步骤跳转
jumpByStep(step: number) {}
计算玩家的位置
update (deltaTime: number) {}
接下来,让我们完成这些方法。
侦听鼠标单击事件
Cocos Creator 支持各种常见的控制设备,如鼠标、键盘、触摸板和游戏手柄。您可以通过课堂轻松访问相关内容。Input
为了便于使用,Cocos Creator 为该类提供了一个全局实例对象。inputInput
注意它很容易混淆,是实例,是类。inputInput为了使引擎在单击鼠标时调用该方法,我们需要在该方法中添加以下代码。onMouseUpstart
start () {
    input.on(Input.EventType.MOUSE_UP, this.onMouseUp, this);
}
该方法具有 类型的参数。onMouseUpeventEventMouse
通过该方法,我们可以获取单击鼠标的哪个按钮。event.getButton()
将以下代码添加到该方法中:onMouseUp
onMouseUp(event: EventMouse) {
    if (event.getButton() === EventMouse.BUTTON_LEFT) {
        this.jumpByStep(1);
    } else if (event.getButton() === EventMouse.BUTTON_RIGHT) {
        this.jumpByStep(2);
    }
}
在类中,定义了三个值:EventMouse
- 公共静态BUTTON_LEFT = 0;
- 公共静态BUTTON_MIDDLE = 1;
- 公共静态BUTTON_RIGHT = 2;
该代码已实现:
- 单击鼠标左键时,玩家向前跳一步。
- 当鼠标右键被点击时,玩家会向前跳两步。
移动播放器
在我们的游戏中,玩家水平向右移动,因此我们需要使用一个简单的物理公式,如下所示:
P_1 = P_0 + v*t
其中是最终位置,是原始位置,v是物体的速度,t是单位时间。P_1P_0
最终位置 = 原始位置 + 速度 * 增量时间
玩家控制器组件中的函数将由游戏引擎自动调用。并且还传入一个参数。updatedeltaTime
update (deltaTime: number) {}
每秒调用的时间由游戏运行时的帧速率(也称为 FPS)决定。update
例如,如果游戏以 30 FPS 的速度运行,则为 1.0 / 30.0 = 0.03333333...第二。deltaTime
在游戏开发中,我们使用物理公式来确保在任何帧速率下一致的移动结果。deltaTimet
在这里,让我们添加一些计算玩家移动组件所需的属性。PlayerController
//used to judge if the player is jumping.
private _startJump: boolean = false;

//the number of steps will the player jump, should be 1 or 2. determined by which mouse button is clicked.
private _jumpStep: number = 0;

//the time it takes for the player to jump once.
private _jumpTime: number = 0.1;

//the time that the player's current jump action has taken, should be set to 0 each time the player jumps, when it reaches the value of `_jumpTime`, the jump action is completed.
private _curJumpTime: number = 0;

// The player's current vertical speed, used to calculate the Y value of position when jumping.
private _curJumpSpeed: number = 0;

// The current position of the player, used as the original position in the physics formula.
private _curPos: Vec3 = new Vec3();

//movement calculated by deltaTime.
private _deltaPos: Vec3 = new Vec3(0, 0, 0);

// store the final position of the player, when the player's jumping action ends, it will be used directly to avoid cumulative errors.
private _targetPos: Vec3 = new Vec3();
现在,我们接下来需要做的非常简单:
- 计算方法中玩家移动所需的数据。
jumpByStep - 在方法中处理玩家移动。
update
在该方法中,我们添加以下代码:jumpByStep
jumpByStep(step: number) {
    if (this._startJump) {
        //if the player is jumping, do nothing.
        return;
    }
    //mark player is jumping.
    this._startJump = true;
    //record the number of steps the jumping action will take.
    this._jumpStep = step;
    //set to 0 when a new jumping action starts
    this._curJumpTime = 0;
    //because the player will finish the jumping action in the fixed duration(_jumpTime), so it needs to calculate jump speed here.
    this._curJumpSpeed = this._jumpStep / this._jumpTime;
    //copy the current position of the node which will be used when calculating the movement.
    this.node.getPosition(this._curPos);
    //calculate the final position of the node which will be used when the jumping action ends.
    Vec3.add(this._targetPos, this._curPos, new Vec3(this._jumpStep, 0, 0));
}
Vec3是 Cocos Creator 中的向量类,名称是 的缩写,它有 3 个分量,x,y,z。如 等。Vector3Vec3Vec3.addVec3.subtract
在 Cocos Creator 中,2D 游戏还用作位置、缩放和旋转的属性类型。只需忽略不相关的组件,例如 z 组件就位。Vec3
接下来,让我们计算玩家在跳跃时的移动。
在这个游戏中,玩家只在跳跃时移动,在不跳跃时保持静止。
让我们将以下代码添加到 中的方法中。updatePlayerController
update (deltaTime: number) {
    //we only do something when the player is jumping.
    if (this._startJump) {
        //accumulate the jumping time.
        this._curJumpTime += deltaTime;
        //check if it reaches the jump time.
        if (this._curJumpTime > this._jumpTime) {
            // When the jump ends, set the player's position to the target position.
            this.node.setPosition(this._targetPos);
            //clear jump state
            this._startJump = false;
        } else {
            //if it still needs to move.
            // copy the position of the node.
            this.node.getPosition(this._curPos);
            //calculate the offset x by using deltaTime and jumping speed.
            this._deltaPos.x = this._curJumpSpeed * deltaTime;
            //calculate the final pos by adding deltaPos to the original position
            Vec3.add(this._curPos, this._curPos, this._deltaPos);
            //update the position of the player.
            this.node.setPosition(this._curPos);
        }
    }
}
现在,点击 预览 顶部的按钮 Cocos 创建器.

播放器将通过单击鼠标按钮移动。
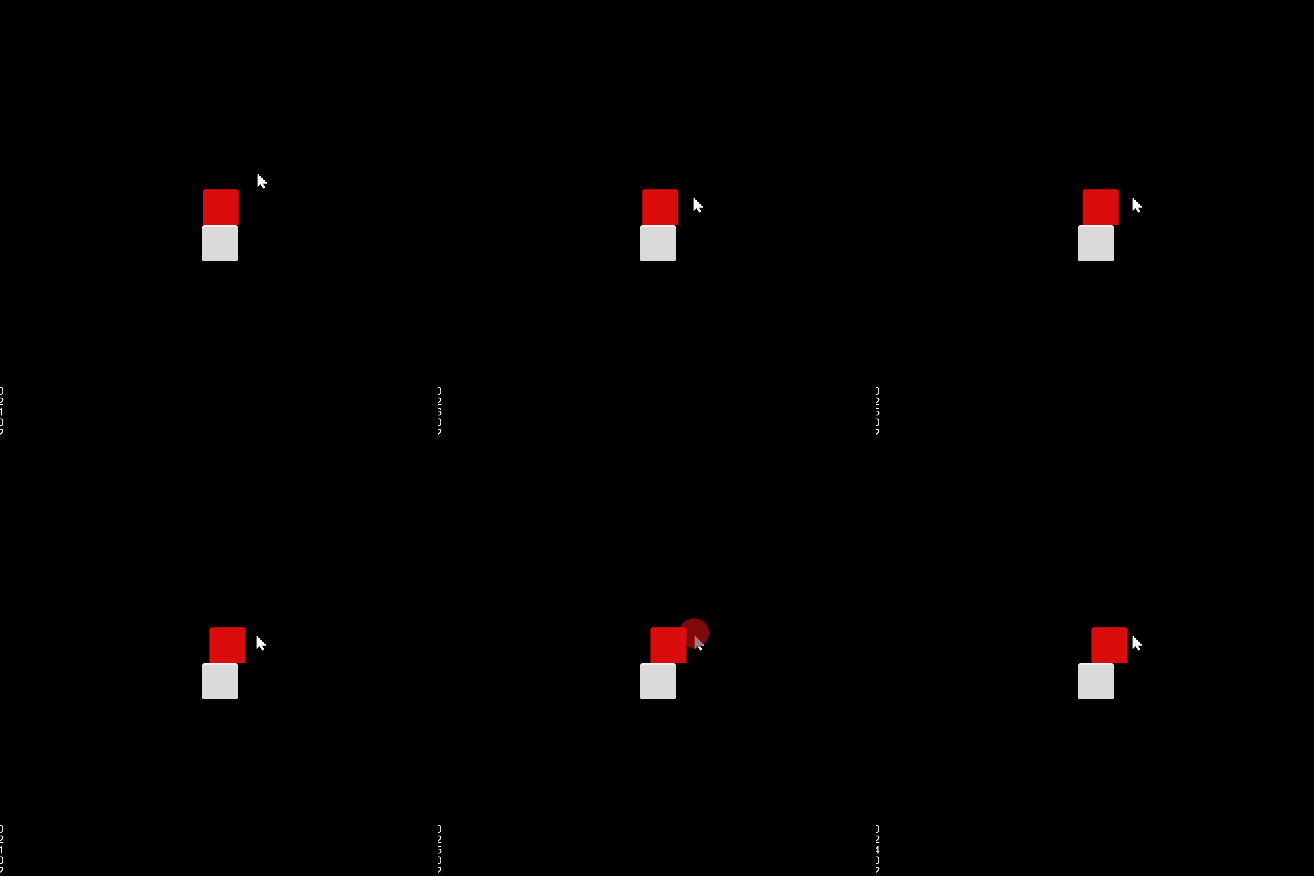
如您所见,每次单击鼠标按钮时,播放器只会移动一点。
这是因为我们使用播放器作为速度单位。pixels/s
this._curJumpSpeed = this._jumpStep / this._jumpTime;
上面的代码表示玩家每步只会移动一个像素。
事实上,我们希望玩家每步移动一定距离。
为了解决这个问题,我们需要添加一个常量来表示步长。
下面,用于此目的。BLOCK_SIZE
import { _decorator, Component, Node } from 'cc';
const { ccclass, property } = _decorator;

//
export const BLOCK_SIZE = 40;

@ccclass('PlayerController')
export class PlayerController extends Component {
    //...
}
如您所见,在 TypeScript 中:
- 常量可以在类外部定义并单独导出。
- 声明为 const 的值不能修改,通常用于固定配置。
接下来,在方法中找到代码行:jumpByStep
this._curJumpSpeed = this._jumpStep / this._jumpTime;
将其更改为:
this._curJumpSpeed = this._jumpStep * BLOCK_SIZE/ this._jumpTime;
这是更新的:jumpByStep
jumpByStep(step: number) {
    if (this._startJump) {
        return;
    }
    this._startJump = true;
    this._jumpStep = step;
    this._curJumpTime = 0;

    this._curJumpSpeed = this._jumpStep * BLOCK_SIZE/ this._jumpTime;

    this.node.getPosition(this._curPos);
    Vec3.add(this._targetPos, this._curPos, new Vec3(this._jumpStep* BLOCK_SIZE, 0, 0));
}
重新开始游戏,可以看到玩家移动的距离现在符合预期。
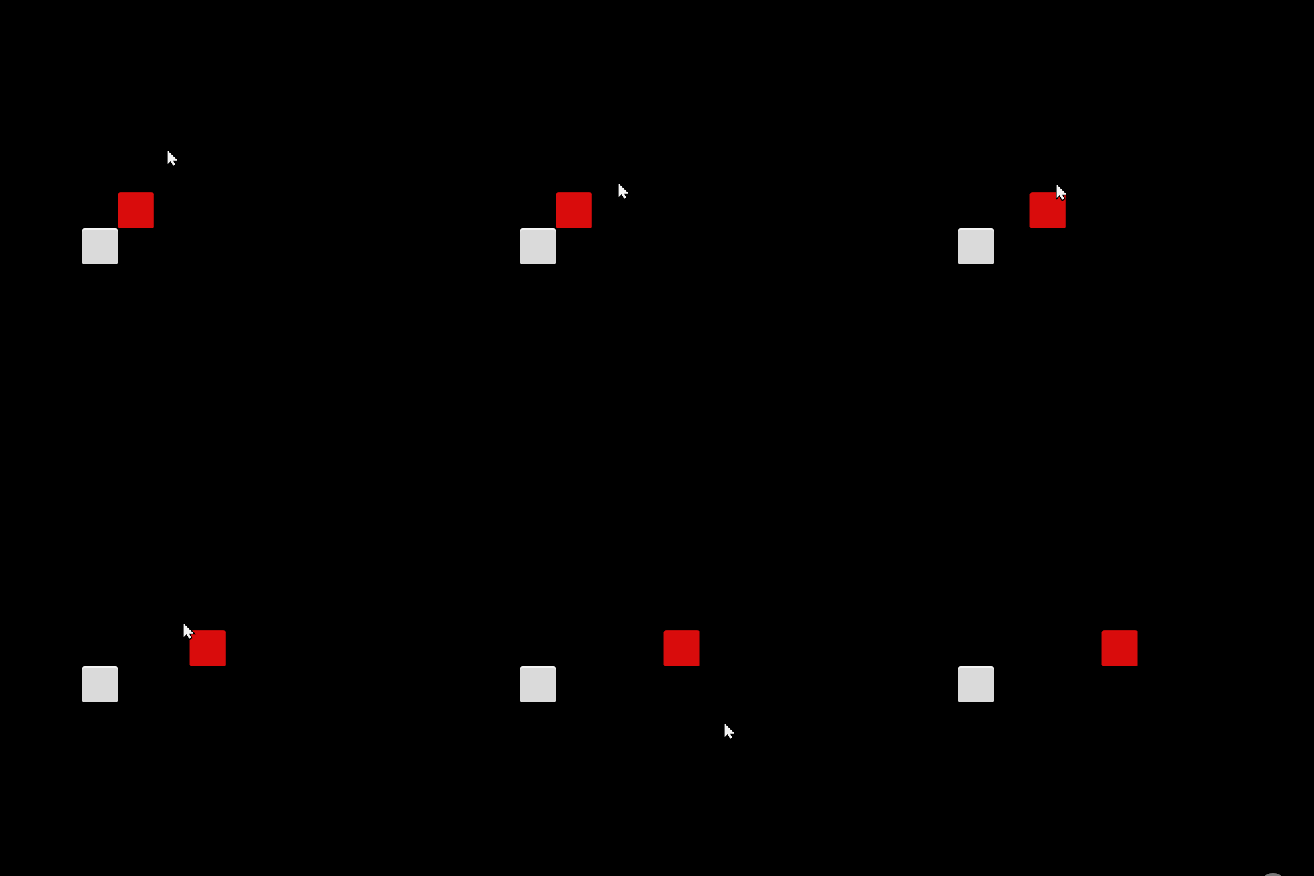
此时,的代码如下。PlayerController
import { _decorator, Component, Vec3, EventMouse, input, Input } from "cc";
const { ccclass, property } = _decorator;

export const BLOCK_SIZE = 40;

@ccclass("PlayerController")
export class PlayerController extends Component {

    private _startJump: boolean = false;
    private _jumpStep: number = 0;
    private _curJumpTime: number = 0;
    private _jumpTime: number = 0.3;
    private _curJumpSpeed: number = 0;
    private _curPos: Vec3 = new Vec3();
    private _deltaPos: Vec3 = new Vec3(0, 0, 0);
    private _targetPos: Vec3 = new Vec3();

    start () {
        input.on(Input.EventType.MOUSE_UP, this.onMouseUp, this);
    }

    reset() {
    }

    onMouseUp(event: EventMouse) {
        if (event.getButton() === 0) {
            this.jumpByStep(1);
        } else if (event.getButton() === 2) {
            this.jumpByStep(2);
        }

    }

    jumpByStep(step: number) {
        if (this._startJump) {
            return;
        }
        this._startJump = true;
        this._jumpStep = step;
        this._curJumpTime = 0;

        this._curJumpSpeed = this._jumpStep * BLOCK_SIZE/ this._jumpTime;
        this.node.getPosition(this._curPos);
        Vec3.add(this._targetPos, this._curPos, new Vec3(this._jumpStep* BLOCK_SIZE, 0, 0));
    }

    update (deltaTime: number) {
        if (this._startJump) {
            this._curJumpTime += deltaTime;
            if (this._curJumpTime > this._jumpTime) {
                // end
                this.node.setPosition(this._targetPos);
                this._startJump = false;
            } else {
                // tween
                this.node.getPosition(this._curPos);
                this._deltaPos.x = this._curJumpSpeed * deltaTime;
                Vec3.add(this._curPos, this._curPos, this._deltaPos);
                this.node.setPosition(this._curPos);
            }
        }
    }
}
播放器动画
对于2D游戏开发,《寻梦环游记》支持各种类型的动画,包括关键帧动画、Spine、DragonBones和Live2D。
在本教程中,播放器的跳转动画非常简单,使用关键帧动画就足够了。
使用Cocos Creator的内置动画编辑器,制作起来很容易。
让我们采取分步方法来创建它。
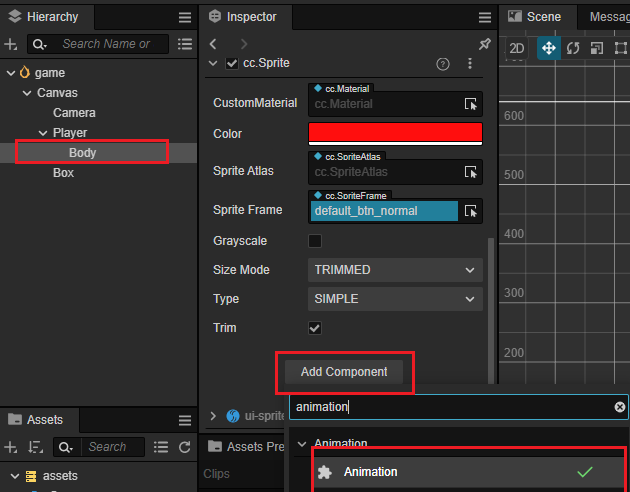
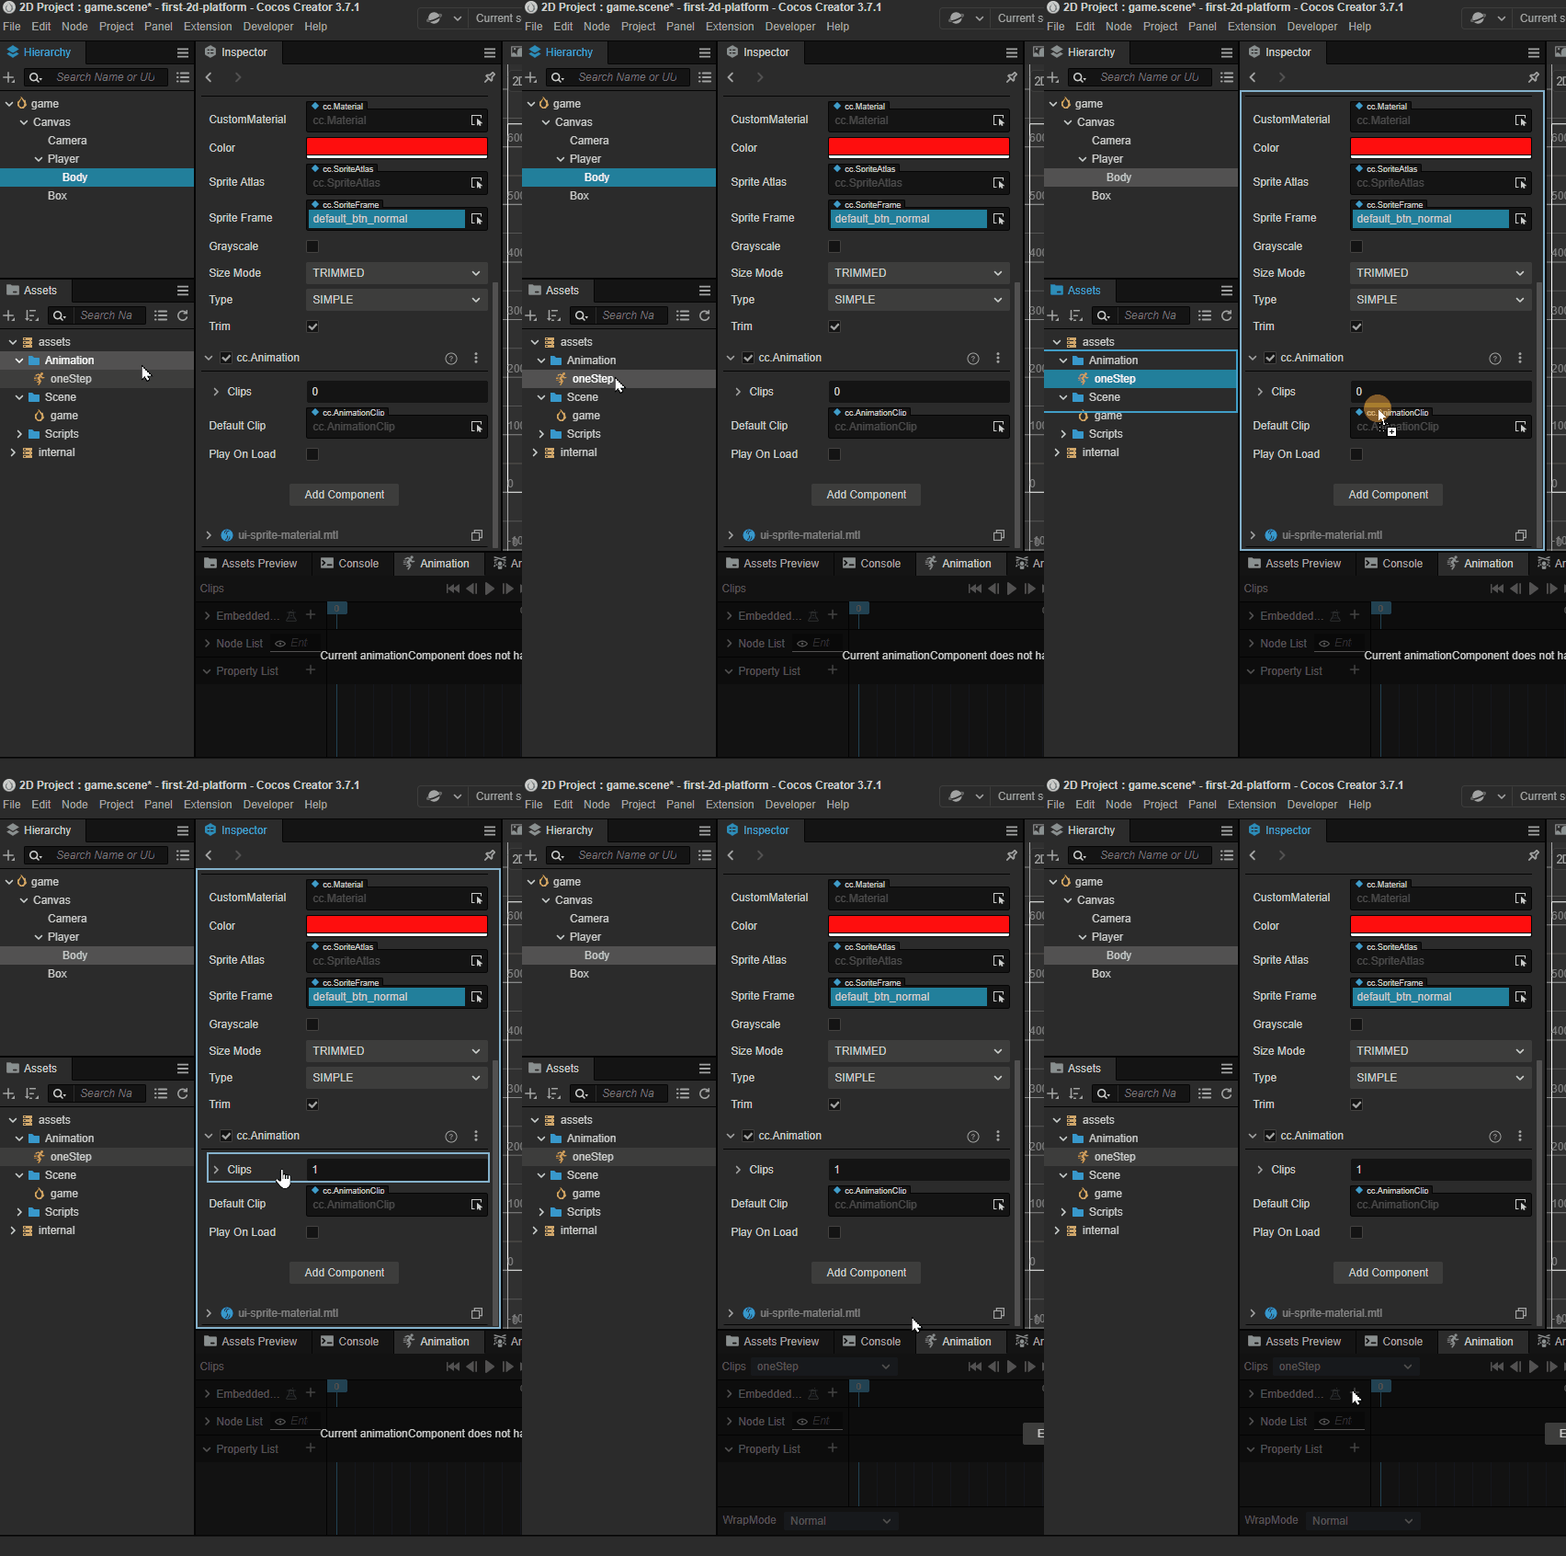
首先,让我们将动画组件添加到播放器的“正文”节点。
在“资源管理器”窗口中,创建一个名为“动画”的新文件夹,在该文件夹中,创建一个名为“oneStep”的新动画剪辑。
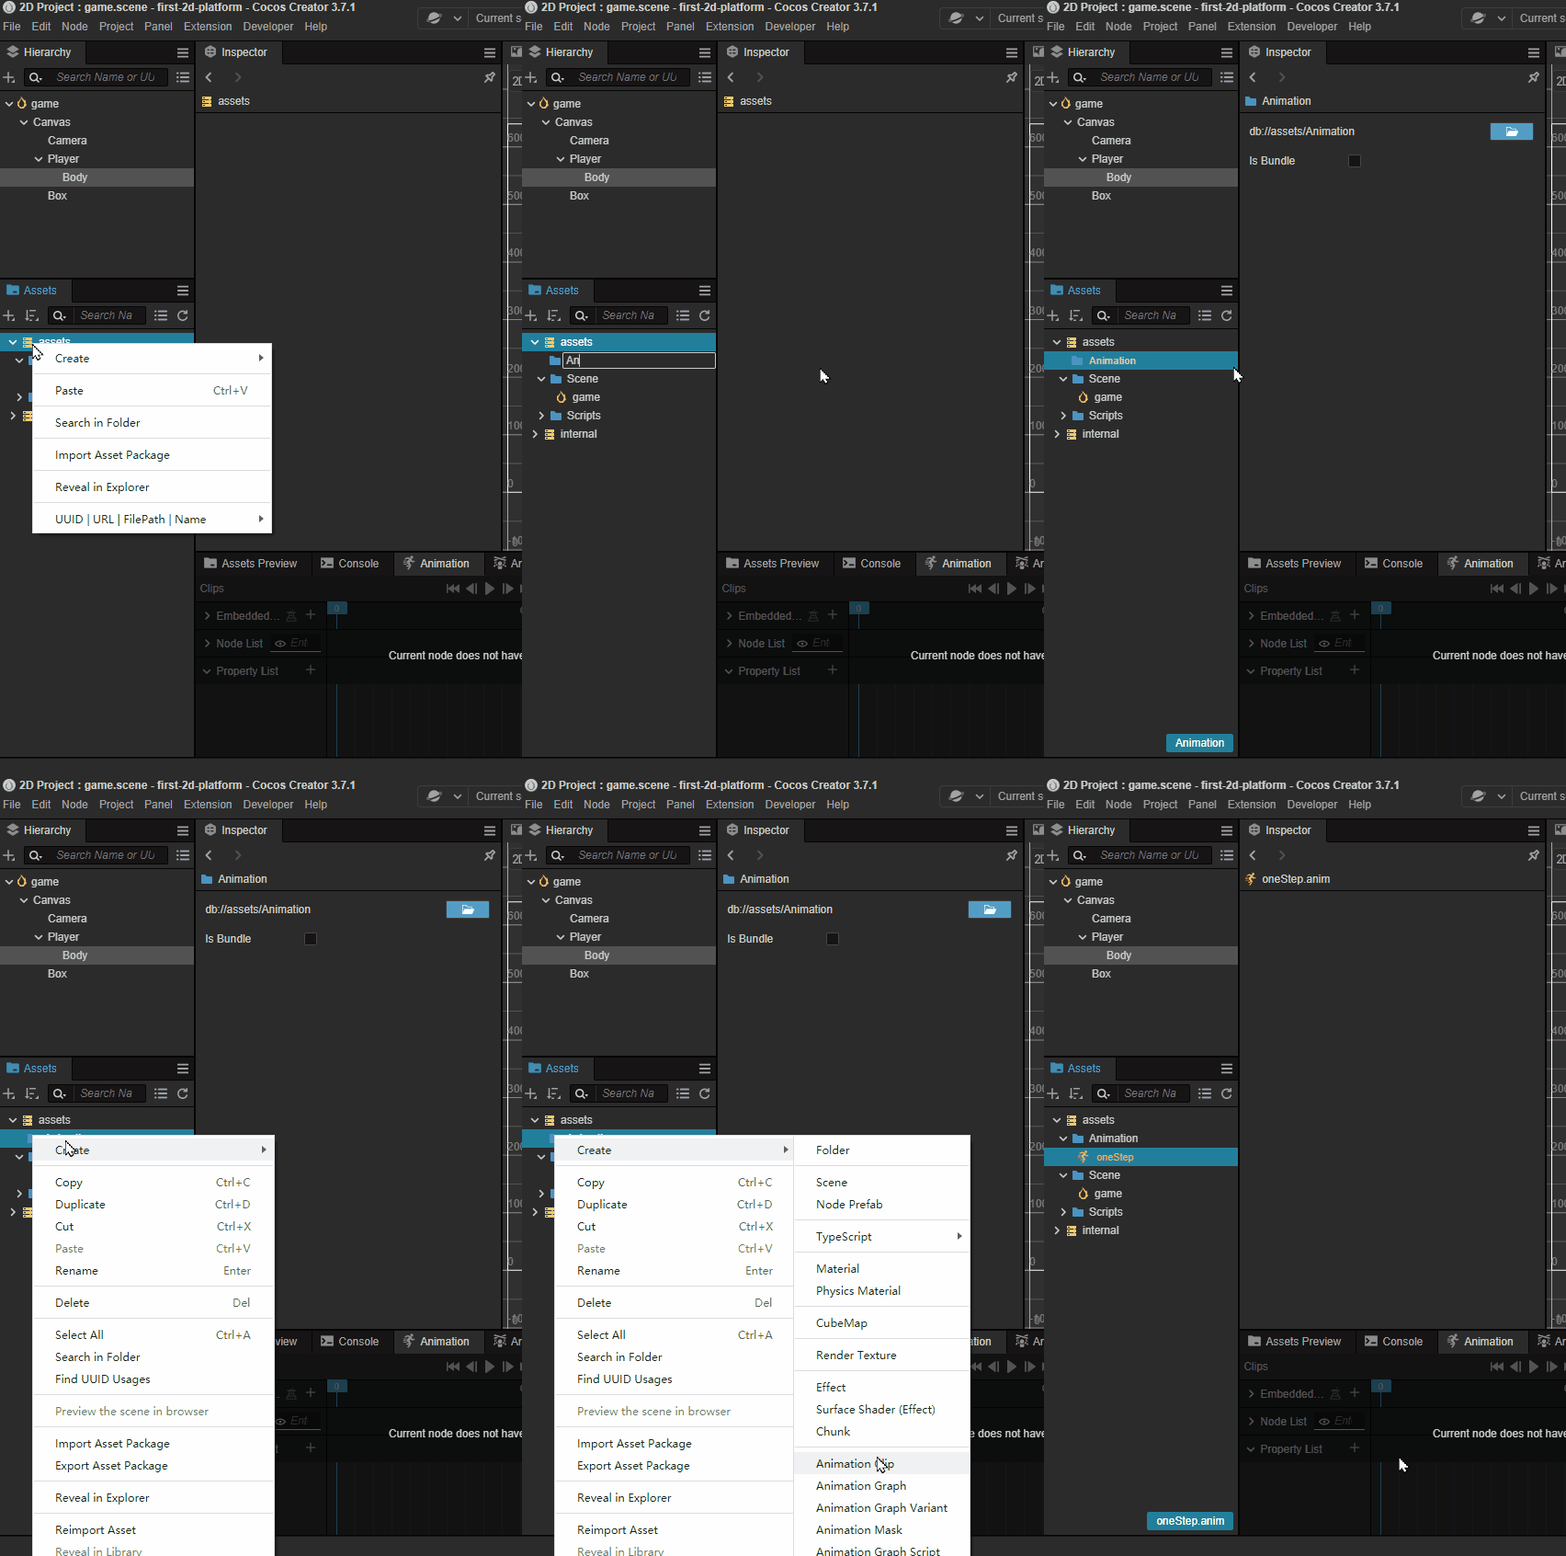
在“层次结构”中,选择“正文”节点,然后将“oneStep”从“动画”文件夹拖到“检查器”面板中的“剪辑”属性上。
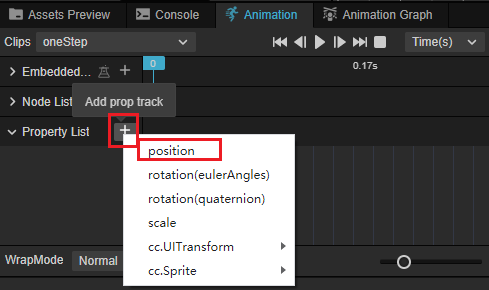
在编辑器控制台区域,切换到“动画”选项卡,点击“进入动画编辑模式”按钮:

在动画编辑器中,我们为节点的位置属性添加轨迹。
添加轨迹后,我们可以将当前帧的指示器设置为某个帧,然后更改节点的位置,当前帧将自动设置为关键帧。
两者都会修改“检查器”面板上的值,并且在场景中拖动节点可以更改节点的位置。
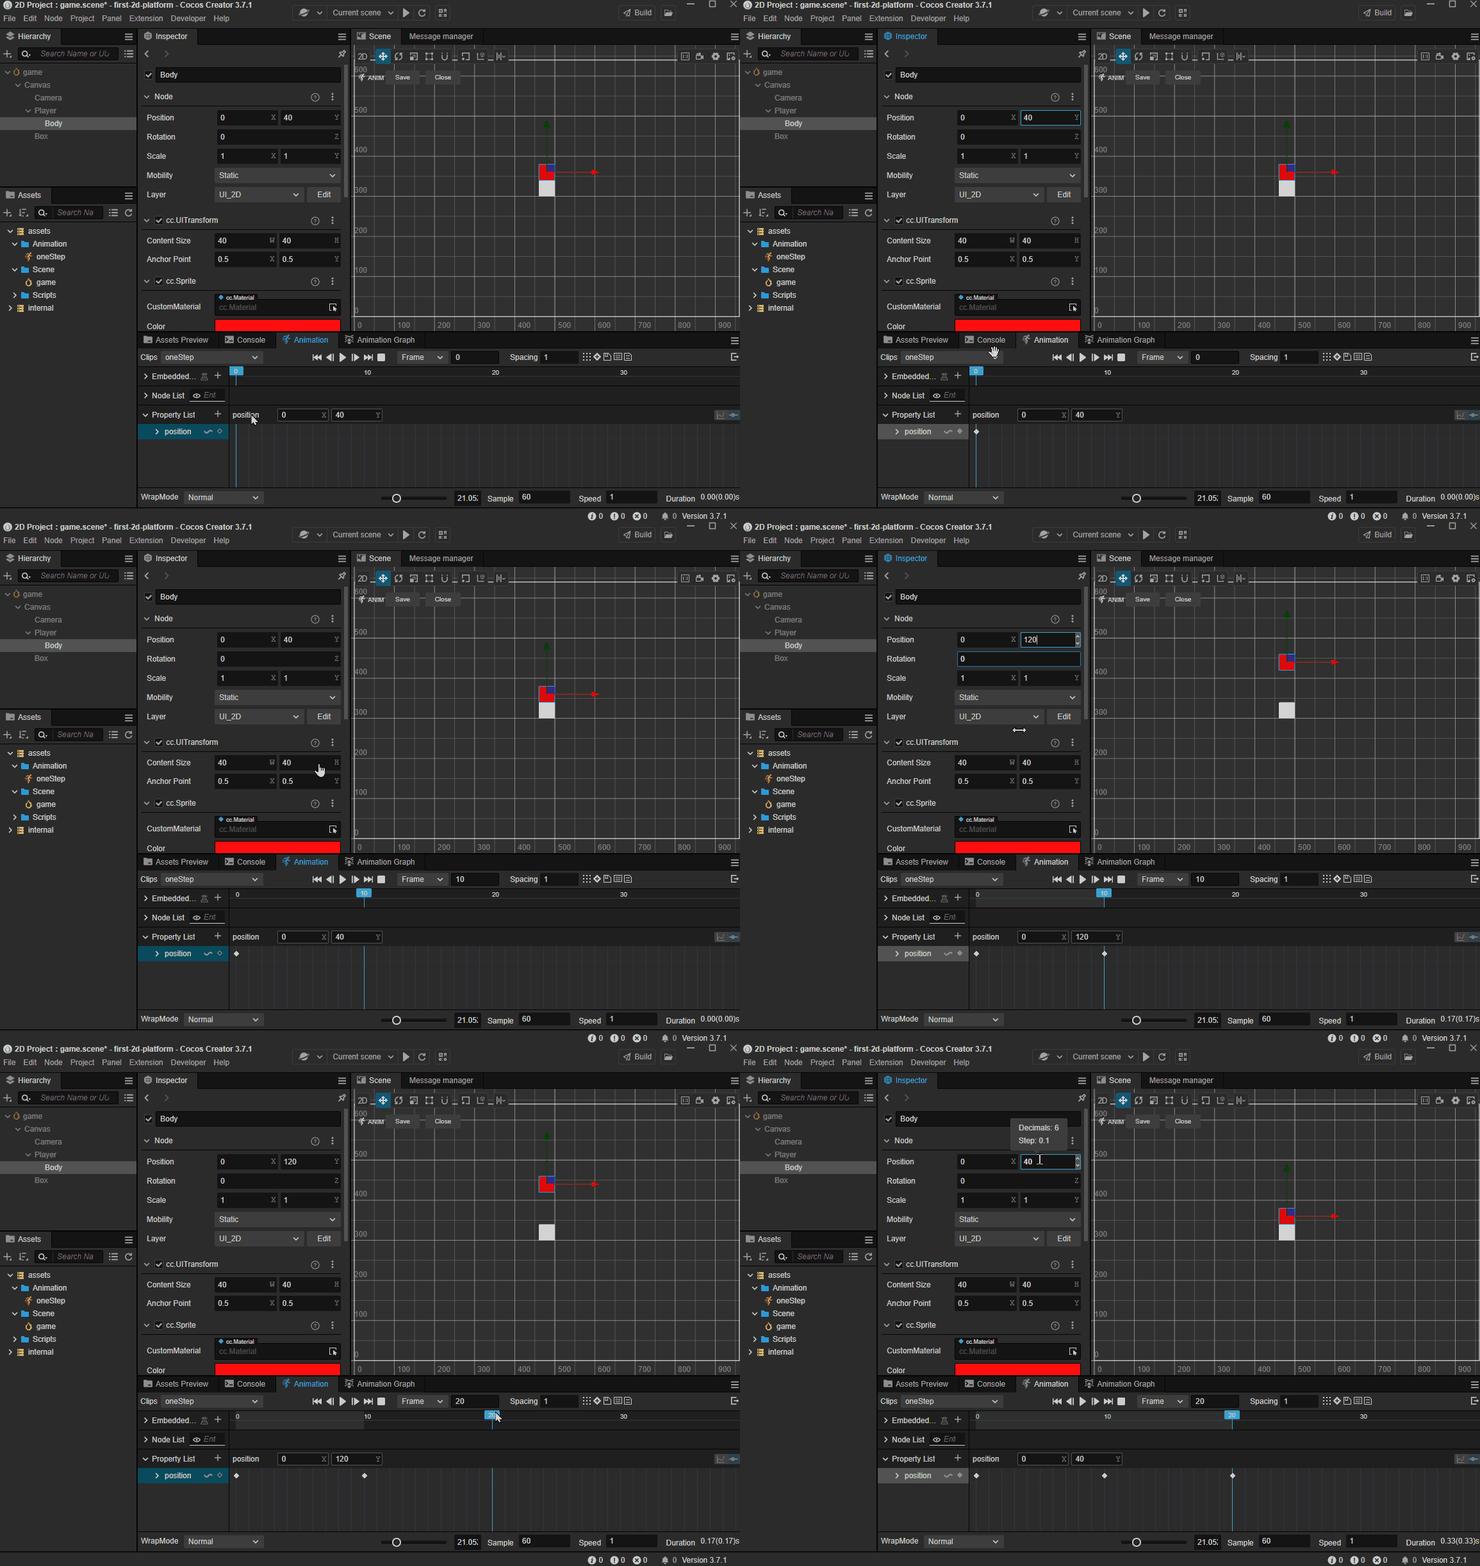
最后,我们有以下关键帧:
- 0 帧:将位置设置为 x = 0, y = 40
- 10 帧:将位置设置为 x = 0,y = 120
- 20帧:将位置设置为x = 0,y = 40
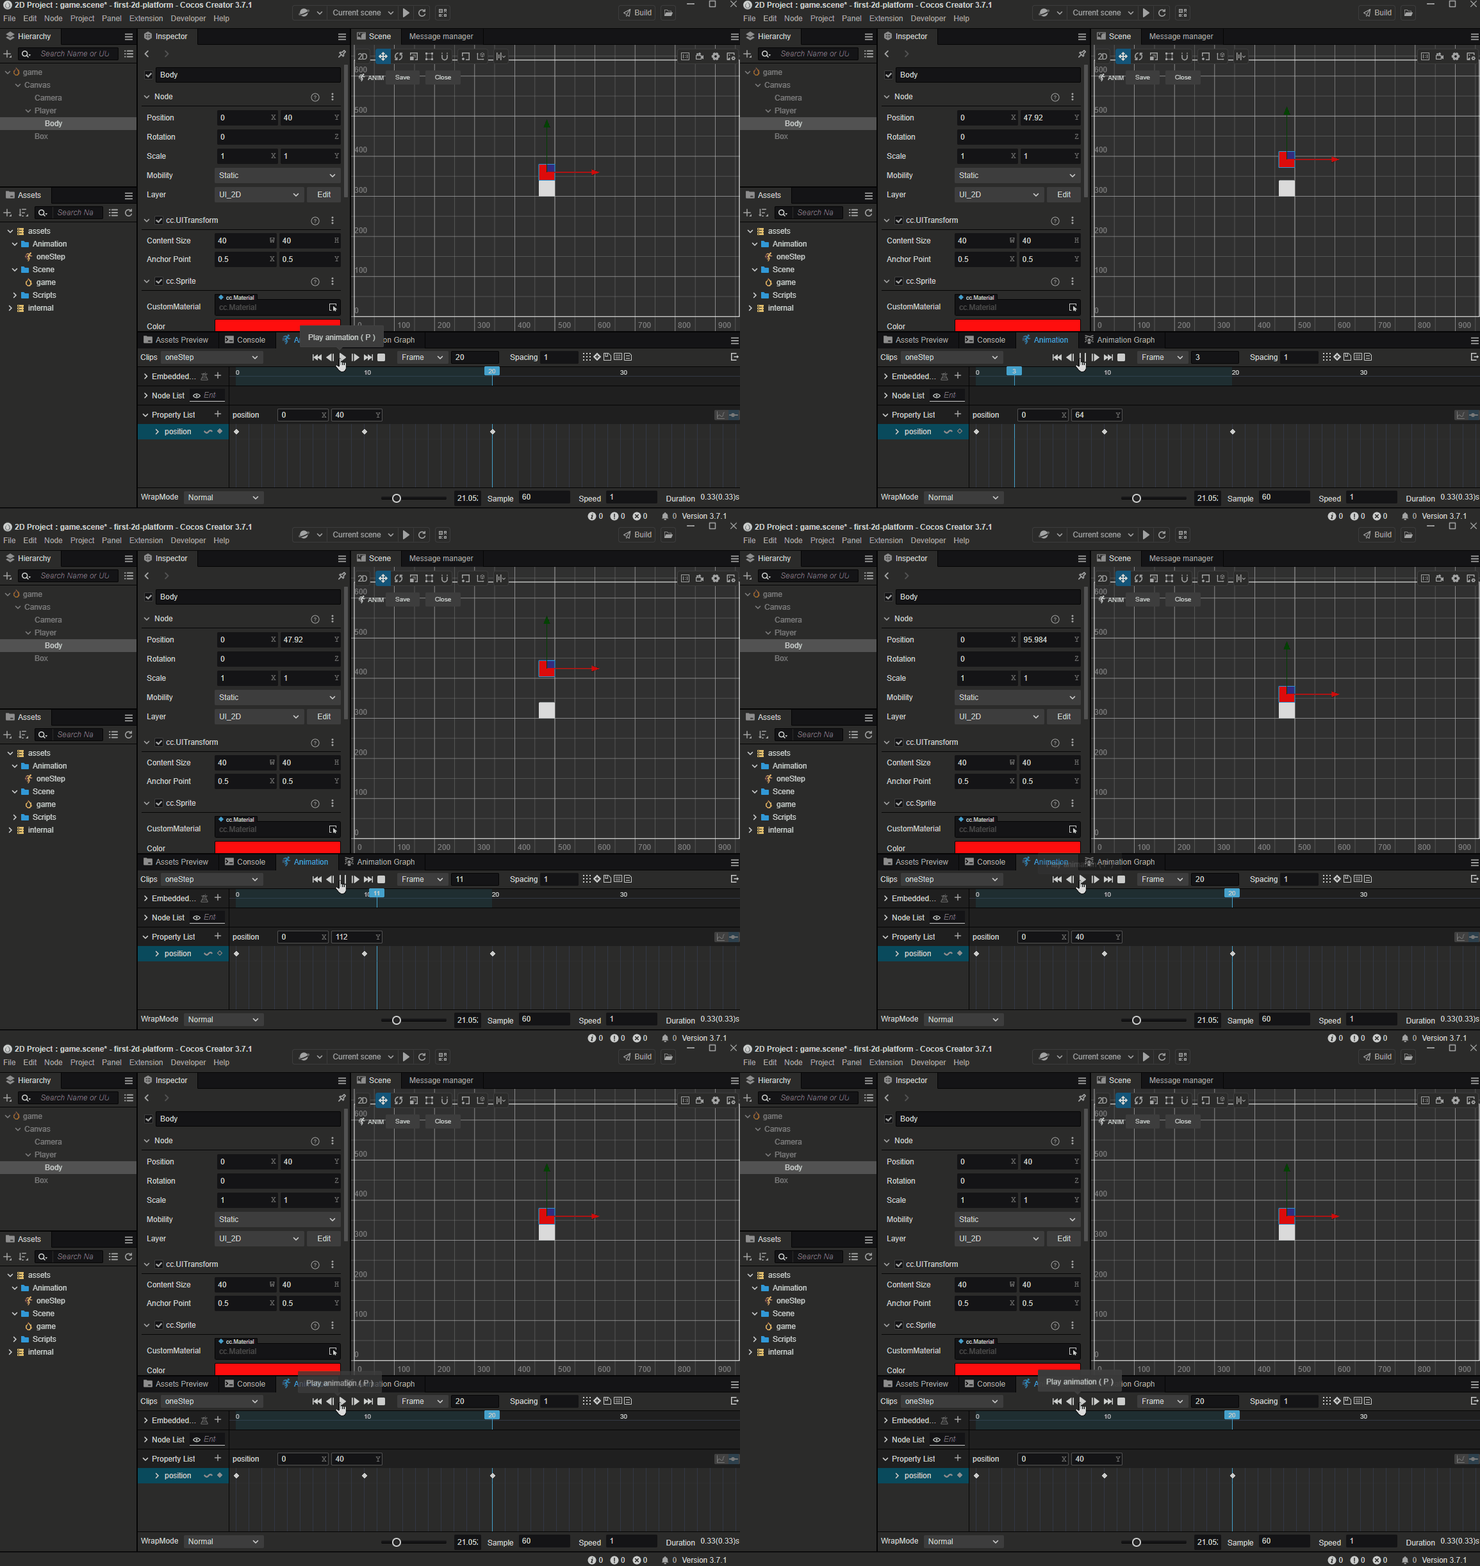
不要忘记点击 优惠 按钮保存它。
您可以点击 玩 按钮预览动画剪辑。
按照制作动画的步骤操作,然后制作另一个:。oneSteptwoStep
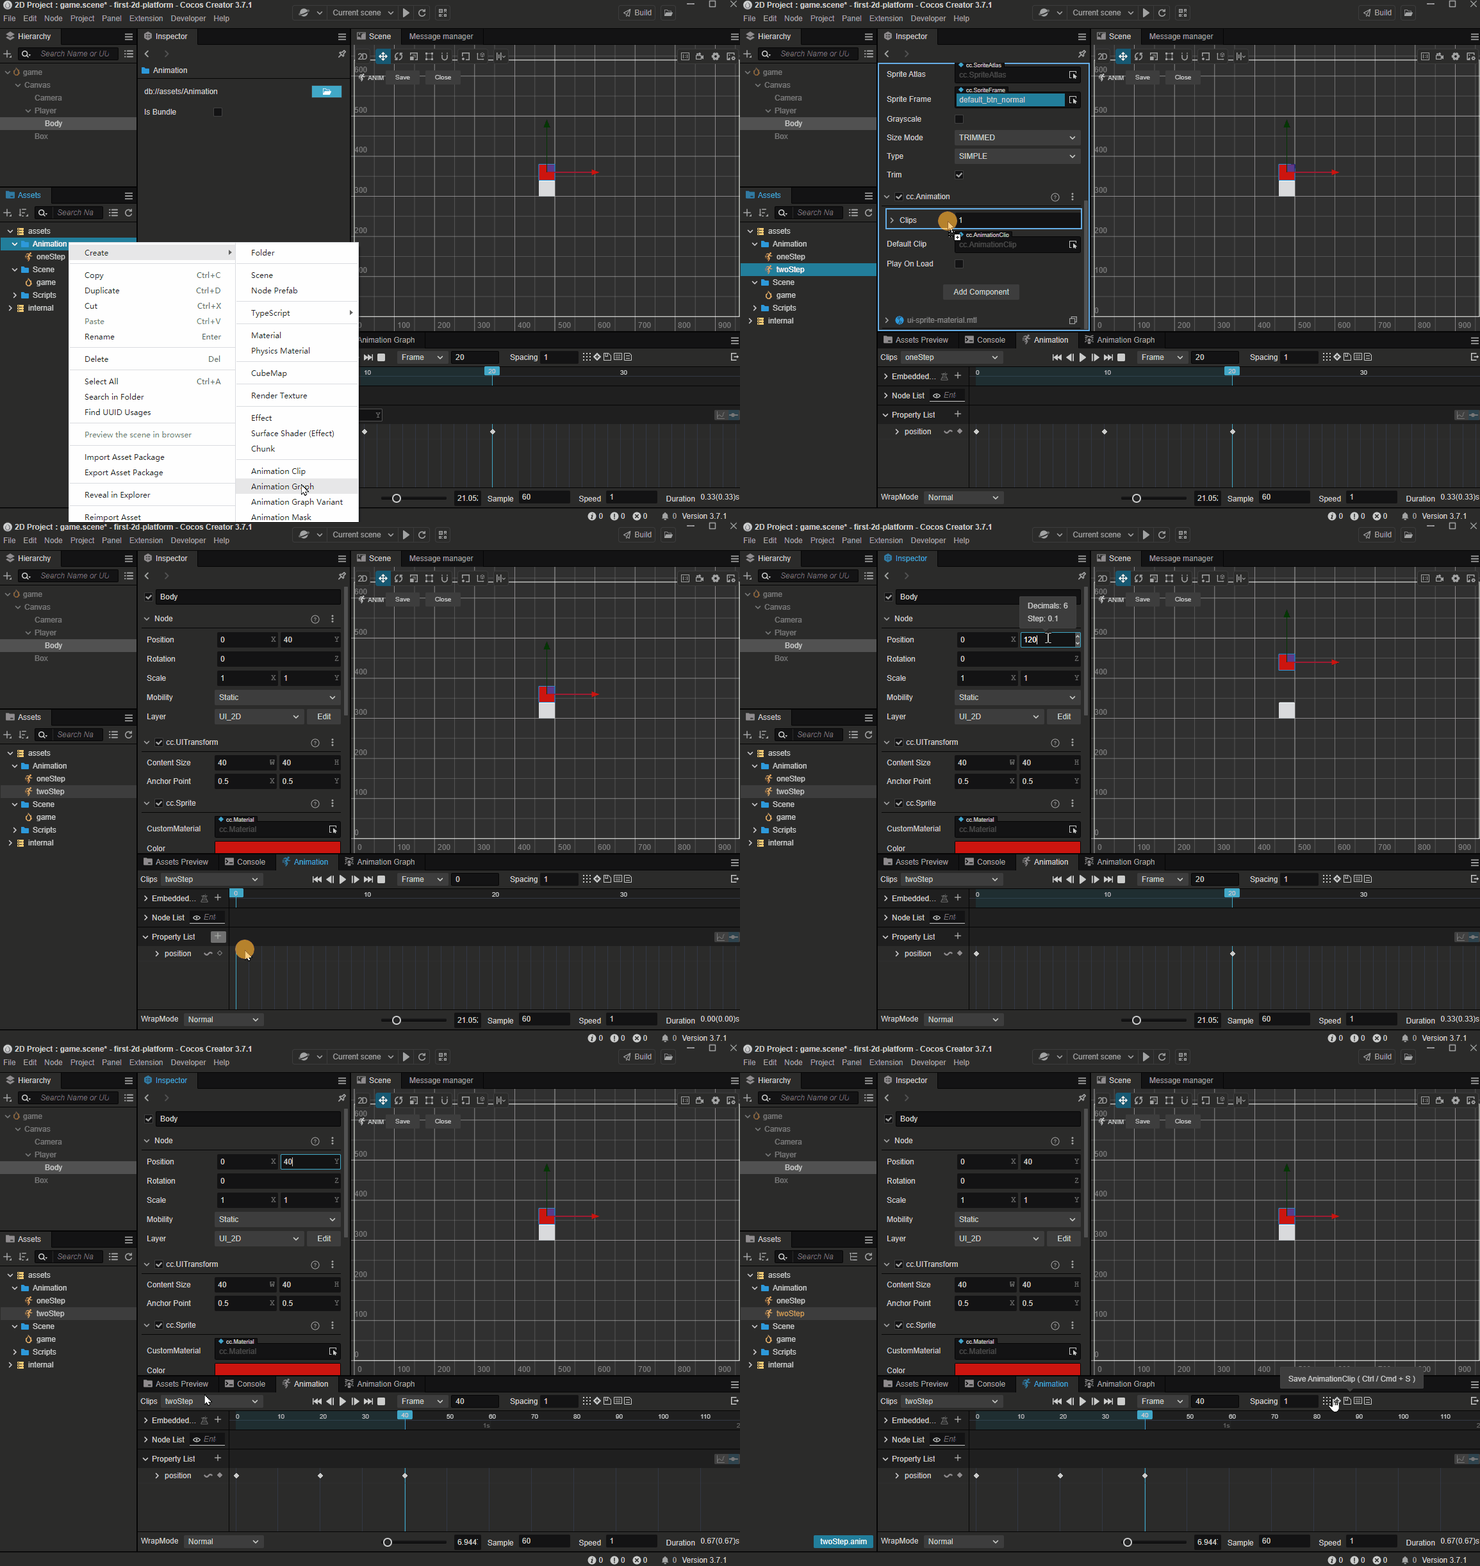
完成动画创建后,单击 关闭 按钮退出动画编辑模式。
在代码中播放动画
接下来,让我们在 PlayerController 中添加一些代码行来播放我们刚刚制作的动画。
在 Cocos Creator 中使用 TypeScript 播放动画非常简单:
animation.play(animName);
- 动画是“主体”节点上的“动画”组件。
- 播放是动画组件播放动画的方法
- animName 是要播放的动画文件的名称
在 Cocos Creator 中,我们必须确保将要播放的动画包含在节点的动画组件的剪辑中,
在 PlayerController 类的开头添加以下代码:
@ccclass("PlayerController")
export class PlayerController extends Component {
    @property(Animation)
    BodyAnim:Animation = null;
    //...
}
注意:TypeScript 和 Cocos Creator 都有一个 Animation 类,请确保包含在代码行中。否则,代码将使用 from TypeScript,并且可能会出现不可预测的错误。Animationimport { ... } from "cc"Animation在这里,我们添加了一个命名并在其上方添加的属性。此语法称为:装饰器。修饰器允许编辑器了解动画组件的类型,并在“检查器”面板上显示动画组件的导出属性。BodyAnim@property@propertyBodyAnim
确保 PlayerController 文件中有如下代码行,否则代码将无法编译。
`const { ccclass, property } = _decorator;`
这是一个包含可以在 Cocos Creator 中使用的所有装饰器的类,在使用之前应该从命名空间 cc 导入它。_decorator
相关代码行如下:
import { _decorator, Component, Vec3, EventMouse, input, Input, Animation } from "cc";
const { ccclass, property } = _decorator;
在方法中,我们添加到以下代码行:jumpByStep
if (this.BodyAnim) {
    if (step === 1) {
        this.BodyAnim.play('oneStep');
    } else if (step === 2) {
        this.BodyAnim.play('twoStep');
    }
}
现在,方法是这样的:jumpByStep
jumpByStep(step: number) {
    if (this._startJump) {
        return;
    }
    this._startJump = true;
    this._jumpStep = step;
    this._curJumpTime = 0;
    this._curJumpSpeed = this._jumpStep * BLOCK_SIZE/ this._jumpTime;
    this.node.getPosition(this._curPos);
    Vec3.add(this._targetPos, this._curPos, new Vec3(this._jumpStep* BLOCK_SIZE, 0, 0));

    //the code can explain itself
    if (this.BodyAnim) {
        if (step === 1) {
            this.BodyAnim.play('oneStep');
        } else if (step === 2) {
            this.BodyAnim.play('twoStep');
        }
    }
}
返回到 Cocos 创建器,选择“播放器”节点,然后将“正文”节点拖到属性上。BodyAnim
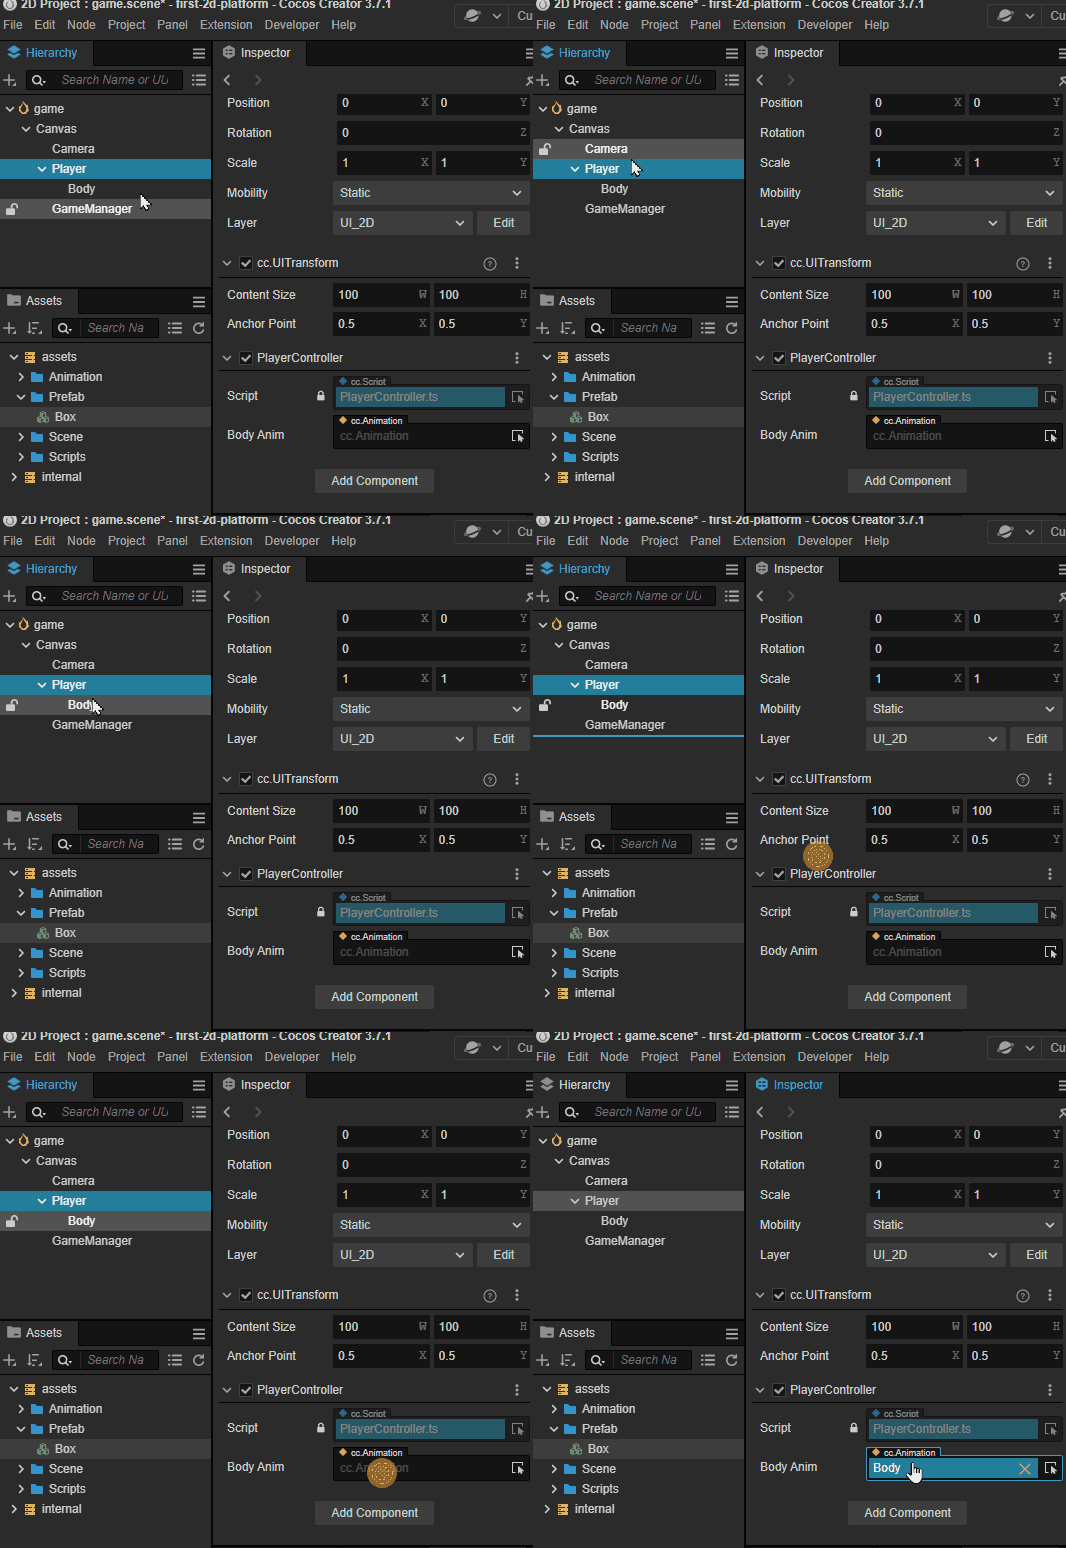
引擎将自动获取“主体”节点上的动画组件并将其分配给 。因此,'s 属性引用 Body 节点的组件。BodyAnimPlayerControllerBodyAnimAnimation
点击 玩 按钮在 Cocos Creator 顶部进行预览,您可以看到播放器在单击鼠标按钮时跳跃。
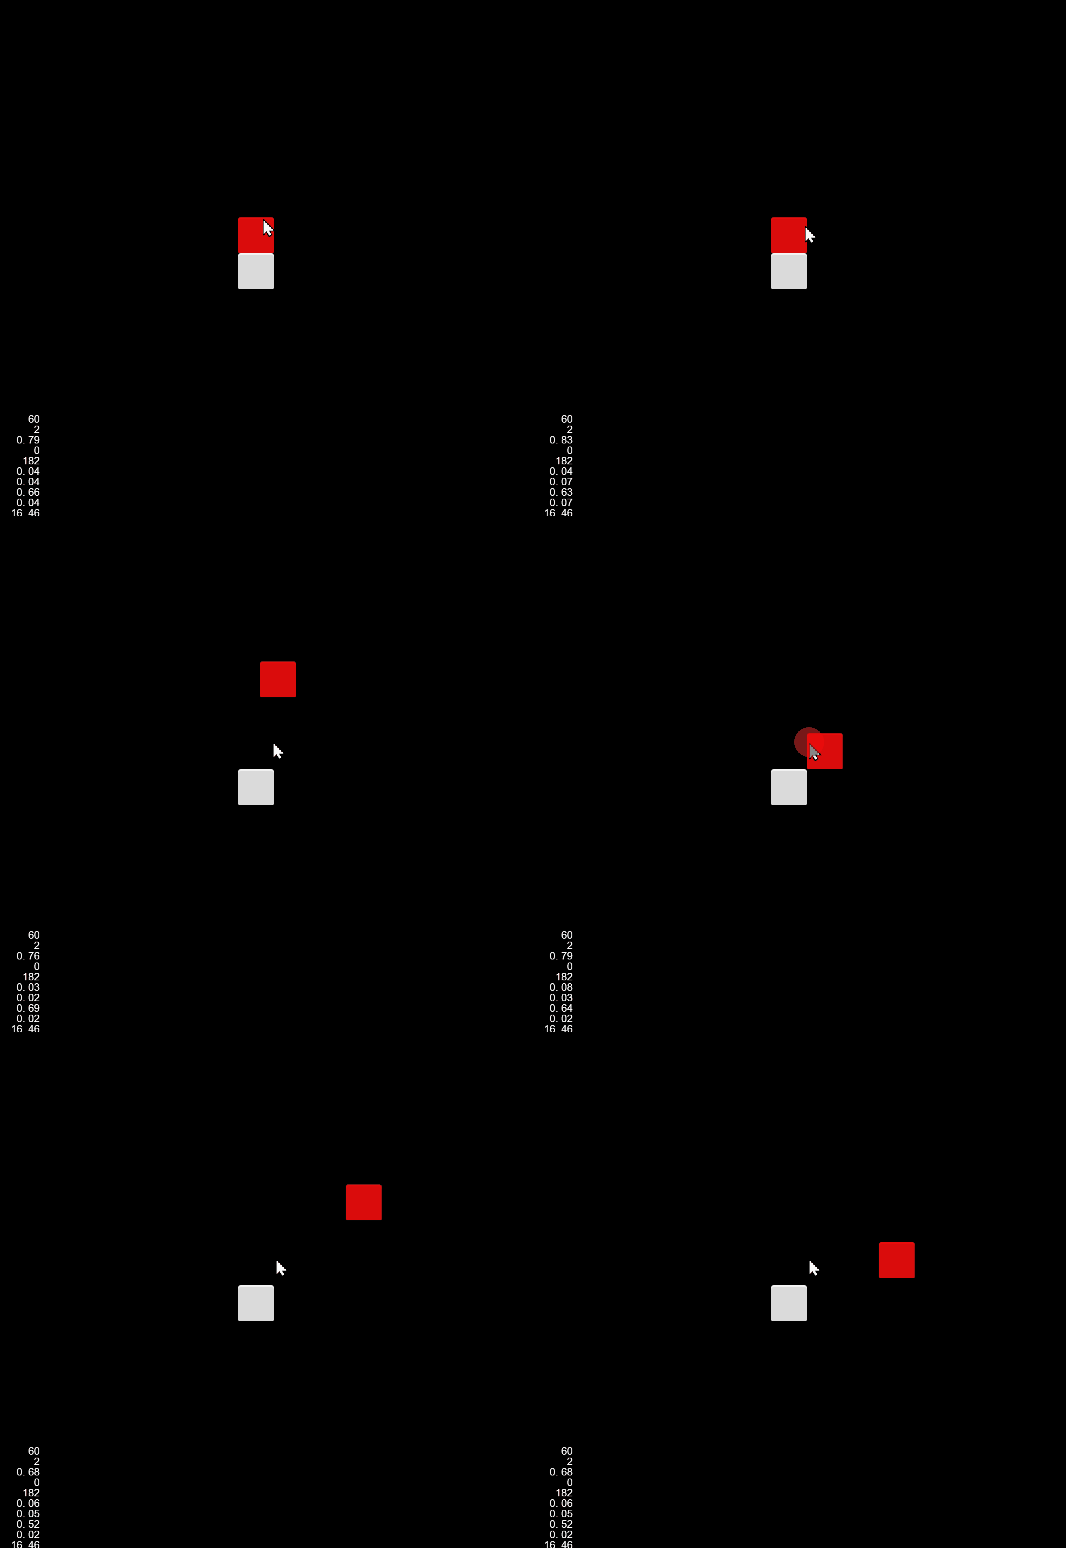
因为使用了统一。
这里我们用了一个统一的 jumpTime 值,但是由于两个动画的时长不一样,所以在播放动画的时候会发现有点怪怪的。jumpTime = 0.1
要解决此问题,最好使用动画的实际持续时间作为 的值。jumpTime
// Get jump time from animation duration.
const clipName = step == 1? 'oneStep' : 'twoStep';
const state =  this.BodyAnim.getState(clipName);
this._jumpTime = state.duration;
游戏管理器
在游戏开发中,我们可以使用 Box.prefab 手动放置节点来构建地图,但地图将被修复。为了使地图在游戏开始时发生变化并为玩家提供一些惊喜,我们可以在代码中随机构建地图。
现在,让我们创建一个在资源管理器窗口中调用的新 TypeScript 组件来存档它。GameManger
注意:如果在创建脚本组件时忘记重命名脚本或输入不想使用的错误名称,修复它的最佳方法是将其删除并创建一个新名称。注:如果修改脚本名称,脚本文件中的内容不会相应更改。
创建脚本组件后,让我们创建一个名为 GameManager 的新节点,然后附加到它。GameMangerGameManager
注意通常,我们可以将脚本组件附加到场景中的任何节点,但为了保持项目结构井井有条,我们通常会创建一个同名节点并附加到该节点。此规则适用于所有 XXXManager 脚本组件。GameManagerGameManager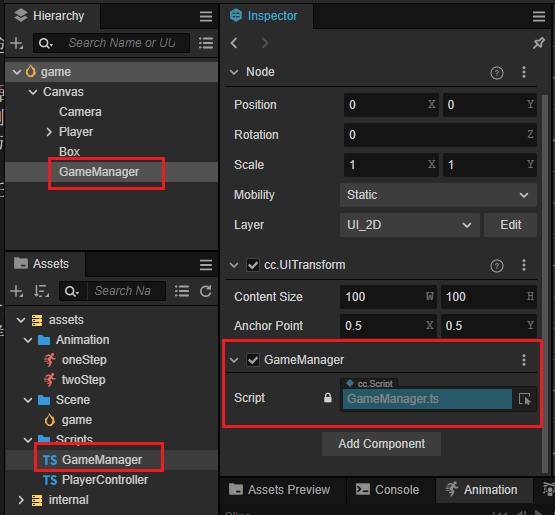
为了构建映射,我们将使用 来创建节点。Box.prefab
因此,我们需要做的第一件事是向类添加一个属性以引用 .GameManagerBox.prefab
现在,该类的内容如下:GameManager
import { _decorator, Component, Prefab } from 'cc';
const { ccclass, property } = _decorator;

@ccclass('GameManager')
export class GameManager extends Component {

    @property({type: Prefab})
    public boxPrefab: Prefab|null = null;

    start(){}

    update(dt: number): void {

    }
}
返回到 Cocos Creator,选择 GameManager 节点,然后将预制件拖到 GameManager 节点的属性上。BoxboxPrefab
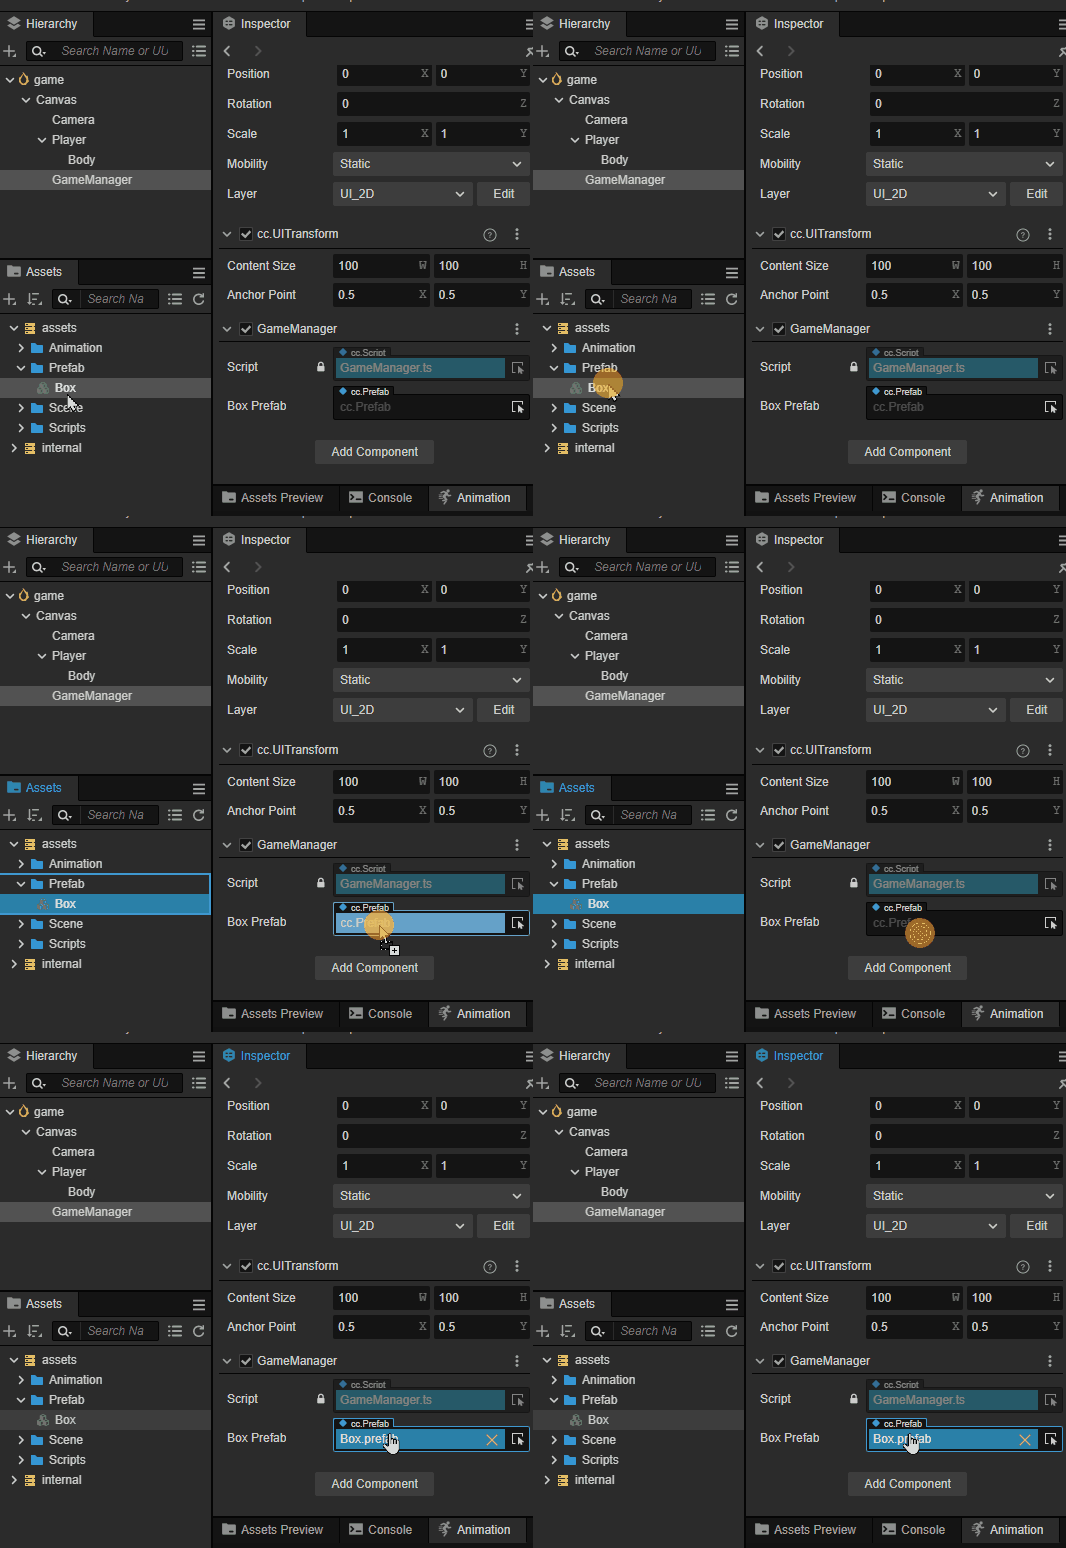
这个游戏中的地图由两种类型的块组成。两种类型的块交替形成地图。
- 无:一个空块,如果玩家踩到这种类型的块,游戏结束。
- 石头:玩家可以站在上面。
为了使代码更易于理解,我们经常使用 定义对象的类型。enum
我们定义一个名为的枚举,它有两个元素,如下所示。BlockType
enum BlockType{
    BT_NONE,
    BT_STONE,
};
在 TypeScript 中,如果枚举的第一个元素没有被赋予值,它将默认为 0。这里。BT_NONE = 0BT_STONE = 1在下面的代码中,您可以看到我们如何使用它。
我们把它放在 GameManager 类的定义之上,没有给它一个 .因此,它只能在此单个文件中使用。export
接下来,需要确定在哪里放置新块。我们添加一个名为的属性,用于记录由块组成的道路长度。roadLength
为了管理我们创建的所有类型的块,我们添加了 Array 类型的私有属性来存储生成的块类型。_road
现在,的代码如下:GameManager
import { _decorator, CCInteger, Component, Prefab } from 'cc';
const { ccclass, property } = _decorator;

enum BlockType{
    BT_NONE,
    BT_STONE,
};

@ccclass('GameManager')
export class GameManager extends Component {

    @property({type: Prefab})
    public boxPrefab: Prefab|null = null;
    @property({type: CCInteger})
    public roadLength: number = 50;
    private _road: BlockType[] = [];

    start() {

    }
}
构建地图的流程如下:
- 游戏开始时清除所有数据
- 第一个块的类型始终是防止玩家掉下来。
BlockType.BT_STONE - 类型为 的块之后的块类型应始终为 。
BlockType.BT_STONEBlockType.BT_STONE
接下来,让我们将以下方法添加到 .GameManger
生成地图的方法:
  generateRoad() {

      this.node.removeAllChildren();

      this._road = [];
      // startPos
      this._road.push(BlockType.BT_STONE);

      for (let i = 1; i < this.roadLength; i++) {
          if (this._road[i - 1] === BlockType.BT_NONE) {
              this._road.push(BlockType.BT_STONE);
          } else {
              this._road.push(Math.floor(Math.random() * 2));
          }
      }

      for (let j = 0; j < this._road.length; j++) {
          let block: Node | null = this.spawnBlockByType(this._road[j]);
          if (block) {
              this.node.addChild(block);
              block.setPosition(j * BLOCK_SIZE, 0, 0);
          }
      }
  }
Math.floor:向下舍入并返回小于或等于给定数字的最大整数。有关更多详细信息,请参阅Math.floor。:返回 [0.0,1.0] 范围内的浮点数),有关详细信息,请参阅 Math.random。Math.random
显然,代码只会产生两个整数,0 或 1,它们与枚举中的值完全对应和声明。Math.floor(Math.random() * 2)BT_NONEBT_STONEBlockType
按给定类型创建新块:
  spawnBlockByType(type: BlockType) {
      if (!this.boxPrefab) {
          return null;
      }

      let block: Node|null = null;
      switch(type) {
          case BlockType.BT_STONE:
              block = instantiate(this.boxPrefab);
              break;
      }

      return block;
  }
如果给定的类型是 ,我们从 using 方法创建一个新块。BT_STONEboxPrefabinstantiate
如果给定的类型是 ,我们什么都不做。BT_NONE
instantiate:是 Cocos Creator 提供的内置方法,用于复制现有节点并为预制件创建新实例。让我们调用以下方法:generateRoadstartGameManager
start() {
    this.generateRoad()
}
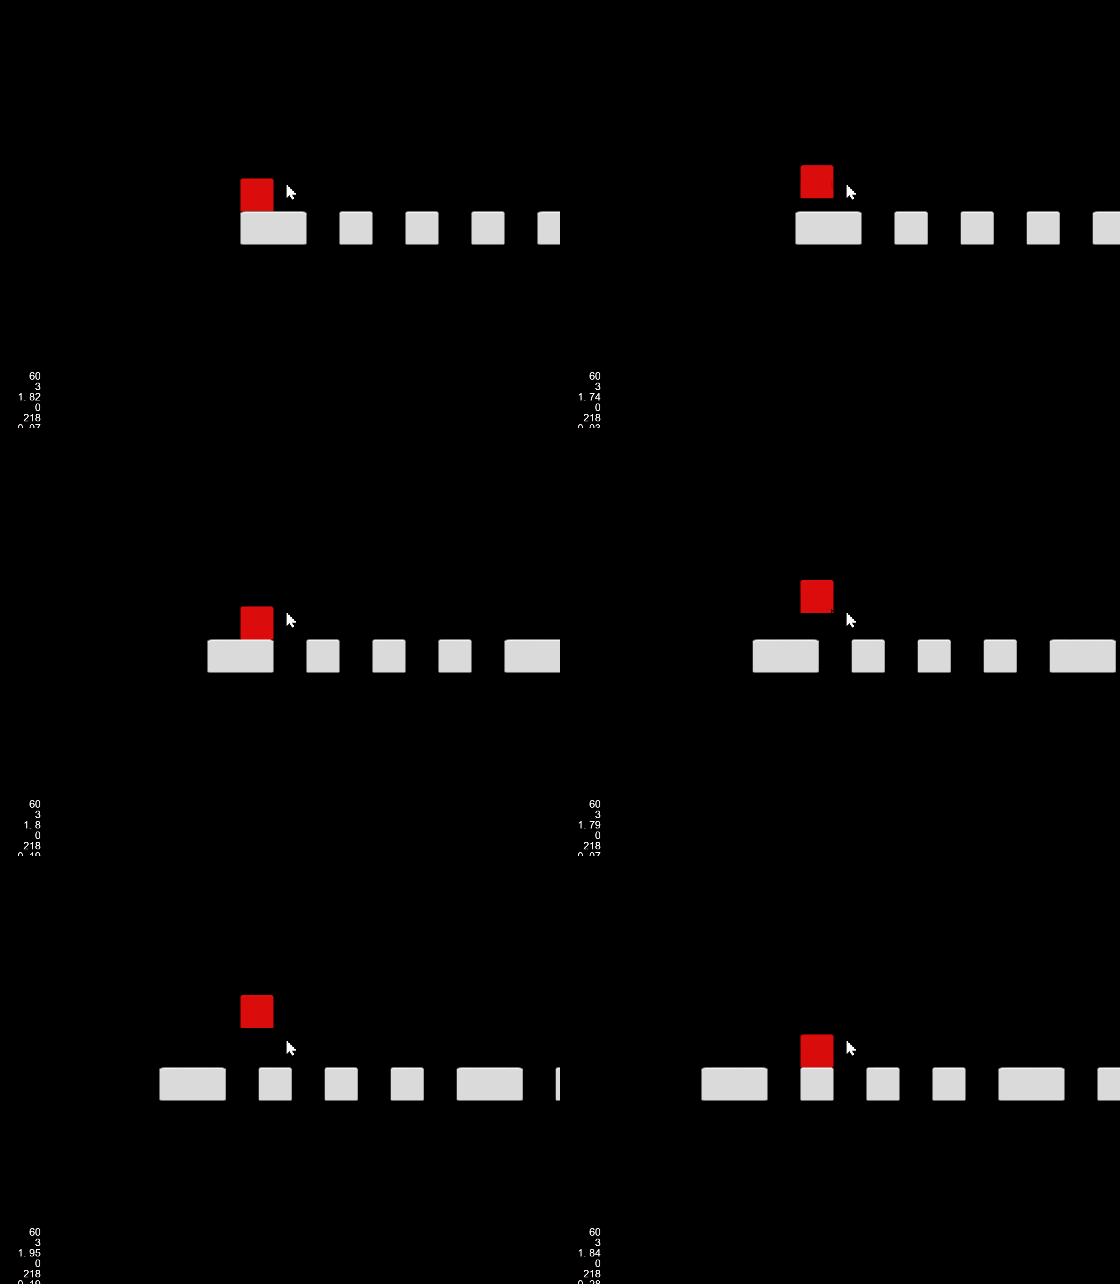
您可以在运行游戏时看到生成的地图。
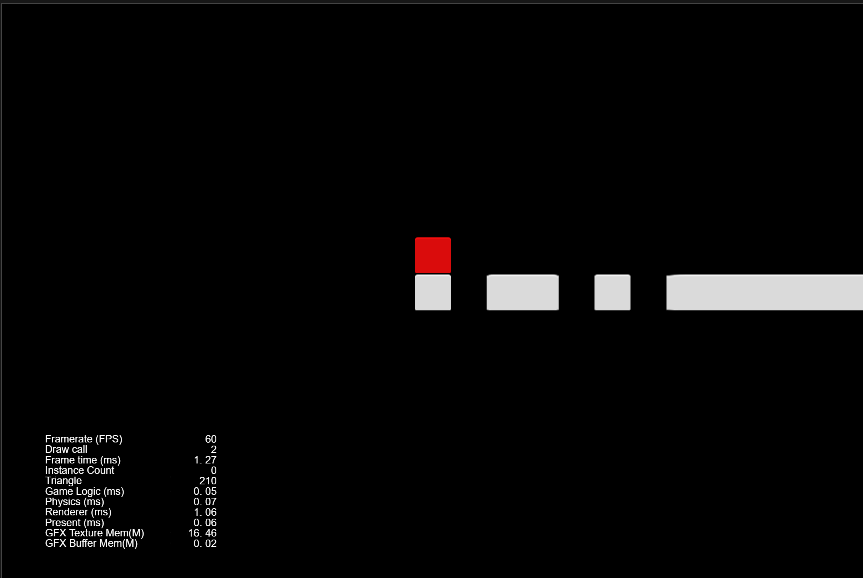
相机跟随
在有可移动玩家的游戏中,我们经常让摄像机跟随玩家。因此,您可以看到播放器移动时屏幕滚动。
在Cocos Creator中存档非常简单。只需进行以下更改。
- 选择“画布”节点,然后取消选中“检查器”面板上 cc.Canvas 组件的“画布与屏幕对齐”属性。
- 拖动“播放器”节点上的“摄像机”节点,并使其成为子节点。
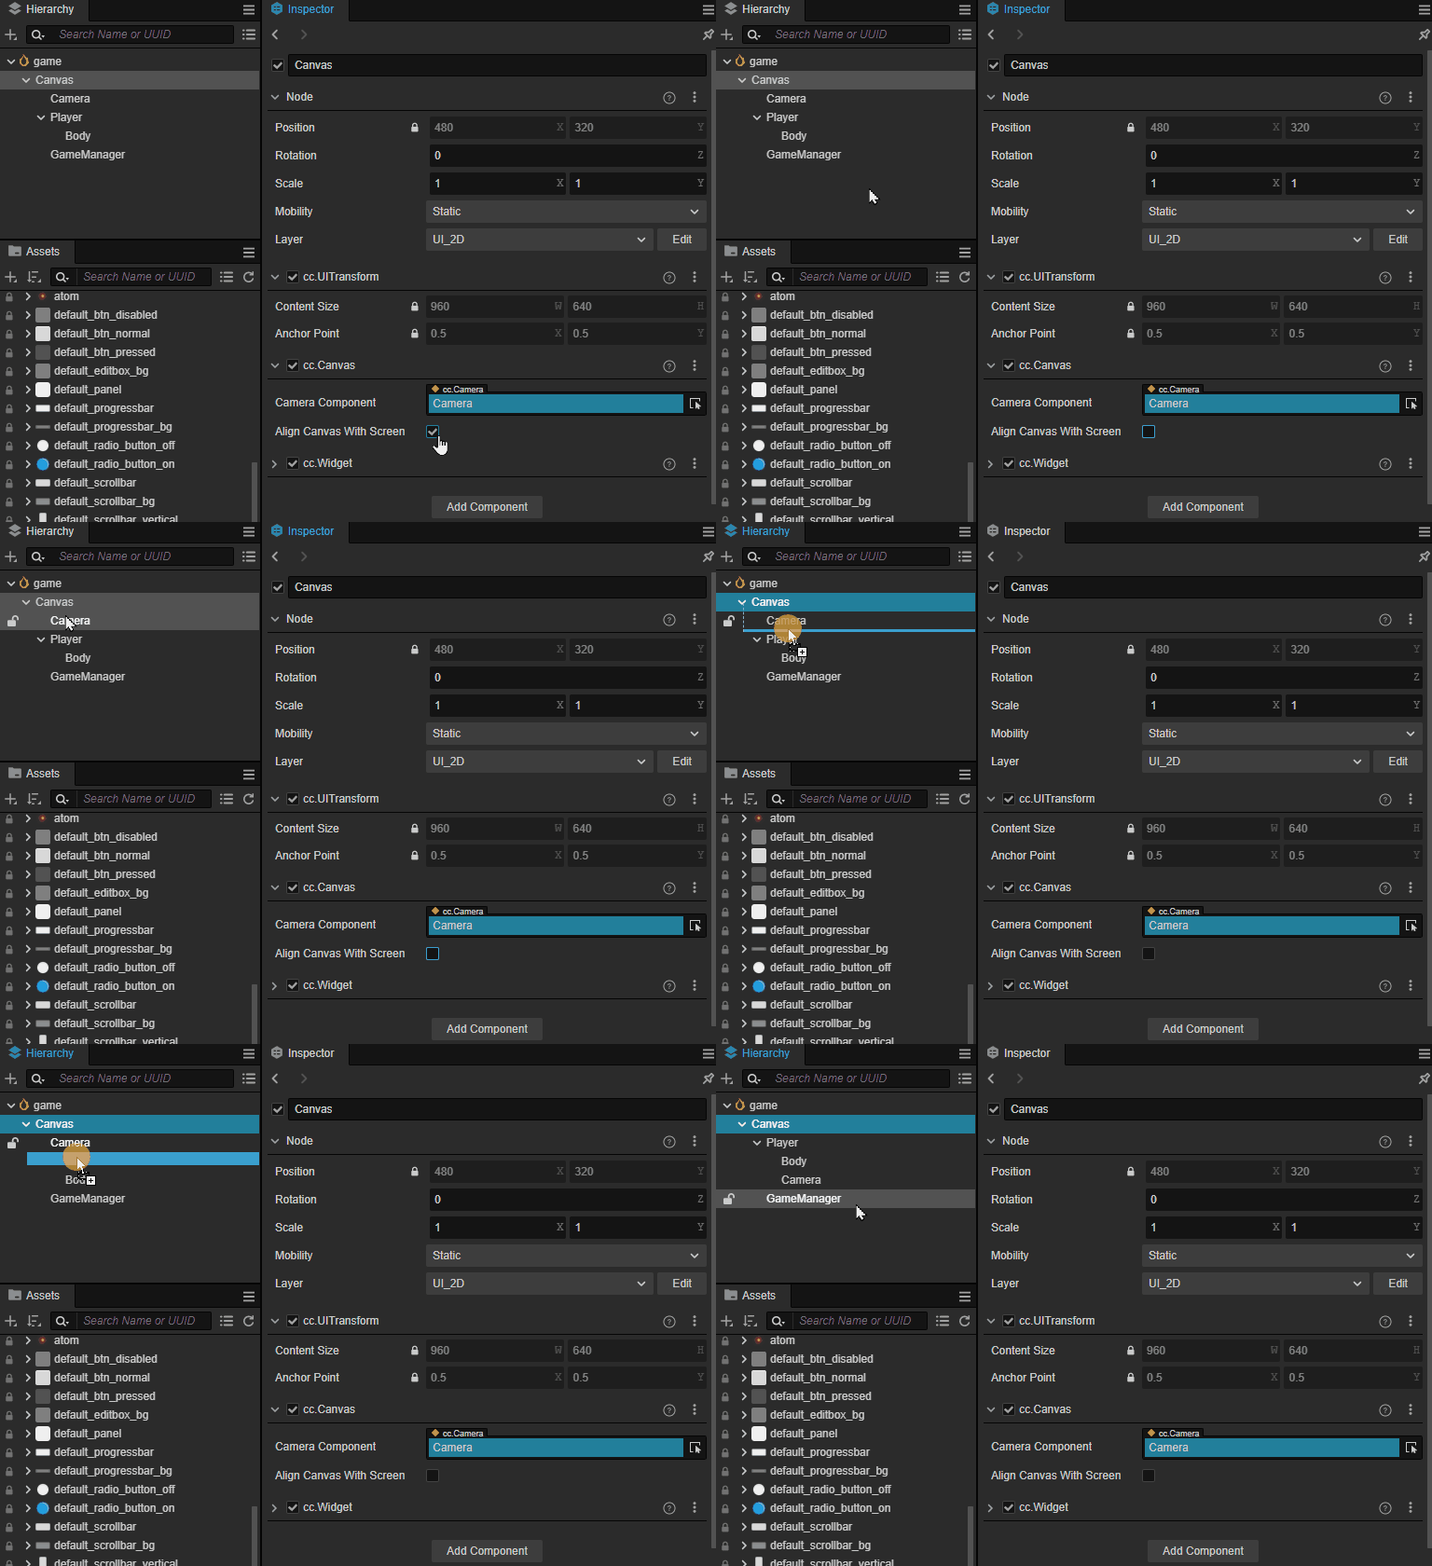
现在,运行游戏,您可以看到摄像机正在跟随玩家。
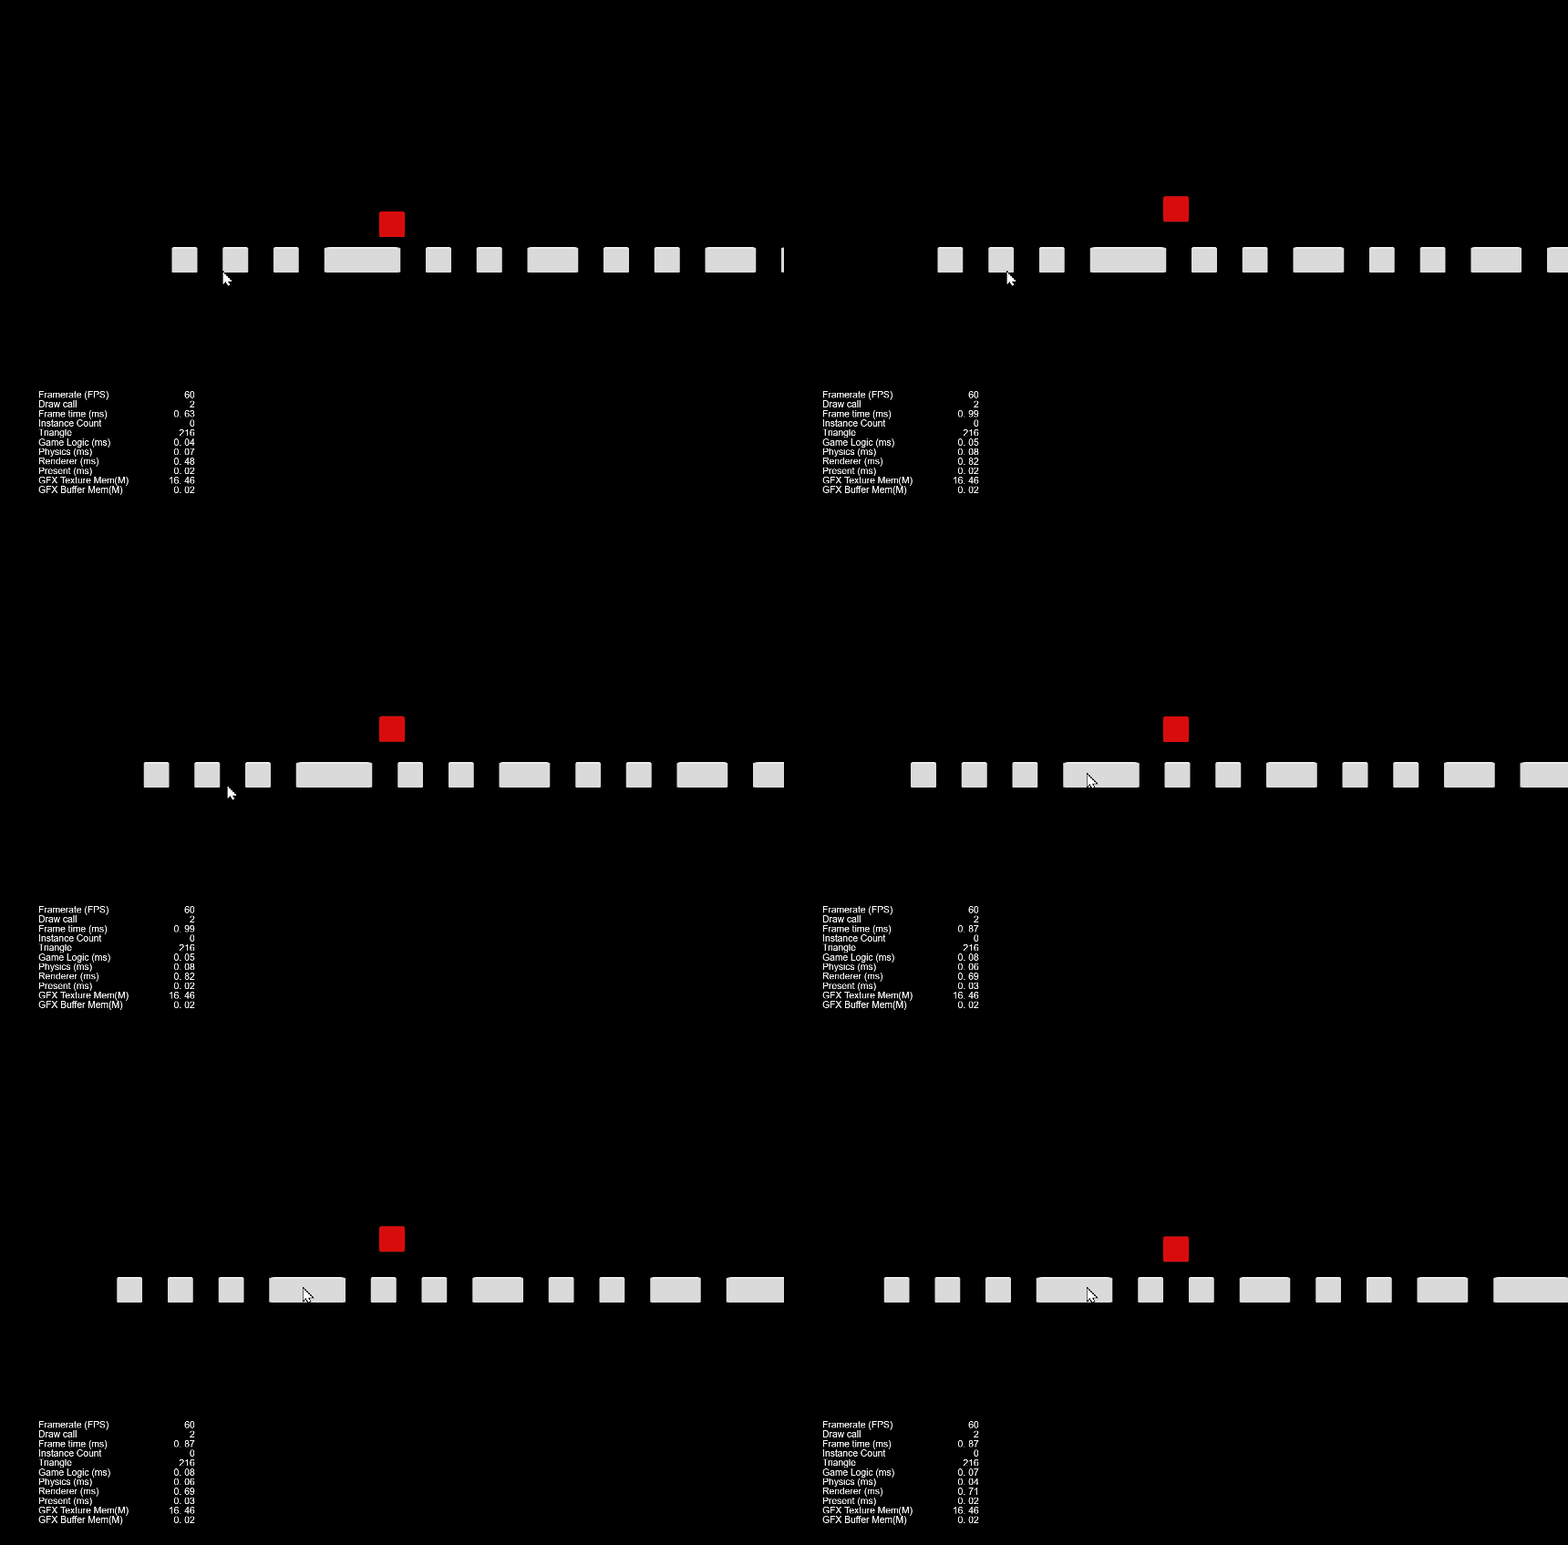
用户界面布局
UI(用户界面)是大多数游戏中非常重要的一部分。它显示有关游戏的信息,并允许用户与游戏系统进行交互。
正如我们之前提到的,在 Cocos Creator 中,所有 2D 元素都应该直接或间接地放在 Canvas 节点下,否则它们将不会渲染。
在 Cocos Creator 中,UI 是 2D 元素的特殊集合,它们是文本、按钮、切换等。
作为 2D 元素,它们还需要放在 Canvas 节点下。
众所周知,UI 元素始终固定在屏幕上,因此我们需要一个固定的摄像机来渲染它们。
在上一节中,Canvas 的摄像头已更改为跟随我们的播放器,它不再适合 UI 渲染。
因此,我们需要为 UI 创建一个新的画布。
UICanvas
在层次结构中,右舔场景根目录,然后在弹出菜单中选择“创建 -> UI 组件 -> 画布”。
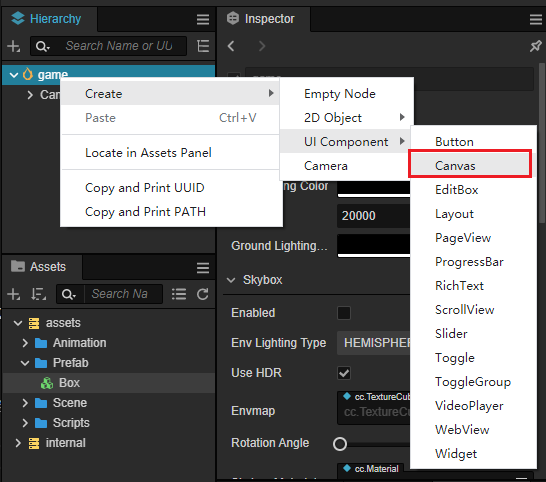
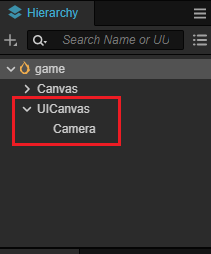
将其命名为“UICanvas”。
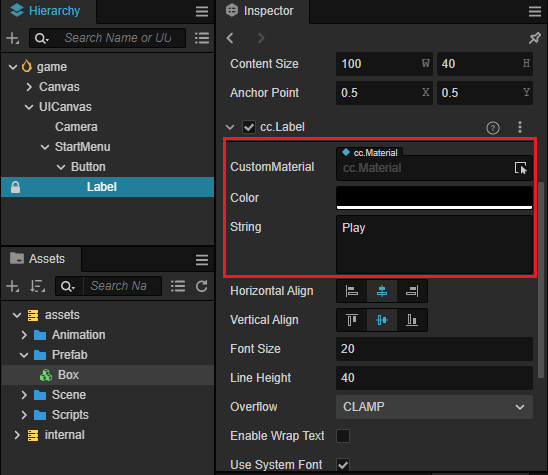
在 UICanvas 下创建一个名为 StartMenu 的空节点。
然后,在StartMenu节点下创建一个按钮节点,您可以在按钮节点下找到一个名为“标签”的节点。选择它并将字符串属性设置为“播放”。
现在,我们制作了一个“播放”按钮。
背景和文本
接下来,让我们添加一个背景和文本来告诉用户如何玩这个游戏。
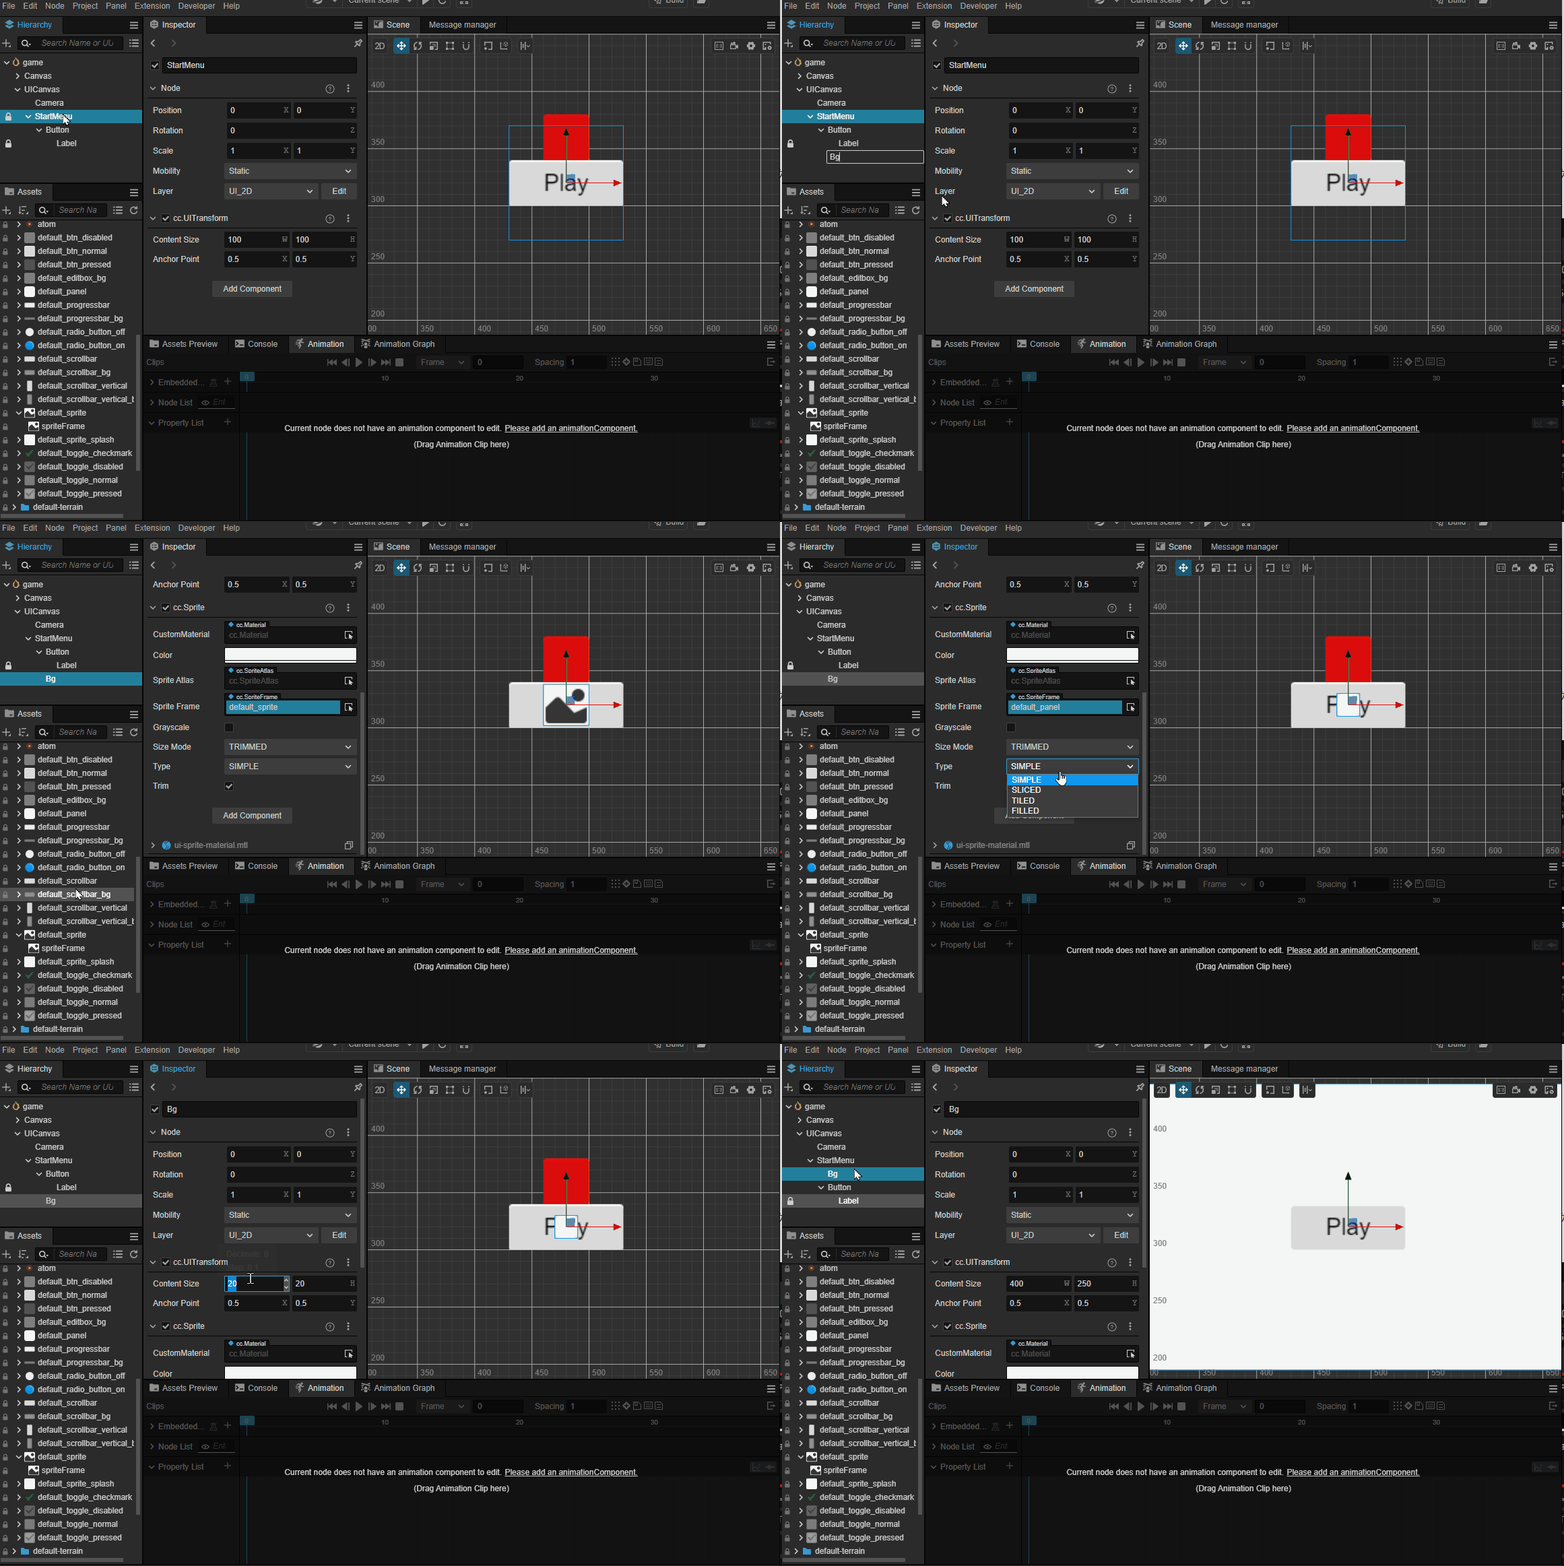
在“开始菜单”节点下创建一个精灵节点,并将其命名为“Bg”。
分配给“Bg”节点的属性。internal/default_ui/default_panelSprite Frame
将属性的值设置为 。TypeSLICED
将 of 设置为某个值(例如 400,250)。Content SizeUITransform
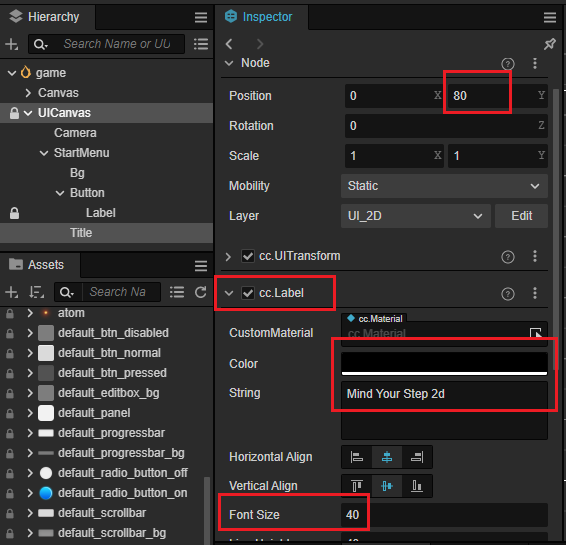
在“开始菜单”节点下创建一个名为“标题”的新标签节点,并按如下所示设置属性:
- 位置: 0,80
- cc.标签颜色:黑色
- cc.标签字符串:注意你的步骤 2D
- cc.标签字体大小:40
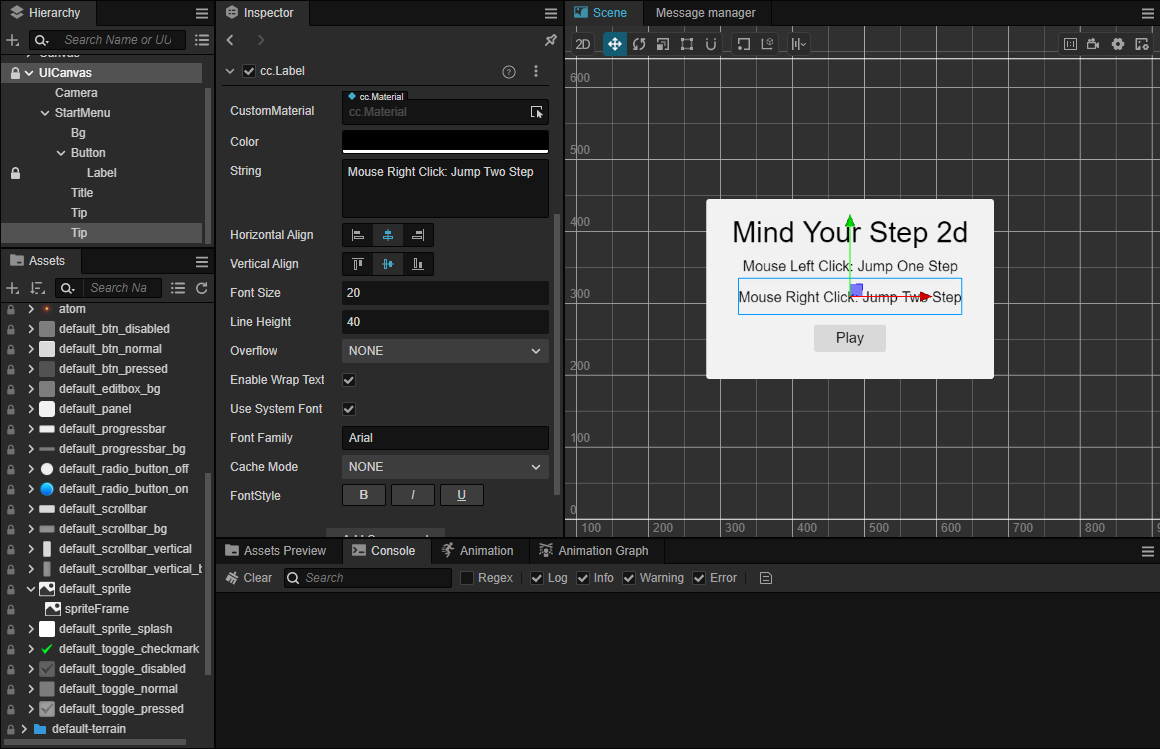
继续创建一些节点来描述游戏玩法。将它们命名为“提示”。Label
在 UICanvas 下创建一个节点,并将其命名为“步骤”,以显示玩家执行了多少步。Label

现在,我们已经完成了 UI 布局,让我们编写一些代码来完成游戏逻辑。
游戏状态
大多数游戏中有 3 个状态。
- 初始化:游戏已准备好开始
- 正在玩:游戏正在玩
- END:游戏结束,将重新启动或退出
我们可以使用枚举类型定义这些状态,如下所示:
enum GameState{
    GS_INIT,
    GS_PLAYING,
    GS_END,
};
为了更好的可读性,让我们把它放在枚举之后。BlockType
让我们向 添加一个方法,它将用于控制游戏的状态。setCurStateGameManger
代码如下。
setCurState (value: GameState) {
    switch(value) {
        case GameState.GS_INIT:
            break;
        case GameState.GS_PLAYING:
            break;
        case GameState.GS_END:
            break;
    }
}
添加一个名为初始化游戏数据的新方法。init
init() {
    //to do something
}
然后,在游戏状态设置为 .setCurStateGameState.GS_INIT
setCurState (value: GameState) {
    switch(value) {
        case GameState.GS_INIT:
            this.init();
            break;
        case GameState.GS_PLAYING:
            break;
        case GameState.GS_END:
            break;
    }
}
按照设计,播放器只能在游戏运行时由用户控制。
因此,我们对 中的输入事件侦听器进行了一个小的更改。PlayerController
输入事件不再侦听方法,而是创建一个名为处理它的新方法。该方法将在需要时调用。startsetInputActivesetInputActive
start () {

}

setInputActive(active: boolean) {
    if (active) {
        input.on(Input.EventType.MOUSE_UP, this.onMouseUp, this);
    } else {
        input.off(Input.EventType.MOUSE_UP, this.onMouseUp, this);
    }
}
在这里,的代码是这样的:GameManager
import { _decorator, CCInteger, Component, instantiate, Node, Prefab } from 'cc';
import { BLOCK_SIZE, PlayerController } from './PlayerController';
const { ccclass, property } = _decorator;

enum BlockType{
    BT_NONE,
    BT_STONE,
};

enum GameState{
    GS_INIT,
    GS_PLAYING,
    GS_END,
};

@ccclass('GameManager')
export class GameManager extends Component {

    @property({type: Prefab})
    public boxPrefab: Prefab|null = null;
    @property({type: CCInteger})
    public roadLength: number = 50;
    private _road: BlockType[] = [];

    start() {
    }

    init() {
    }

    setCurState (value: GameState) {
        switch(value) {
            case GameState.GS_INIT:
                this.init();
                break;
            case GameState.GS_PLAYING:

                break;
            case GameState.GS_END:
                break;
        }
    }

    generateRoad() {

        this.node.removeAllChildren();

        this._road = [];
        // startPos
        this._road.push(BlockType.BT_STONE);

        for (let i = 1; i < this.roadLength; i++) {
            if (this._road[i - 1] === BlockType.BT_NONE) {
                this._road.push(BlockType.BT_STONE);
            } else {
                this._road.push(Math.floor(Math.random() * 2));
            }
        }

        for (let j = 0; j < this._road.length; j++) {
            let block: Node | null = this.spawnBlockByType(this._road[j]);
            if (block) {
                this.node.addChild(block);
                block.setPosition(j * BLOCK_SIZE, 0, 0);
            }
        }
    }

    spawnBlockByType(type: BlockType) {
        if (!this.boxPrefab) {
            return null;
        }

        let block: Node|null = null;
        switch(type) {
            case BlockType.BT_STONE:
                block = instantiate(this.boxPrefab);
                break;
        }

        return block;
    }
}
接下来,让我们添加逻辑代码。
游戏开始
这不是一个国家,但我们必须从这里开始。当游戏启动时,将调用的方法。startGameManager
我们在这里调用以初始化游戏。setCurState
    start(){
        this.setCurState(GameState.GS_INIT);
    }
GS_INIT
在这种游戏状态下,我们应该初始化地图,重置玩家的位置,显示游戏UI等。
因此,我们需要将所需的属性添加到“游戏管理器”。
// References to the startMenu node.
@property({ type: Node })
public startMenu: Node | null = null;

//references to player
@property({ type: PlayerController })
public playerCtrl: PlayerController | null = null;

//references to UICanvas/Steps node.
@property({type: Label})
public stepsLabel: Label|null = null;
在该方法中,我们添加代码行,如下所示:init
init() {
    //show the start menu
    if (this.startMenu) {
        this.startMenu.active = true;
    }

    //generate the map
    this.generateRoad();


    if (this.playerCtrl) {

        //disable input
        this.playerCtrl.setInputActive(false);

        //reset player data.
        this.playerCtrl.node.setPosition(Vec3.ZERO);
        this.playerCtrl.reset();
    }
}
处理按钮单击事件
接下来,让我们实现当用户单击 UI 上的“播放”按钮时,游戏开始播放。
为类添加一个名为的新方法,该方法用于处理“开始菜单”节点上“播放”按钮的单击事件。onStartButtonClickedGameManager
在 中,我们只需调用即可将游戏状态设置为 。onStartButtonClickedsetCurStateGameState.GS_PLAYING
onStartButtonClicked() {
    this.setCurState(GameState.GS_PLAYING);
}
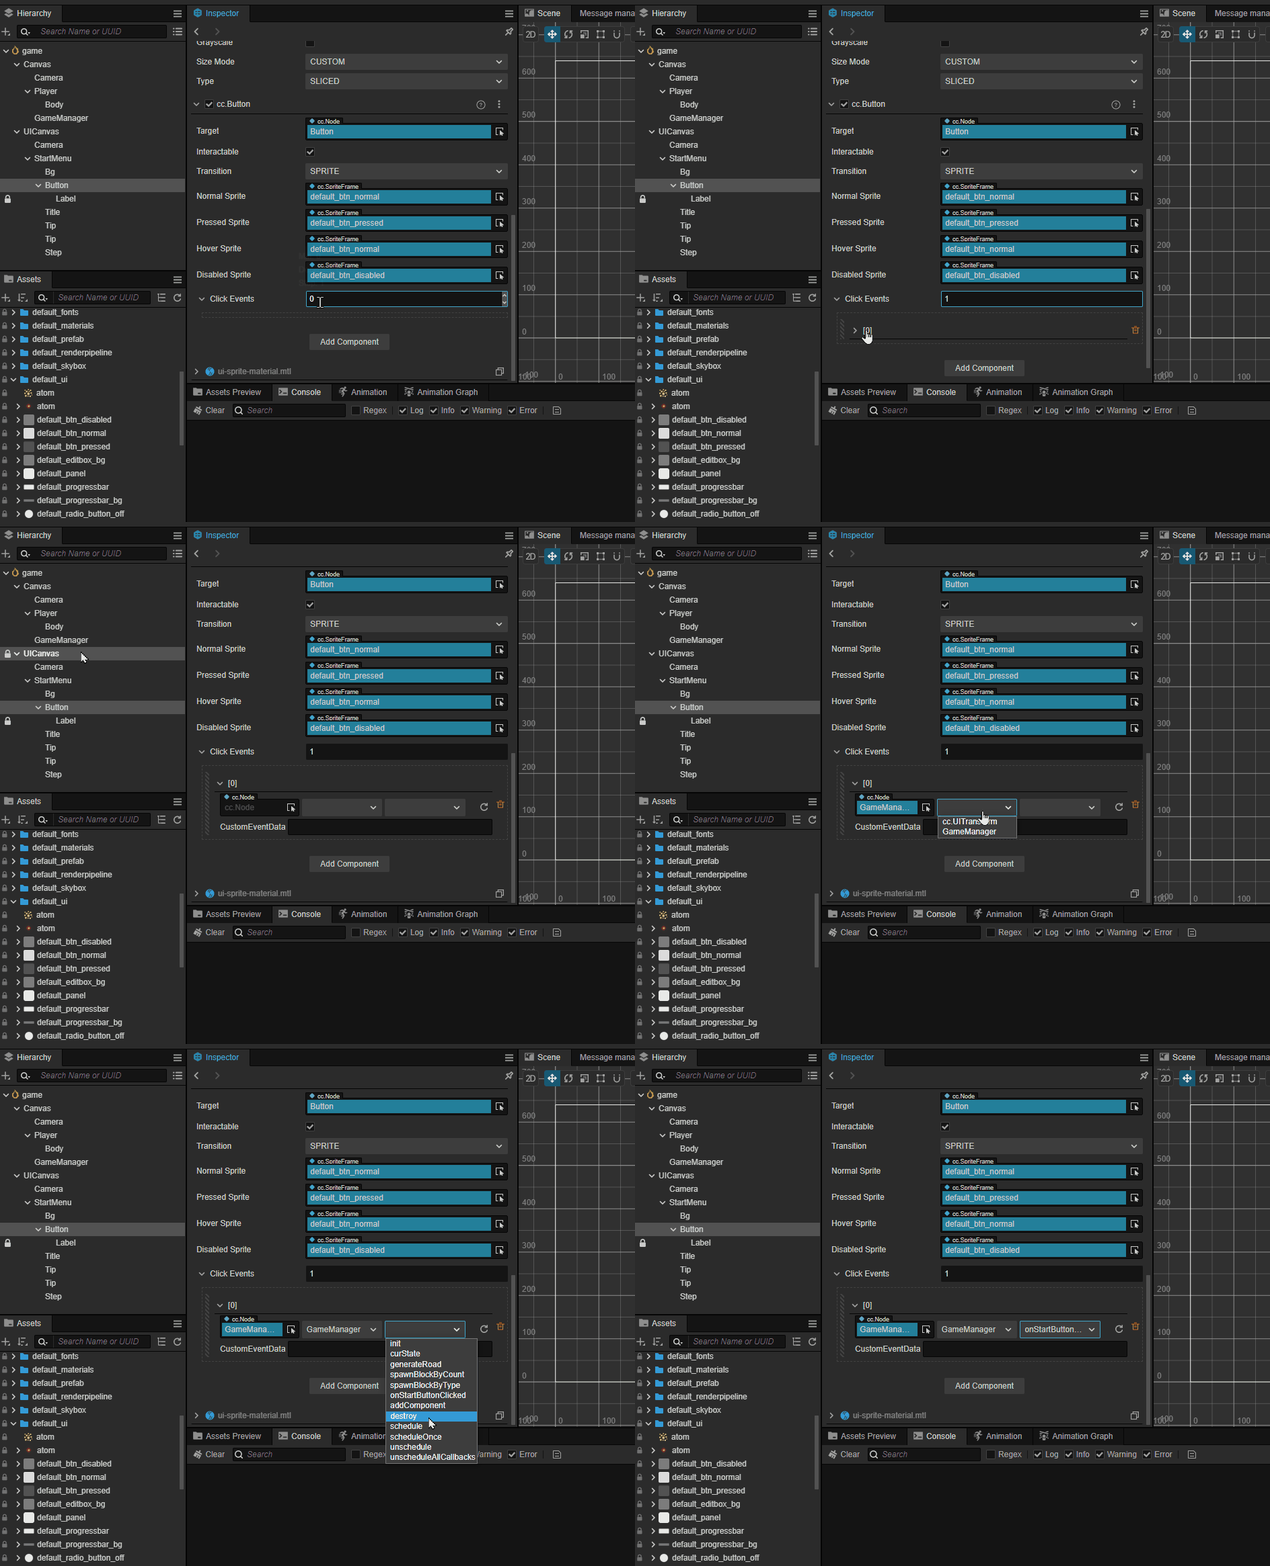
返回到 Cocos Creator,然后选择节点。UICanvas/StartMenu/Button
在“检查器”面板上,在属性后面的输入框中键入内容。1Click Events
然后将节点拖动到第一个槽,选择第二个槽,然后选择第三个槽。GameManagerGameManageronStartButtonClicked
GS_PLAYING
用户单击“开始”按钮后,游戏将进入此状态。我们需要:
- 隐藏“开始”菜单
- 重置步数
- 启用用户输入
方法中的相关代码如下:setCurState
setCurState(value: GameState) {
    switch (value) {
        //...
        case GameState.GS_PLAYING:
            if (this.startMenu) {
                this.startMenu.active = false;
            }

            //reset steps counter to 0
            if (this.stepsLabel) {
                this.stepsLabel.string = '0';
            }

            //enable user input after 0.1 second.
            setTimeout(() => {
                if (this.playerCtrl) {
                    this.playerCtrl.setInputActive(true);
                }
            }, 0.1);
            break;
        //...
    }
}
GS_END
我们现在什么都不做。您可以添加任何您想要使游戏完美的内容。
绑定属性
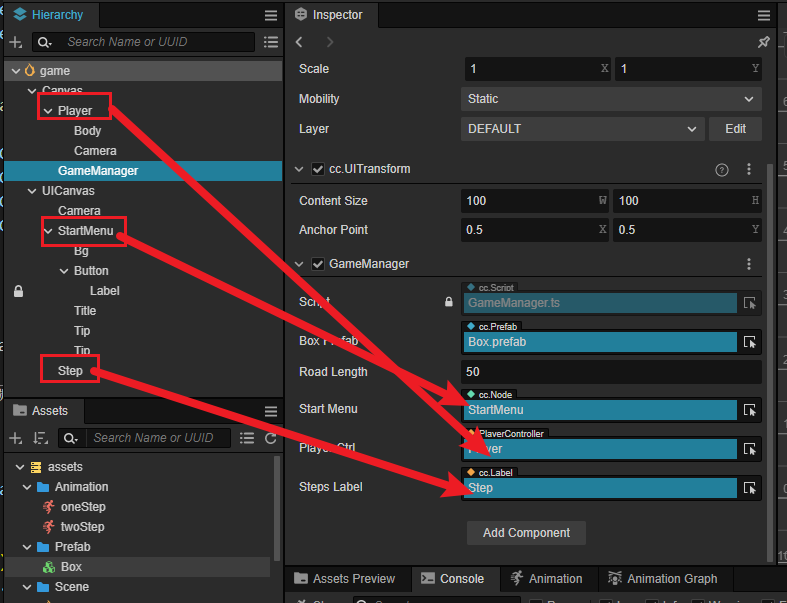
返回到 Cocos Creator,并将相应的节点拖到 的每个属性中。GameManager
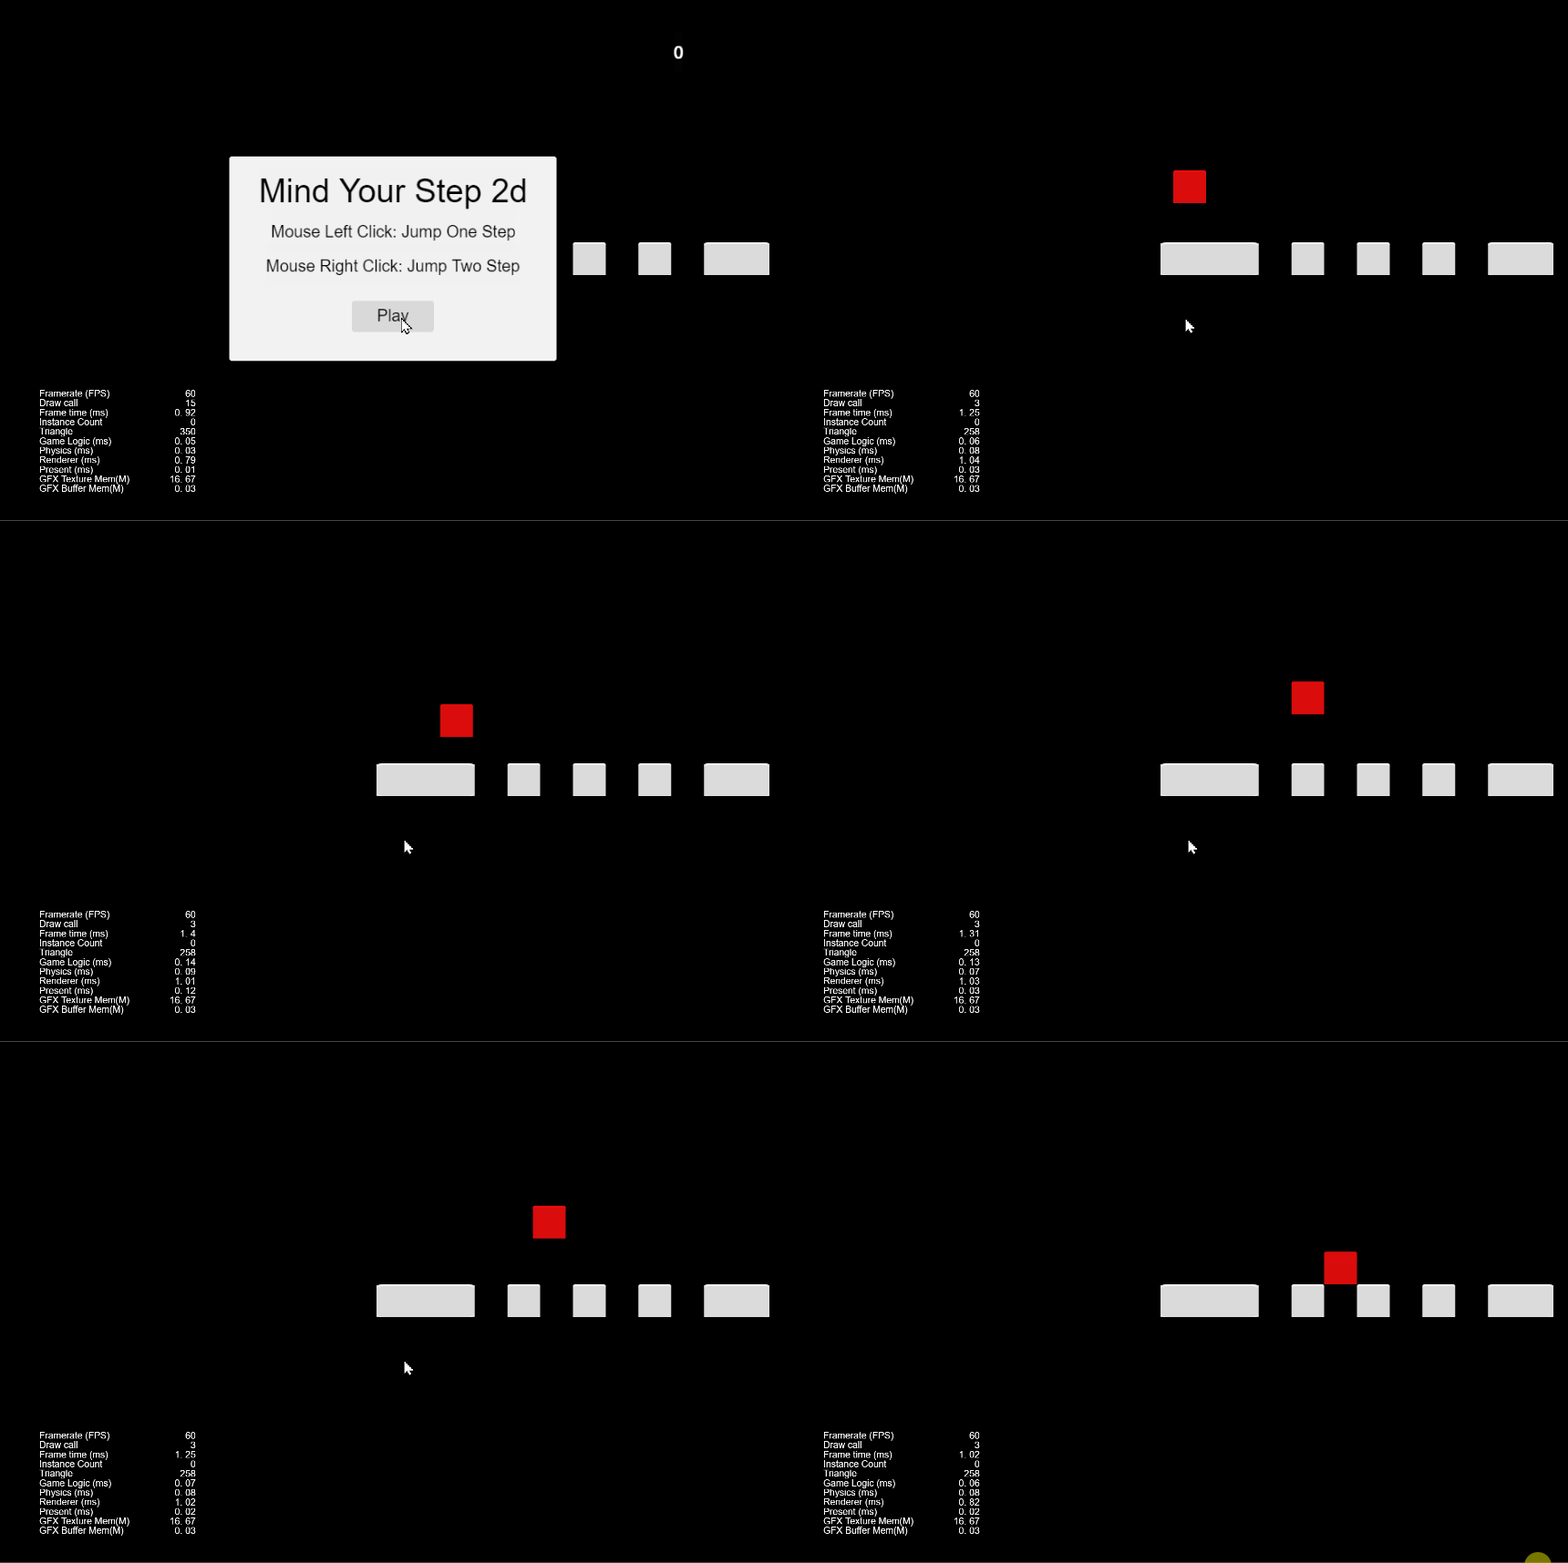
看!我们现在可以玩了。
游戏结束
接下来,让我们处理玩家踩到空块的情况。
手柄跳端
添加一个名为 的新属性 ,用于记录玩家走了多少步。_curMoveIndexPlayerController
private _curMoveIndex: number = 0;
在方法中将其设置为 0。reset
reset() {
    this._curMoveIndex = 0;
}
在该方法中,将其增加 。jumpByStepstep
jumpByStep(step: number) {
    if (this._startJump) {
        return;
    }
    this._startJump = true;
    this._jumpStep = step;
    this._curJumpTime = 0;
    this._curJumpSpeed = this._jumpStep * BLOCK_SIZE/ this._jumpTime;
    this.getPosition(this._curPos);
    Vec3.add(this._targetPos, this._curPos, new Vec3(this._jumpStep* BLOCK_SIZE, 0, 0));

    if (this.BodyAnim) {
        if (step === 1) {
            this.BodyAnim.play('oneStep');
        } else if (step === 2) {
            this.BodyAnim.play('twoStep');
        }
    }

    this._curMoveIndex += step;
}
添加到以发出“JumpEnd”事件并作为参数传入。onOnceJumpEndPlayerController_curMoveIndex
onOnceJumpEnd() {
    this.node.emit('JumpEnd', this._curMoveIndex);
}
跳转动作结束时调用 。onOnceJumpEndupdatePlayerController
update (deltaTime: number) {
    if (this._startJump) {
        this._curJumpTime += deltaTime;
        if (this._curJumpTime > this._jumpTime) {
            // end
            this.node.setPosition(this._targetPos);
            this._startJump = false;
            this.onOnceJumpEnd();
        } else {
            // tween
            this.node.getPosition(this._curPos);
            this._deltaPos.x = this._curJumpSpeed * deltaTime;
            Vec3.add(this._curPos, this._curPos, this._deltaPos);
            this.node.setPosition(this._curPos);
        }
    }
}
返回到并添加以下代码。GameManager
添加用于处理跳转结束事件的方法。onPlayerJumpEnd
  onPlayerJumpEnd(moveIndex: number) {

  }
侦听方法中的“JumpEnd”事件。start
  start() {
      this.setCurState(GameState.GS_INIT);
      this.playerCtrl?.node.on('JumpEnd', this.onPlayerJumpEnd, this);
  }
在 Cocos Creator 中,通过节点调度的事件只能通过使用其 .emiton添加以检查玩家踩到的块的类型。checkResult
  checkResult(moveIndex: number) {
      if (moveIndex < this.roadLength) {
          if (this._road[moveIndex] == BlockType.BT_NONE) {   //steps on empty block, reset to init.
              this.setCurState(GameState.GS_INIT);
          }
      } else {    //out of map, reset to init.
          this.setCurState(GameState.GS_INIT);
      }
  }
完成方法。onPlayerJumpEnd
  onPlayerJumpEnd(moveIndex: number) {
      //update steps label.
      if (this.stepsLabel) {
          this.stepsLabel.string = '' + (moveIndex >= this.roadLength ? this.roadLength : moveIndex);
      }
      this.checkResult(moveIndex);
  }
图层和可见性
玩游戏时,您可能会注意到重叠的图形,这是因为两个相机(画布/相机,UICanvas/相机)都在渲染所有对象。
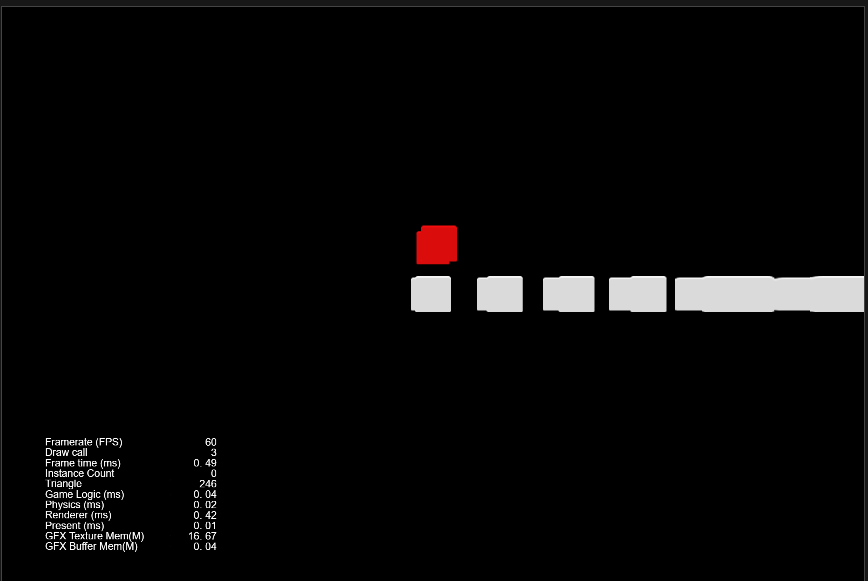
在 Cocos Creator 中,一个节点只能放在其中一个图层中,摄像机可以选择自行渲染哪些图层。
为了解决这个问题,我们需要分配图层的角色和摄像机的可见性。
在这个游戏中,我们有两种类型的对象。
- 场景对象:玩家、方块
- UI 对象:窗口、按钮、标签
因此,我们只需要将所有场景对象分层,并将所有 UI 对象分层。DEFAULTUI_2D
然后,我们需要稍微改变一下摄像机的可见性,让只渲染图层中的对象,只渲染图层中的对象,一切都会好起来的。Canvas/CameraDEFAULTUICanvas/CameraUI_2D
很清楚,现在,让我们去做吧。
违约
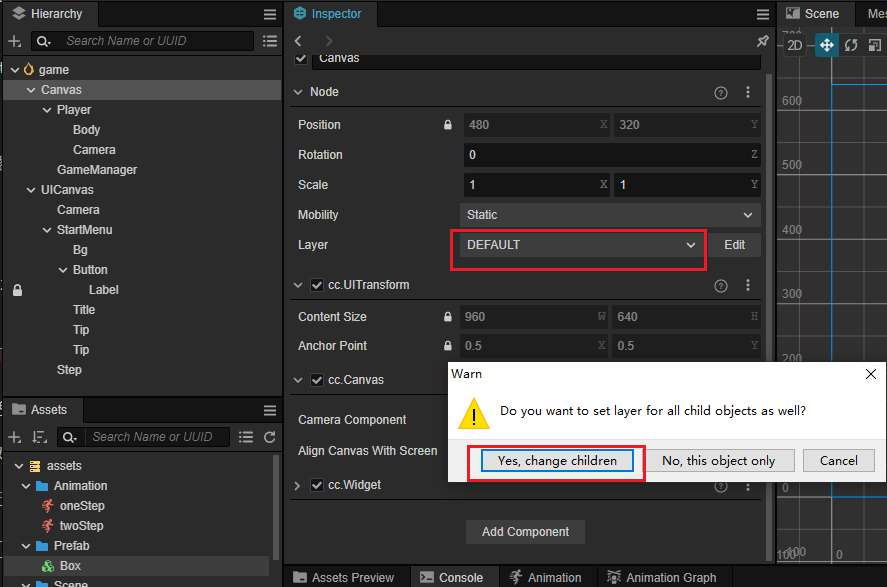
将画布图层及其所有子层设置为 :DEFAULT
将 的图层设置为 :Box.prefabDEFAULT
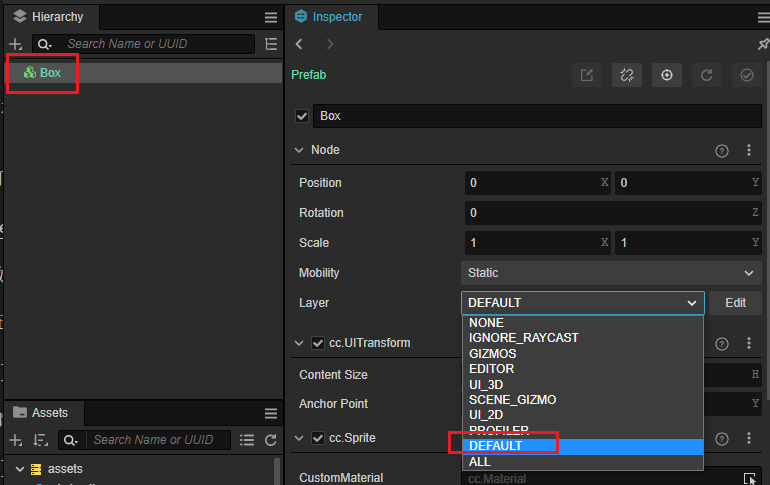
双击预制件文件上的鼠标左键进入预制件编辑模式,完成修改后不要忘记点击“保存”按钮。

设置可见性,如下所示:Canvas/Player/Camera
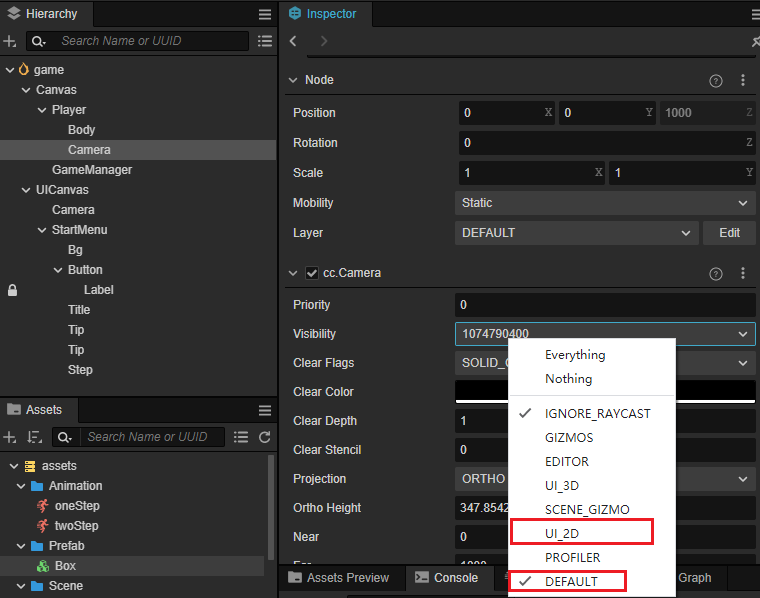
UI_2D
设置可见性,如下所示:UICanvas/Camera
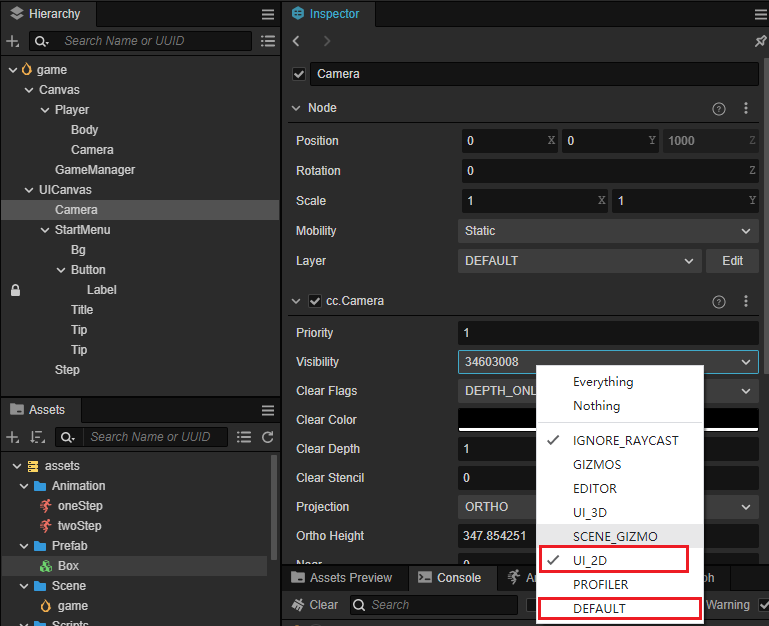
由于 2D 节点的默认图层是 ,因此我们不需要在 下设置节点的图层。UI_2DUICanvas
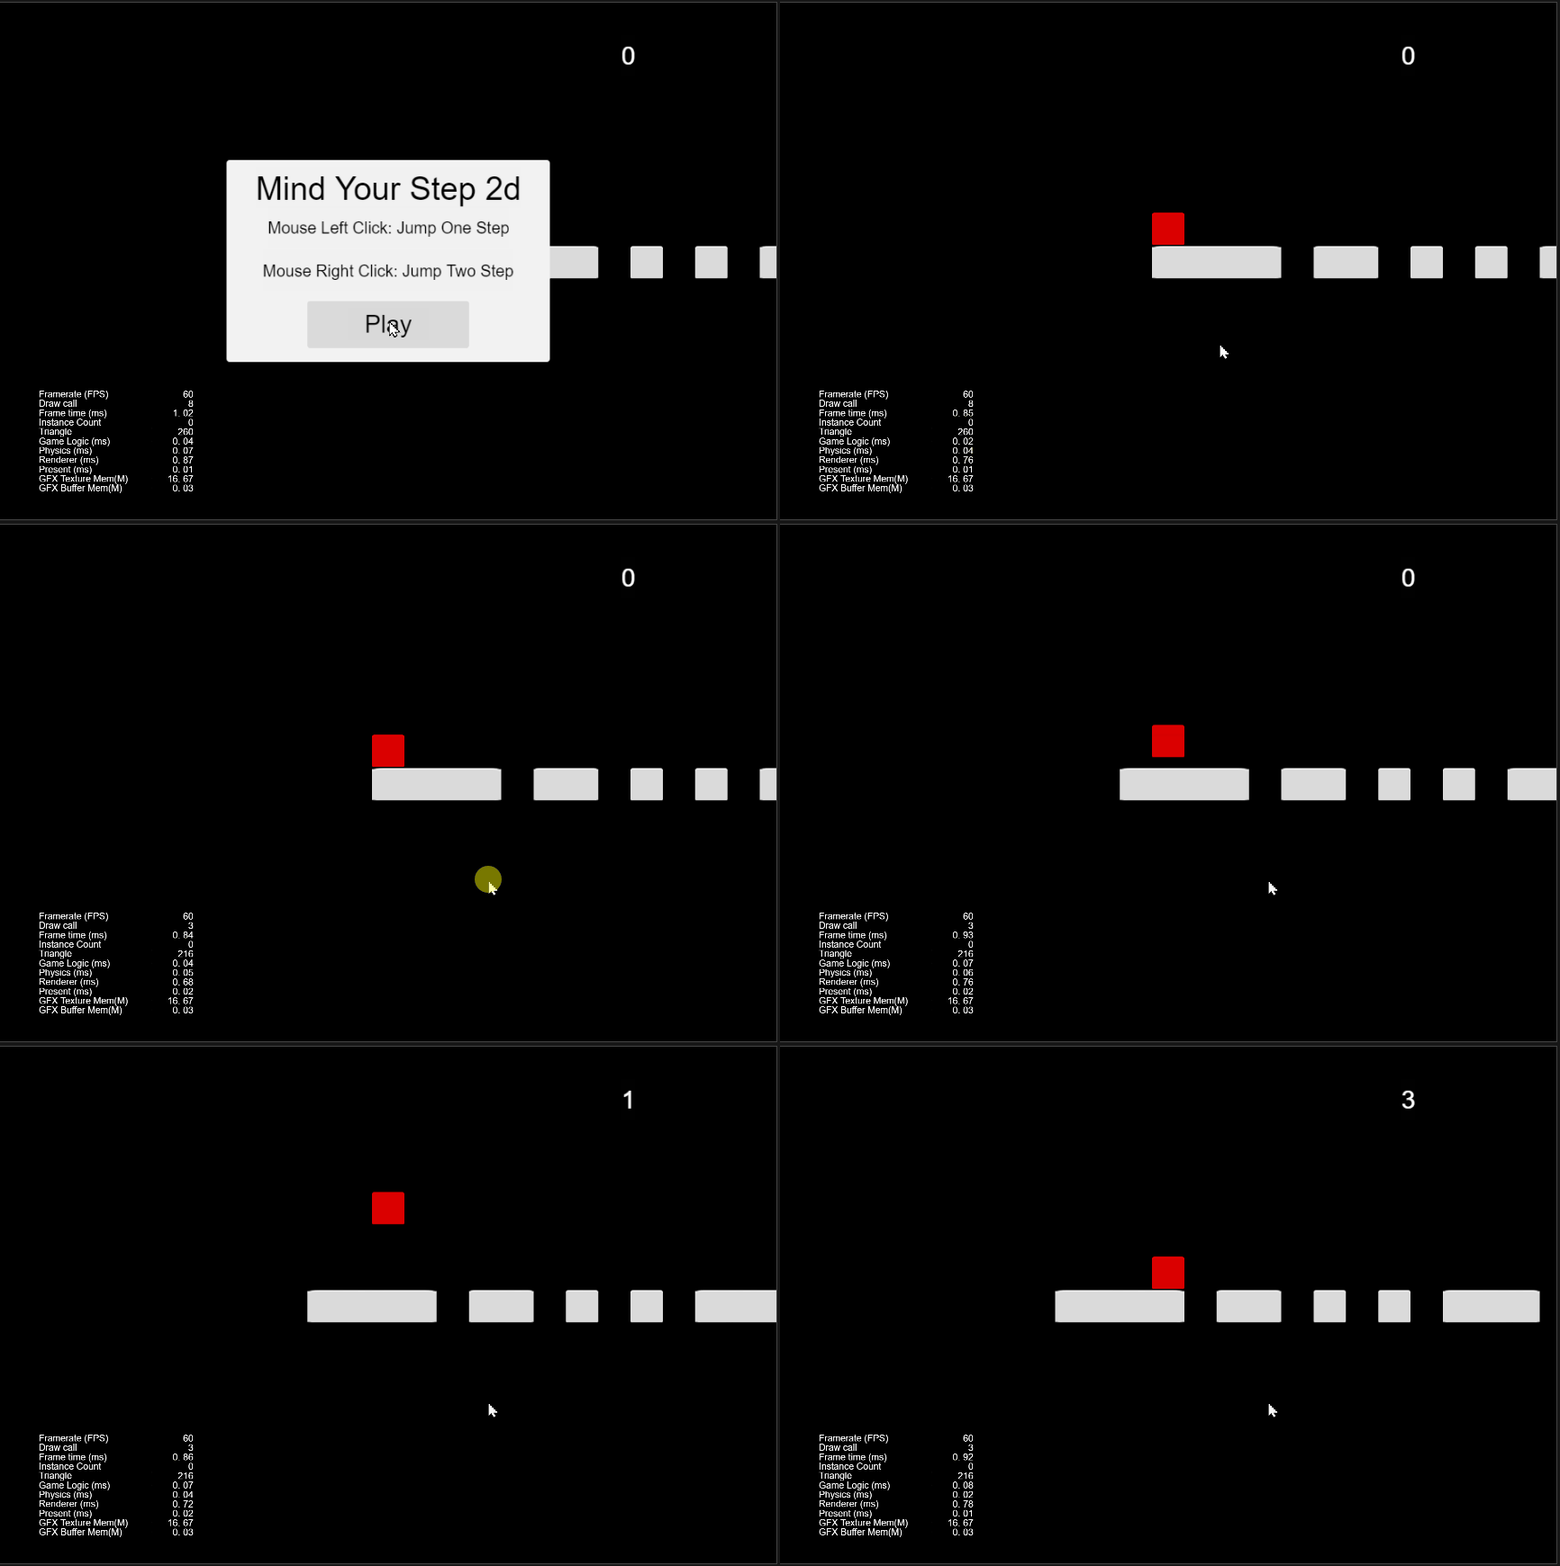
再次玩游戏,现在一切都好了。
总结
到这里,我们来到本教程的结尾,希望对您有所帮助。
以后可以基于这款游戏添加更多的玩法和功能,比如用动画角色替换玩家,添加漂亮的背景图片,添加有节奏的背景音乐和声音等。
如果您有任何疑问,请参阅获取帮助和支持。
完整源代码
PlayerController.ts:
import { _decorator, Component, Vec3, EventMouse, input, Input, Animation } from "cc";
const { ccclass, property } = _decorator;

export const BLOCK_SIZE = 40;

@ccclass("PlayerController")
export class PlayerController extends Component {

    @property(Animation)
    BodyAnim:Animation = null;

    private _startJump: boolean = false;
    private _jumpStep: number = 0;
    private _curJumpTime: number = 0;
    private _jumpTime: number = 0.1;
    private _curJumpSpeed: number = 0;
    private _curPos: Vec3 = new Vec3();
    private _deltaPos: Vec3 = new Vec3(0, 0, 0);
    private _targetPos: Vec3 = new Vec3();
    private _curMoveIndex: number = 0;
    start () {
        //input.on(Input.EventType.MOUSE_UP, this.onMouseUp, this);
    }

    setInputActive(active: boolean) {
        if (active) {
            input.on(Input.EventType.MOUSE_UP, this.onMouseUp, this);
        } else {
            input.off(Input.EventType.MOUSE_UP, this.onMouseUp, this);
        }
    }

    reset() {
        this._curMoveIndex = 0;
    }

    onMouseUp(event: EventMouse) {
        if (event.getButton() === 0) {
            this.jumpByStep(1);
        } else if (event.getButton() === 2) {
            this.jumpByStep(2);
        }

    }

    jumpByStep(step: number) {
        if (this._startJump) {
            return;
        }
        this._startJump = true;
        this._jumpStep = step;
        this._curJumpTime = 0;

        // get jump time from animation duration.
        const clipName = step == 1? 'oneStep' : 'twoStep';
        const state =  this.BodyAnim.getState(clipName);
        this._jumpTime = state.duration;


        this._curJumpSpeed = this._jumpStep * BLOCK_SIZE/ this._jumpTime;
        this.node.getPosition(this._curPos);
        Vec3.add(this._targetPos, this._curPos, new Vec3(this._jumpStep* BLOCK_SIZE, 0, 0));

        if (this.BodyAnim) {
            if (step === 1) {
                this.BodyAnim.play('oneStep');
            } else if (step === 2) {
                this.BodyAnim.play('twoStep');
            }
        }

        this._curMoveIndex += step;
    }


    onOnceJumpEnd() {
        this.node.emit('JumpEnd', this._curMoveIndex);
    }

    update (deltaTime: number) {
        if (this._startJump) {
            this._curJumpTime += deltaTime;
            if (this._curJumpTime > this._jumpTime) {
                // end
                this.node.setPosition(this._targetPos);
                this._startJump = false;
                this.onOnceJumpEnd();
            } else {
                // tween
                this.node.getPosition(this._curPos);
                this._deltaPos.x = this._curJumpSpeed * deltaTime;
                Vec3.add(this._curPos, this._curPos, this._deltaPos);
                this.node.setPosition(this._curPos);
            }
        }
    }
}
游戏管理器:
import { _decorator, CCInteger, Component, instantiate, Label, Node, Prefab, Vec3 } from 'cc';
import { BLOCK_SIZE, PlayerController } from './PlayerController';
const { ccclass, property } = _decorator;

enum BlockType {
    BT_NONE,
    BT_STONE,
};

enum GameState {
    GS_INIT,
    GS_PLAYING,
    GS_END,
};

@ccclass('GameManager')
export class GameManager extends Component {

    @property({ type: Prefab })
    public boxPrefab: Prefab | null = null;
    @property({ type: CCInteger })
    public roadLength: number = 50;
    private _road: BlockType[] = [];

    @property({ type: Node })
    public startMenu: Node | null = null;
    @property({ type: PlayerController })
    public playerCtrl: PlayerController | null = null;
    @property({type: Label})
    public stepsLabel: Label|null = null;

    start() {
        this.setCurState(GameState.GS_INIT);
        this.playerCtrl?.node.on('JumpEnd', this.onPlayerJumpEnd, this);
    }

    init() {
        if (this.startMenu) {
            this.startMenu.active = true;
        }

        this.generateRoad();

        if (this.playerCtrl) {
            this.playerCtrl.setInputActive(false);
            this.playerCtrl.node.setPosition(Vec3.ZERO);
            this.playerCtrl.reset();
        }
    }

    setCurState(value: GameState) {
        switch (value) {
            case GameState.GS_INIT:
                this.init();
                break;
            case GameState.GS_PLAYING:
                if (this.startMenu) {
                    this.startMenu.active = false;
                }

                if (this.stepsLabel) {
                    this.stepsLabel.string = '0';
                }

                setTimeout(() => {
                    if (this.playerCtrl) {
                        this.playerCtrl.setInputActive(true);
                    }
                }, 0.1);
                break;
            case GameState.GS_END:
                break;
        }
    }

    generateRoad() {

        this.node.removeAllChildren();

        this._road = [];
        // startPos
        this._road.push(BlockType.BT_STONE);

        for (let i = 1; i < this.roadLength; i++) {
            if (this._road[i - 1] === BlockType.BT_NONE) {
                this._road.push(BlockType.BT_STONE);
            } else {
                this._road.push(Math.floor(Math.random() * 2));
            }
        }

        for (let j = 0; j < this._road.length; j++) {
            let block: Node | null = this.spawnBlockByType(this._road[j]);
            if (block) {
                this.node.addChild(block);
                block.setPosition(j * BLOCK_SIZE, 0, 0);
            }
        }
    }

    spawnBlockByType(type: BlockType) {
        if (!this.boxPrefab) {
            return null;
        }

        let block: Node | null = null;
        switch (type) {
            case BlockType.BT_STONE:
                block = instantiate(this.boxPrefab);
                break;
        }

        return block;
    }

    onStartButtonClicked() {
        this.setCurState(GameState.GS_PLAYING);
    }

    checkResult(moveIndex: number) {
        if (moveIndex < this.roadLength) {
            if (this._road[moveIndex] == BlockType.BT_NONE) {
                this.setCurState(GameState.GS_INIT);
            }
        } else {
            this.setCurState(GameState.GS_INIT);
        }
    }

    onPlayerJumpEnd(moveIndex: number) {
        if (this.stepsLabel) {
            this.stepsLabel.string = '' + (moveIndex >= this.roadLength ? this.roadLength : moveIndex);
        }
        this.checkResult(moveIndex);
    }

}3D建模学习工作室整理翻译,转载请标明出处!