在 PyTorch 中使用单层神经网络构建图像分类器
在本教程中,您将使用 CIFAR-10 数据集。它是一个用于图像分类的数据集,由 60 个类的 000,32 张 32×10 像素的彩色图像组成,每类 6,000 张图像。有 50,000 张训练图像和 10,000 张测试图像。这些课程包括飞机、汽车、鸟类、猫、鹿、狗、青蛙、马、轮船和卡车。CIFAR-10是机器学习和计算机视觉研究的流行数据集,因为它相对较小且简单,但具有挑战性,需要使用深度学习方法。此数据集可以轻松导入到 PyTorch 库中。
推荐:将NSDT场景编辑器加入你的3D工具链
3D工具集:NSDT简石数字孪生
在 PyTorch 中使用单层神经网络构建图像分类器
单层神经网络,也称为单层感知器,是最简单的神经网络类型。它仅由一层神经元组成,这些神经元连接到输入层和输出层。对于图像分类器,输入层将是图像,输出层将是类标签。
要在 PyTorch 中使用单层神经网络构建图像分类器,您首先需要准备数据。这通常涉及将图像和标签加载到 PyTorch 数据加载器中,然后将数据拆分为训练集和验证集。准备好数据后,您可以定义神经网络。
接下来,您可以使用 PyTorch 的内置函数在训练数据上训练网络,并评估其在验证数据上的性能。您还需要选择一个优化器,例如随机梯度下降(SGD)和损失函数(例如交叉熵损失)。
请注意,单层神经网络可能并非适合每个任务,但它可以作为简单的分类器,也有助于您了解神经网络的内部工作原理并能够对其进行调试。
因此,让我们构建图像分类器。在此过程中,您将了解:
- 如何在 PyTorch 中使用和预处理内置数据集。
- 如何在 PyTorch 中构建和训练自定义神经网络。
- 如何在 PyTorch 中构建分步图像分类器。
- 如何使用 PyTorch 中经过训练的模型进行预测。
让我们开始吧。

概述
本教程分为三个部分;他们是
- 准备数据集
- 构建模型体系结构
- 训练模型
准备数据集
在本教程中,您将使用 CIFAR-10 数据集。它是一个用于图像分类的数据集,由 60 个类的 000,32 张 32×10 像素的彩色图像组成,每类 6,000 张图像。有 50,000 张训练图像和 10,000 张测试图像。这些课程包括飞机、汽车、鸟类、猫、鹿、狗、青蛙、马、轮船和卡车。CIFAR-10是机器学习和计算机视觉研究的流行数据集,因为它相对较小且简单,但具有挑战性,需要使用深度学习方法。此数据集可以轻松导入到 PyTorch 库中。
这是你如何做到这一点。
1 2 3 4 5 6 7 | import torch import torchvision import torchvision.transforms as transforms # import the CIFAR-10 dataset train_set = torchvision.datasets.CIFAR10(root='./data', train=True, download=True, transform=transforms.ToTensor()) test_set = torchvision.datasets.CIFAR10(root='./data', train=False, download=True, transform=transforms.ToTensor()) |
如果您以前从未下载过数据集,您可能会看到以下代码显示图像的下载位置:
1 2 3 4 | Downloading https://www.cs.toronto.edu/~kriz/cifar-10-python.tar.gz to ./data/cifar-10-python.tar.gz 0%| | 0/170498071 [00:00<!--?, ?it/s] Extracting ./data/cifar-10-python.tar.gz to ./data Files already downloaded and verified |
你指定了应下载数据集的目录,以及导入训练集和导入测试集的设置。如果数据集尚未存在于指定目录中,则参数将下载数据集。roottrain=Truetrain=Falsedownload=Trueroot
构建神经网络模型
让我们定义一个继承自 的简单神经网络。网络有两个完全连接 (fc) 层,并在方法中定义。第一个完全连接的层将图像作为输入,并具有100个隐藏的神经元。类似地,第二全连接层具有100个输入神经元和输出神经元。该参数默认为 10,因为有 10 个类。SimpleNettorch.nn.Modulefc1fc2__init__fc1fc2num_classesnum_classes
此外,该方法定义了网络的正向传递,其中输入通过方法中定义的层。该方法首先使用该方法重塑输入张量,使其具有所需的形状。然后,输入及其激活函数通过全连接层,最后返回输出张量。forwardx__init__xview
用我的书《Deep Learning with PyTorch》开始你的项目。它提供了带有工作代码的自学教程。
这是上面解释的所有代码。
并且,编写一个函数来可视化此数据,这在以后训练模型时也很有用。
现在,让我们实例化模型对象。
1 2 | # Create the Data object dataset = Data() |
1 2 3 4 5 6 7 8 9 10 11 12 13 14 | import torch.nn as nn class SimpleNet(nn.Module): def __init__(self, num_classes=10): super(SimpleNet, self).__init__() self.fc1 = nn.Linear(32*32*3, 100) # Fully connected layer with 100 hidden neurons self.fc2 = nn.Linear(100, num_classes) # Fully connected layer with num_classes outputs def forward(self, x): x = x.view(-1, 32*32*3) # reshape the input tensor x = self.fc1(x) x = torch.relu(x) x = self.fc2(x) return x |
1 2 | # Instantiate the model model = SimpleNet() |
想开始使用 PyTorch 进行深度学习吗?
立即参加我的免费电子邮件速成课程(带有示例代码)。
单击以注册并获得该课程的免费PDF电子书版本。
下载您的免费迷你课程
Training the Model
您将创建 PyTorch 类的两个实例,分别用于训练和测试。在 中,您将批大小设置为 64,并通过设置 来随机随机洗牌训练数据。DataLoadertrain_loadershuffle=True
然后,您将定义交叉熵损失的函数和用于训练模型的 Adam 优化器。您将优化程序的学习率设置为 0.001。
它与 类似,只是我们不需要洗牌。test_loader
1 2 3 4 5 6 7 | # Load the data into PyTorch DataLoader train_loader = torch.utils.data.DataLoader(train_set, batch_size=64, shuffle=True) test_loader = torch.utils.data.DataLoader(test_set, batch_size=64, shuffle=False) # Define the loss function and optimizer criterion = nn.CrossEntropyLoss() optimizer = torch.optim.Adam(model.parameters(), lr=0.001) |
最后,让我们设置一个训练循环来训练我们的模型几个时期。您将定义一些空列表来存储损失和精度指标的值。
1 2 3 4 5 6 7 8 9 10 11 12 13 14 15 16 17 18 19 20 21 22 23 24 25 26 27 28 29 30 31 32 33 34 35 36 37 38 39 40 41 42 43 44 45 46 47 48 49 50 | # train the model num_epochs = 20 train_loss_history = [] train_acc_history = [] val_loss_history = [] val_acc_history = [] # Loop through the number of epochs for epoch in range(num_epochs): train_loss = 0.0 train_acc = 0.0 val_loss = 0.0 val_acc = 0.0 # set model to train mode model.train() # iterate over the training data for inputs, labels in train_loader: optimizer.zero_grad() outputs = model(inputs) #compute the loss loss = criterion(outputs, labels) loss.backward() optimizer.step() # increment the running loss and accuracy train_loss += loss.item() train_acc += (outputs.argmax(1) == labels).sum().item() # calculate the average training loss and accuracy train_loss /= len(train_loader) train_loss_history.append(train_loss) train_acc /= len(train_loader.dataset) train_acc_history.append(train_acc) # set the model to evaluation mode model.eval() with torch.no_grad(): for inputs, labels in test_loader: outputs = model(inputs) loss = criterion(outputs, labels) val_loss += loss.item() val_acc += (outputs.argmax(1) == labels).sum().item() # calculate the average validation loss and accuracy val_loss /= len(test_loader) val_loss_history.append(val_loss) val_acc /= len(test_loader.dataset) val_acc_history.append(val_acc) print(f'Epoch {epoch+1}/{num_epochs}, train loss: {train_loss:.4f}, train acc: {train_acc:.4f}, val loss: {val_loss:.4f}, val acc: {val_acc:.4f}') |
运行此循环将打印以下内容:
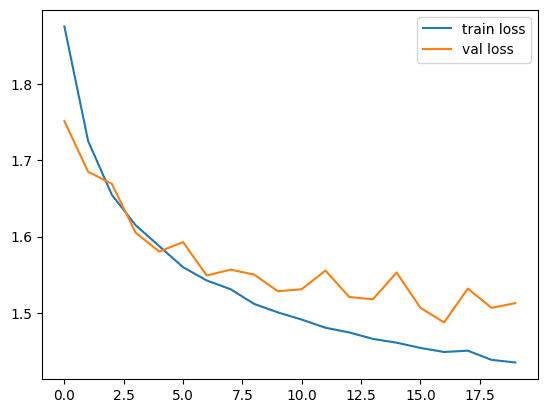
1 2 3 4 5 6 7 8 9 10 11 12 13 14 15 16 17 18 19 20 | Epoch 1/20, train loss: 1.8757, train acc: 0.3292, val loss: 1.7515, val acc: 0.3807 Epoch 2/20, train loss: 1.7254, train acc: 0.3862, val loss: 1.6850, val acc: 0.4008 Epoch 3/20, train loss: 1.6548, train acc: 0.4124, val loss: 1.6692, val acc: 0.3987 Epoch 4/20, train loss: 1.6150, train acc: 0.4268, val loss: 1.6052, val acc: 0.4265 Epoch 5/20, train loss: 1.5874, train acc: 0.4343, val loss: 1.5803, val acc: 0.4384 Epoch 6/20, train loss: 1.5598, train acc: 0.4424, val loss: 1.5928, val acc: 0.4315 Epoch 7/20, train loss: 1.5424, train acc: 0.4506, val loss: 1.5489, val acc: 0.4514 Epoch 8/20, train loss: 1.5310, train acc: 0.4568, val loss: 1.5566, val acc: 0.4454 Epoch 9/20, train loss: 1.5116, train acc: 0.4626, val loss: 1.5501, val acc: 0.4442 Epoch 10/20, train loss: 1.5005, train acc: 0.4677, val loss: 1.5282, val acc: 0.4598 Epoch 11/20, train loss: 1.4911, train acc: 0.4702, val loss: 1.5310, val acc: 0.4629 Epoch 12/20, train loss: 1.4804, train acc: 0.4756, val loss: 1.5555, val acc: 0.4457 Epoch 13/20, train loss: 1.4743, train acc: 0.4762, val loss: 1.5207, val acc: 0.4629 Epoch 14/20, train loss: 1.4658, train acc: 0.4792, val loss: 1.5177, val acc: 0.4570 Epoch 15/20, train loss: 1.4608, train acc: 0.4819, val loss: 1.5529, val acc: 0.4527 Epoch 16/20, train loss: 1.4539, train acc: 0.4832, val loss: 1.5066, val acc: 0.4645 Epoch 17/20, train loss: 1.4486, train acc: 0.4863, val loss: 1.4874, val acc: 0.4727 Epoch 18/20, train loss: 1.4503, train acc: 0.4866, val loss: 1.5318, val acc: 0.4575 Epoch 19/20, train loss: 1.4383, train acc: 0.4910, val loss: 1.5065, val acc: 0.4673 Epoch 20/20, train loss: 1.4348, train acc: 0.4897, val loss: 1.5127, val acc: 0.4679 |
如您所见,单层分类器仅训练了 20 个 epoch,验证准确率约为 47%。训练它更多的时期,你可能会得到一个不错的准确性。同样,我们的模型只有一层有100个隐藏神经元。如果添加更多图层,精度可能会显着提高。
现在,让我们绘制损失和精度矩阵,看看它们的外观。
1 2 3 4 5 6 7 8 9 10 11 12 13 | import matplotlib.pyplot as plt # Plot the training and validation loss plt.plot(train_loss_history, label='train loss') plt.plot(val_loss_history, label='val loss') plt.legend() plt.show() # Plot the training and validation accuracy plt.plot(train_acc_history, label='train acc') plt.plot(val_acc_history, label='val acc') plt.legend() plt.show() |
损失图如下:精度图如下:


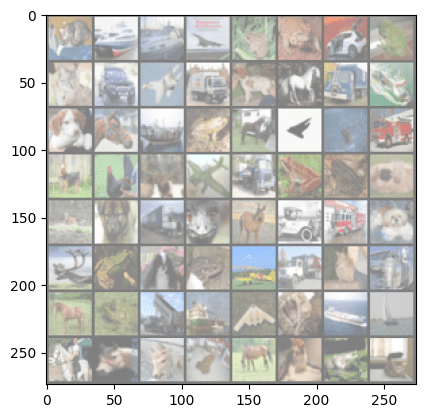
Here is how you can see how the model make predictions against the true labels.
1 2 3 4 5 6 7 8 9 10 11 12 13 14 15 16 17 18 | import numpy as np # get some validation data for inputs, labels in test_loader: break # this line stops the loop after the first iteration # make predictions outputs = model(inputs) _, predicted = torch.max(outputs, 1) # display the images and their labels img_grid = torchvision.utils.make_grid(inputs) img_grid = img_grid / 2 + 0.5 # unnormalize npimg = img_grid.numpy() plt.imshow(np.transpose(npimg, (1, 2, 0))) print('True Labels: ', labels) print('Predicted Labels: ', predicted) |
The printed labels are as following:
1 2 3 4 5 6 | True Labels: tensor([3, 8, 8, 0, 6, 6, 1, 6, 3, 1, 0, 9, 5, 7, 9, 8, 5, 7, 8, 6, 7, 0, 4, 9, 5, 2, 4, 0, 9, 6, 6, 5, 4, 5, 9, 2, 4, 1, 9, 5, 4, 6, 5, 6, 0, 9, 3, 9, 7, 6, 9, 8, 0, 3, 8, 8, 7, 7, 4, 6, 7, 3, 6, 3]) Predicted Labels: tensor([3, 9, 8, 8, 4, 6, 3, 6, 2, 1, 8, 9, 6, 7, 1, 8, 5, 3, 8, 6, 9, 2, 0, 9, 4, 6, 6, 2, 9, 6, 6, 4, 3, 3, 9, 1, 6, 9, 9, 5, 0, 6, 7, 6, 0, 9, 3, 8, 4, 6, 9, 4, 6, 3, 8, 8, 5, 8, 8, 2, 7, 3, 6, 9]) |
These labels are to correspond to the following images:

总结
在本教程中,您学习了如何仅使用单层神经网络构建图像分类器。特别是,您学到了:
- 如何在 PyTorch 中使用和预处理内置数据集。
- 如何在 PyTorch 中构建和训练自定义神经网络。
- 如何在 PyTorch 中构建分步图像分类器。
- 如何使用 PyTorch 中经过训练的模型进行预测。
由3D建模学习工作室 翻译整理,转载请注明出处!