案例研究:利用合成数据提高对象检测性能
合成数据的效用取决于模型将其学到的知识推广到实际用例的能力。

通常很难提前知道是否可以在不尝试的情况下生成与真实图像足够相似的图像。但好消息是:尝试起来很容易!我们将向您展示如何操作。
本指南是关于生成合成数据的系列文章的一部分。我们还提供指南,可让您使用以下工具生成合成数据:
什么是合成数据?
合成数据是添加到数据集中的信息,从数据集中的现有代表性数据生成,以帮助模型学习特征。使用合成数据有助于模型进行泛化,并可以帮助模型识别在当前数据集中可能无法很好地表示的边缘情况。
在计算机视觉中,合成数据涉及生成包含要在数据集中显示的特征的新图像。
在这个项目中,我们将创建一个对象检测数据集来识别水果。我们将通过组合来自两个分类数据集的图像来创建此数据集——我们甚至会自动为我们的图像添加注释。
我使用我们将在这篇文章中派生的数据集来训练一个模型,并创建一个示例“Fruit Finder”移动应用程序。效果很好!
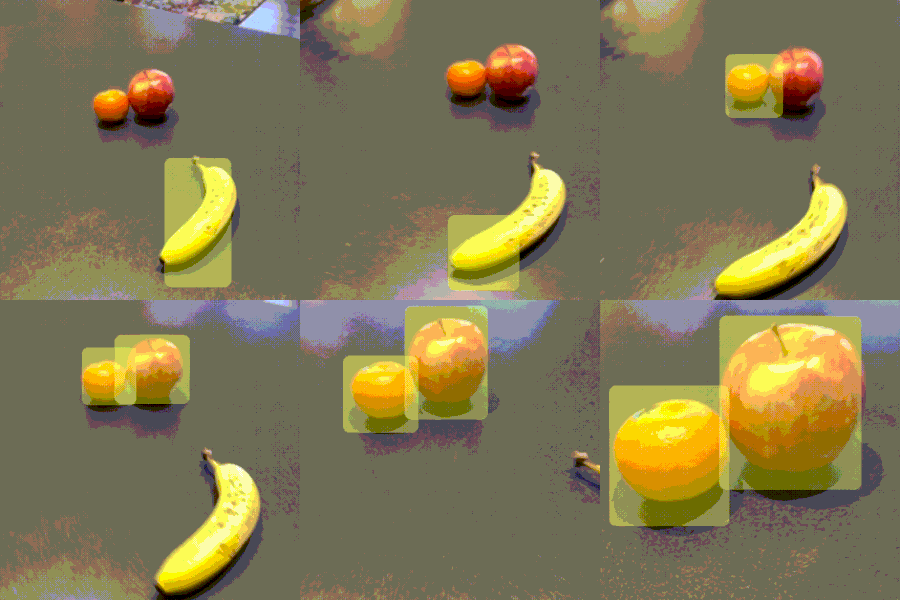
在本教程中,我将引导您完成创建新对象检测数据集的过程。 我们将合并来自两个开源经典数据集的图像:Horea94 的水果分类数据集和 Google 的开放图像数据集。
水果分类数据集是白色背景上的水果图像的集合。水果被标记为整个图像(即没有边界框)。

谷歌的开放图像数据集总共有513GB的图像,适用于各种环境。我们将使用验证集(一个 12GB 的子集)作为背景图像。
为了合成我们的图像,我们将“复制”水果图像,删除它们的白色背景,并将它们“粘贴”到 Google 开放图像数据集中的图像之上。我们还将记录我们在图像中放置哪些水果的位置,以便我们可以创建边界框注释来训练我们的对象检测模型。
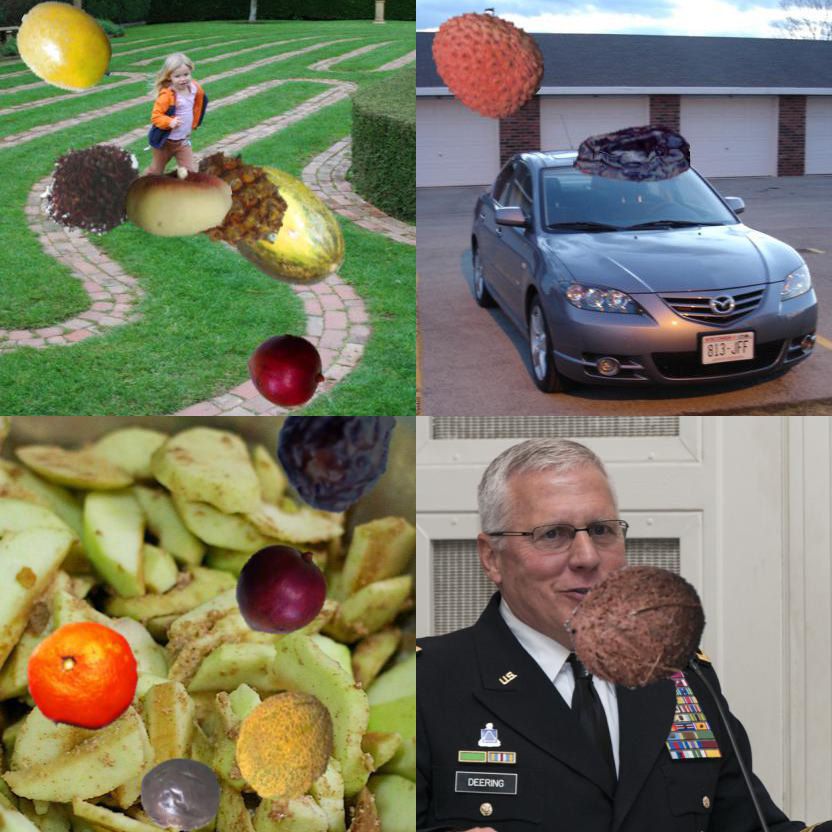
它们在训练模型时有用吗?事实证明,是的!
我使用 Apple 的 CreateML 无代码训练应用程序在数据集上训练了一个模型。虽然结果并不完美,但该模型能够在现实世界中找到水果,尽管只在我们的合成图像上进行了训练。
通常,一个好的策略是使用在人工数据上训练的模型来引导你的项目,并随着时间的推移引入真实世界的数据。想象一下,使用基于人工数据训练的模型向用户推出一个准确率为 80% 的应用程序。您可以使用用户的错误报告来收集模型遇到问题的真实图像,并基于合成数据和这些新图像的混合训练改进的模型。重复此过程足够多次后,您的模型最终将在几乎所有实际场景中表现良好。
作弊码
️如果您只想下载最终结果,请点击此处获取水果物体检测数据集。用于生成它的完整源代码可在 Roboflow 的 GitHub 上获得,以及预训练的 CoreML 模型。我们这里还有一个完整的 CreateML 无代码对象检测教程。
开始
首先,我们需要下载源图像。我们的背景图像来自Google的开放图像验证集(41,620张图像; 12GB),可在此处获得,标题为验证.zip。我们的主题是 Horea94 在白色背景上拍摄的水果照片,可通过他的 github 进行克隆。我分别下载并提取了这些文件。~/OpenImages~/Fruit-Images-Dataset

在本教程中,我们的输出图像将是 416x550,因此我们希望确保背景图像至少是这个大小。我们还希望确保我们的背景不会将自己的错误引入我们的数据中。就我们的目的而言,这意味着删除包含水果的背景图像。您可以自行执行此筛选器。否则,我已经编制了一个包含大约 10,000 张符合这些标准的图像的列表。
接下来,我们需要安装将用于生成图像的软件。在本教程中,我将使用 Node.js、node-canvas、几个实用程序包(async、lodash 和 handlebars)以及我们扩展用于 node-canvas 的泛滥填充库。
# first install Node.js from https://nodejs.org/en/

# then, create a project directory
mkdir synthetic-fruit-dataset
cd synthetic-fruit-dataset

# and install our dependencies
npm install canvas async lodash handlebars @roboflow/floodfill
生成图像的代码
现在我们已全部设置完毕,请创建一个文件并加载我们的依赖项。generate.js
// system packages
const fs = require('fs');
const path = require('path');
const os = require('os');

// basic helpers
const async = require('async');
const _ = require('lodash');

// drawing utilities
const { createCanvas, loadImage, CanvasRenderingContext2D } = require('canvas');
const floodfill = require('@roboflow/floodfill')(CanvasRenderingContext2D);
然后,我们需要创建一个模板来存储我们的注释。我选择以 VOC XML 格式执行此操作,这意味着我们将为我们生成的每个图像创建一个 XML 文件。注释告诉我们的模型我们放置水果的位置(以及它是什么类型的水果)。
创建一个在项目目录中调用的文件,其中包含以下内容:voc.tmpl
<annotation>
	<folder></folder>
	<filename>{{filename}}</filename>
	<path>{{filename}}</path>
	<source>
		<database>roboflow.ai</database>
	</source>
	<size>
		<width>{{width}}</width>
		<height>{{height}}</height>
		<depth>3</depth>
	</size>
	<segmented>0</segmented>
    {{#each boxes}}
	<object>
		<name>{{cls}}</name>
		<pose>Unspecified</pose>
		<truncated>0</truncated>
		<difficult>0</difficult>
		<occluded>0</occluded>
		<bndbox>
			<xmin>{{xmin}}</xmin>
			<xmax>{{xmax}}</xmax>
			<ymin>{{ymin}}</ymin>
			<ymax>{{ymax}}</ymax>
		</bndbox>
	</object>
    {{/each}}
</annotation>
回想一下,我们使用把手作为模板,因此我们需要加载它并引用我们的文件:voc.tmplgenerate.js
// for writing annotations
var Handlebars = require('handlebars');
var vocTemplate = Handlebars.compile(fs.readFileSync(__dirname + "/voc.tmpl", "utf-8"));
现在我们将设置一些我们稍后将使用的常量:
// how many images we want to create
const IMAGES_TO_GENERATE = 5000;
// how many to generate at one time
const CONCURRENCY = Math.max(1, os.cpus().length - 1);

// approximate aspect ratio of our phone camera
// scaled to match the input of CreateML models
const CANVAS_WIDTH = 416;
const CANVAS_HEIGHT = 550;

// the most objects you want in your generated images
const MAX_OBJECTS = 10;
然后,进行一些设置,告诉我们的脚本下载的图像在文件系统中的位置以及我们希望输出的图像的位置(如果您使用的是 Windows 或将图像保存在其他位置,则可能需要更改其中一些路径):
// where to store our images
const OUTPUT_DIR = path.join(__dirname, "output");

// location of jpgs on your filesystem (validation set from here: https://www.figure-eight.com/dataset/open-images-annotated-with-bounding-boxes/)
const OPEN_IMAGES = path.join(os.homedir(), "OpenImages");
// text file of good candidate images (I selected these for size & no fruit content)
const BACKGROUNDS = fs.readFileSync(__dirname + "/OpenImages.filtered.txt", "utf-8").split("\n");

// location of folders containing jpgs on your filesystem (clone from here: https://github.com/Horea94/Fruit-Images-Dataset)
const FRUITS = path.join(os.homedir(), "Fruit-Images-Dataset/Training");
现在,我们将搜索水果文件夹以找到所有不同类型的水果,并根据我们的目的对它们进行一些转换(在 Horea94 的版本中,他有“Apple Golden 1”和“Apple Red 2”等标签,但我们只想标记所有这些“Apple”)。然后,我们将存储每个文件夹中存在的所有图像文件的列表。
// get class names
const folders = _.filter(fs.readdirSync(FRUITS), function(filename) {
    // filter out hidden files like .DS_STORE
    return filename.indexOf('.') != 0;
});
var classes = _.map(folders, function(folder) {
    // This dataset has some classes like "Apple Golden 1" and "Apple Golden 2"
    // We want to combine these into just "Apple" so we only take the first word
    return folder.split(" ")[0];
});

// for each class, get a list of images
const OBJECTS = {};
_.each(folders, function(folder, i) {
    var cls = classes[i]; // get the class name

    var objs = [];
    objs = _.filter(fs.readdirSync(path.join(FRUITS, folder)), function(filename) {
        // only grab jpg images
        return filename.match(/\.jpe?g/);
    });

    objs = _.map(objs, function(image) {
        // we need to know which folder this came from
        return path.join(folder, image);
    });

    if(!OBJECTS[cls]) {
        OBJECTS[cls] = objs;
    } else {
        // append to existing images
        _.each(objs, function(obj) {
            OBJECTS[cls].push(obj);
        });
    }
});
// when we randomly select a class, we want them equally weighted
classes = _.uniq(classes);
接下来,我们将创建之前指定的输出目录(如果该目录尚不存在),以便我们在某个地方保存生成的图像:
// create our output directory if it doesn't exist
if (!fs.existsSync(OUTPUT_DIR)) fs.mkdirSync(OUTPUT_DIR);
现在,核心循环,使用我们将要定义的函数生成图像,并随时打印进度。注意:尽管 javascript 是单线程的,但我们使用并行化该过程,以便在等待图像文件加载和写入磁盘时可以最大限度地提高 CPU 使用率。另请注意,使用 here 来确保在运行此代码块之前定义我们的函数。createImageasync.timesLimit_.defercreateImage
// create the images
_.defer(function() {
    var num_completed = 0;
    const progress_threshold = Math.max(1, Math.round( Math.min(100, IMAGES_TO_GENERATE/1000) ) );
    async.timesLimit(IMAGES_TO_GENERATE, CONCURRENCY, function(i, cb) {
        createImage(i, function() {
            // record progress to console
            num_completed++;
            if(num_completed%progress_threshold === 0) {
                console.log((num_completed/IMAGES_TO_GENERATE*100).toFixed(1)+'% finished.');
            }
            cb(null);
        });
    }, function() {
        // completely done generating!
        console.log("Done");
        process.exit(0);
    });
});
现在,我们定义 .它创建一个画布,以足以填满整个画布的大小绘制随机选择的背景图像,确定要添加多少水果(加权到较低的数字),调用我们将要定义的,然后编写两个文件:我们的合成图像和我们的 XML 注释文件。createImageaddRandomObject
const createImage = function(filename, cb) {
    // select and load a random background
    const BG = _.sample(BACKGROUNDS);
    loadImage(path.join(OPEN_IMAGES, BG)).then(function(img) {
        var canvas = createCanvas(CANVAS_WIDTH, CANVAS_HEIGHT);
        var context = canvas.getContext('2d');

        // scale the background to fill our canvas and paint it in the center
        var scale = Math.max(canvas.width / img.width, canvas.height / img.height);
        var x = (canvas.width / 2) - (img.width / 2) * scale;
        var y = (canvas.height / 2) - (img.height / 2) * scale;
        context.drawImage(img, x, y, img.width * scale, img.height * scale);

        // calculate how many objects to add
        // highest probability is 1, then 2, then 3, etc up to MAX_OBJECTS
        // if you want a uniform probability, remove one of the Math.random()s
        var objects = 1+Math.floor(Math.random()*Math.random()*(MAX_OBJECTS-1));

        var boxes = [];
        async.timesSeries(objects, function(i, cb) {
            // for each object, add it to the image and then record its bounding box
            addRandomObject(canvas, context, function(box) {
                boxes.push(box);
                cb(null);
            });
        }, function() {
            // write our files to disk
            async.parallel([
                function(cb) {
                    // write the JPG file
                    const out = fs.createWriteStream(path.join(__dirname, "output", filename+".jpg"));
                    const stream = canvas.createJPEGStream();
                    stream.pipe(out);
                    out.on('finish', function() {
                        cb(null);
                    });
                },
                function(cb) {
                    // write the bounding boxes to the XML annotation file
                    fs.writeFileSync(
                        path.join(__dirname, "output", filename+".xml"),
                        vocTemplate({
                            filename: filename + ".jpg",
                            width: CANVAS_WIDTH,
                            height: CANVAS_HEIGHT,
                            boxes: boxes
                        })
                    );

                    cb(null);
                }
            ], function() {
                // we're done generating this image
                cb(null);
            });
        });
    });
};
然后,最后,我们的函数选择我们的一个类(Apple/Banana/等),从该文件夹中加载一个随机图像,擦除白色背景,添加一些随机转换(色调/饱和度/亮度、缩放和旋转),并将其绘制在背景顶部的随机 x/y 位置。addRandomObject
const addRandomObject = function(canvas, context, cb) {
    const cls = _.sample(classes);
    const object = _.sample(OBJECTS[cls]);

    loadImage(path.join(FRUITS, object)).then(function(img) {
        // erase white edges
        var objectCanvas = createCanvas(img.width, img.height);
        var objectContext = objectCanvas.getContext('2d');

        objectContext.drawImage(img, 0, 0, img.width, img.height);

        // flood fill starting at all the corners
        const tolerance = 32;
        objectContext.fillStyle = "rgba(0,255,0,0)";
        objectContext.fillFlood(3, 0, tolerance);
        objectContext.fillFlood(img.width-1, 0, tolerance);
        objectContext.fillFlood(img.width-1, img.height-1, tolerance);
        objectContext.fillFlood(0, img.height-1, tolerance);

        // cleanup edges
        objectContext.blurEdges(1);
        objectContext.blurEdges(0.5);

        // make them not all look exactly the same
        // objectContext.randomHSL(0.1, 0.25, 0.4);
        objectContext.randomHSL(0.05, 0.4, 0.4);

        // randomly scale the image
        var scaleAmount = 0.5;
        const scale = 1 + Math.random()*scaleAmount*2-scaleAmount;

        var w = img.width * scale;
        var h = img.height * scale;

        // place object at random position on top of the background
        const max_width = canvas.width - w;
        const max_height = canvas.height - h;

        var x = Math.floor(Math.random()*max_width);
        var y = Math.floor(Math.random()*max_height);

        context.save();

        // randomly rotate and draw the image
        const radians = Math.random()*Math.PI*2;
        context.translate(x+w/2, y+h/2);
        context.rotate(radians);
        context.drawImage(objectCanvas, -w/2, -h/2, w, h);
        context.restore();

        // return the type and bounds of the object we placed
        cb({
            cls: cls,
            xmin: Math.floor(x),
            xmax: Math.ceil(x + w),
            ymin: Math.floor(y),
            ymax: Math.ceil(y + h)
        });
    });
};
仅此而已!运行代码(通过在项目目录中键入)后,你将获得一个包含合成图像及其相应注释的文件夹。node generate.jsoutputIMAGES_TO_GENERATE
现在我们准备训练一个模型了!
但是我们如何使用我们的数据集呢?这就是 Roboflow 的用武之地。只需创建一个新数据集,上传您的文件夹,您只需单击 3 次即可将其导出以用于最常见的 ML 模型。如果你想经历这个过程,你很幸运;我们在此处提供了入门指南,在此处提供了 CreateML 对象检测教程。注册和使用 1000 张图像以下的数据集是完全免费的。output
我在上面的示例中使用了 Create ML,但我们的模型库中有几个示例,从 YOLO v3 到 Faster R-CNN 再到 EfficientDet。我们甚至有几个端到端教程来帮助您使用这些模型进行训练。