使用 timeit 和 cProfile 分析 Python 代码
使用 timeit 和 cProfile 模块分析 Python 代码的介绍性指南。

推荐:使用NSDT编辑器快速搭建3D应用场景
作为一名软件开发人员,你可能在你的职业生涯中不止一次听到过“过早优化是万恶之源”这句话。虽然优化对于小型项目可能不是特别有用(或绝对必要),但分析通常是有帮助的。
完成模块编码后,最好分析代码以衡量每个部分的执行时间。这有助于识别代码异味并指导优化以提高代码质量。因此,在优化之前,请务必分析您的代码!
要采取第一步,本指南将帮助您开始使用 Python 中的分析——使用内置的 timeit 和 cProfile 模块。您将学习如何在 Python 脚本中使用命令行界面和等效的可调用对象。
如何使用timeit分析Python代码
timeit 模块是 Python 标准库的一部分,提供了一些方便的函数,可用于对短代码片段进行计时。
让我们举一个简单的例子来反转一个 Python 列表。我们将使用以下方法测量获取列表反向副本的执行时间:
- 函数,以及
reversed() - 列表切片。
>>> nums=[6,9,2,3,7]
>>> list(reversed(nums))
[7, 3, 2, 9, 6]
>>> nums[::-1]
[7, 3, 2, 9, 6]
在命令行运行 timeit
您可以使用以下语法在命令行运行:timeit
$ python -m timeit -s 'setup-code' -n 'number' -r 'repeat' 'stmt'您需要提供要测量其执行时间的语句。stmt
您可以在需要时指定代码 - 使用短选项 -s 或长选项 --setup。安装代码将仅运行一次。setup
运行语句的次数:短选项 -n 或长选项 --number 是可选的。重复此循环的次数:短选项 -r 或长选项 --重复也是可选的。number
让我们看看上面的示例:
这里创建列表是代码,反转列表是要计时的语句:setup
$ python -m timeit -s 'nums=[6,9,2,3,7]' 'list(reversed(nums))'
500000 loops, best of 5: 695 nsec per loop
如果未为 指定 的值,则使用默认值 5。当您不指定时,代码会根据需要运行多次,以便达到至少 0.2 秒的总时间。repeatnumber
此示例显式设置执行语句的次数:
$ python -m timeit -s 'nums=[6,9,2,3,7]' -n 100Bu000 'list(reversed(nums))'
100000 loops, best of 5: 540 nsec per loop
默认值为 5,但我们可以将其设置为任何合适的值:repeat
$ python3 -m timeit -s 'nums=[6,9,2,3,7]' -r 3 'list(reversed(nums))'
500000 loops, best of 3: 663 nsec per loop
让我们也计时列表切片方法:
$ python3 -m timeit -s 'nums=[6,9,2,3,7]' 'nums[::-1]'
1000000 loops, best of 5: 142 nsec per loop
列表切片方法似乎更快(所有示例都在 Ubuntu 3.10 上的 Python 22.04 中)。
在 Python 脚本中运行 timeit
这相当于在 Python 脚本中运行 timeit:
import timeit

setup = 'nums=[9,2,3,7,6]'
number = 100000
stmt1 = 'list(reversed(nums))'
stmt2 = 'nums[::-1]'

t1 =  timeit.timeit(setup=setup,stmt=stmt1,number=number)
t2 = timeit.timeit(setup=setup,stmt=stmt2,number=number)

print(f"Using reversed() fn.: {t1}")
print(f"Using list slicing: {t2}")
可调用对象返回 for 的执行时间。请注意,我们可以显式提及要运行的次数,或者采用默认值 1000000。timeit()stmtnumbernumber
Output >>
Using reversed() fn.: 0.08982690000000002
Using list slicing: 0.015550800000000004这将在指定的时间内运行语句(而不重复计时器函数),并返回执行时间。使用和花费最少的时间也很常见,如下所示:numbertime.repeat()
import timeit

setup = 'nums=[9,2,3,7,6]'
number = 100000
stmt1 = 'list(reversed(nums))'
stmt2 = 'nums[::-1]'

t1 =  min(timeit.repeat(setup=setup,stmt=stmt1,number=number))
t2 = min(timeit.repeat(setup=setup,stmt=stmt2,number=number))

print(f"Using reversed() fn.: {t1}")
print(f"Using list slicing: {t2}")
这将重复运行次数的代码的过程,并返回最短的执行时间。在这里,我们有 5 次重复,每次 100000 次。numberrepeat
Output >>
Using reversed() fn.: 0.055375300000000016
Using list slicing: 0.015101400000000043
如何使用cProfile分析Python脚本
我们已经看到了如何使用time来衡量短代码片段的执行时间。但是,在实践中,分析整个 Python 脚本会更有帮助。
这将为我们提供所有函数和方法调用(包括内置函数和方法)的执行时间。因此,我们可以更好地了解更昂贵的函数调用,并确定优化的机会。例如:可能存在太慢的 API 调用。或者一个函数可能有一个循环,可以用一个更 Python 的理解表达式代替。
让我们学习如何使用 cProfile 模块(也是 Python 标准库的一部分)分析 Python 脚本。
请考虑以下 Python 脚本:
# main.py
import time

def func(num):
    for i in range(num):
        print(i)

def another_func(num):
    time.sleep(num)
    print(f"Slept for {num} seconds")

def useful_func(nums, target):
    if target in nums:
        return nums.index(target)

if __name__ == "__main__":
    func(1000)
    another_func(20)
    useful_func([2, 8, 12, 4], 12)
这里我们有三个功能:
func()它会循环浏览一系列数字并打印出来。another func()包含对函数的调用。sleep()useful_func()返回列表中目标数字的索引(如果目标存在于列表中)。
每次运行 main.py 脚本时都会调用上面列出的函数。
在命令行运行 cProfile
使用以下方法在命令行运行 cProfile:
python3 -m file-name.py在这里,我们将文件命名为 main.py:
python3 -m main.py运行此命令应提供以下输出:
  Output >>
  0
  ...
  999
  Slept for 20 seconds
以及以下配置文件:
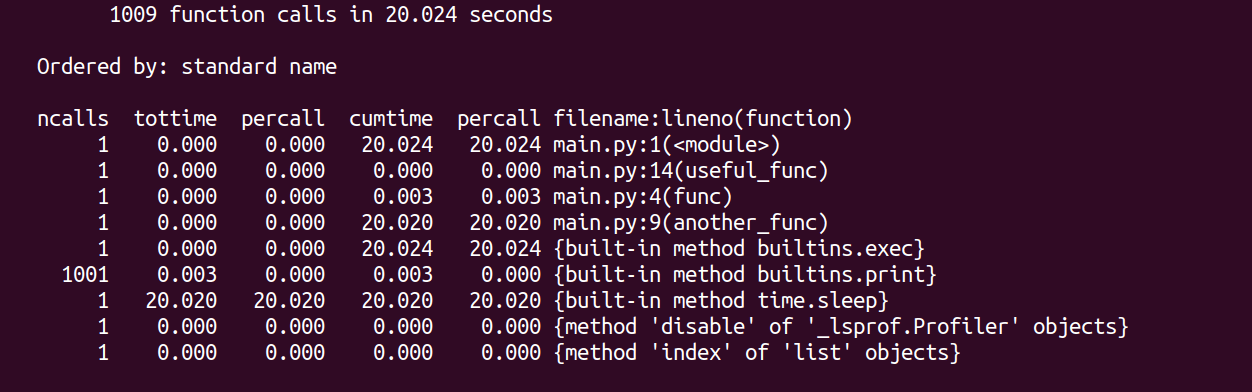
此处,指对函数的调用次数,并指每次函数调用的时间。如果 的值大于 1,则为所有调用的平均时间。ncallspercallncallspercall
脚本的执行时间由使用内置函数调用(休眠 20 秒)主导。我们看到函数调用也非常昂贵。another_funcsleepprint
在 Python 脚本中使用 cProfile
虽然在命令行运行 cProfile 工作正常,但您也可以将分析功能添加到 Python 脚本中。您可以将 cProfile 与 pstats 模块结合使用来分析和访问统计信息。
作为更好地处理资源设置和拆卸的最佳实践,请使用 with 语句并创建一个用作上下文管理器的配置文件对象:
# main.py
import pstats
import time
import cProfile
def func(num):
for i in range(num):
print(i)
def another_func(num):
time.sleep(num)
print(f"Slept for {num} seconds")
def useful_func(nums, target):
if target in nums:
return nums.index(target)
if __name__ == "__main__":
with cProfile.Profile() as profile:
func(1000)
another_func(20)
useful_func([2, 8, 12, 4], 12)
profile_result = pstats.Stats(profile)
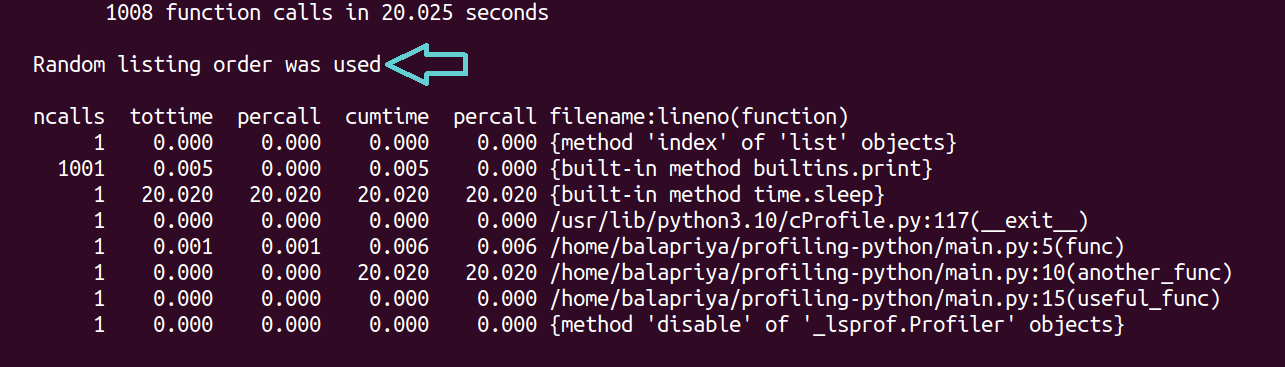
profile_result.print_stats()让我们仔细看看生成的输出配置文件:
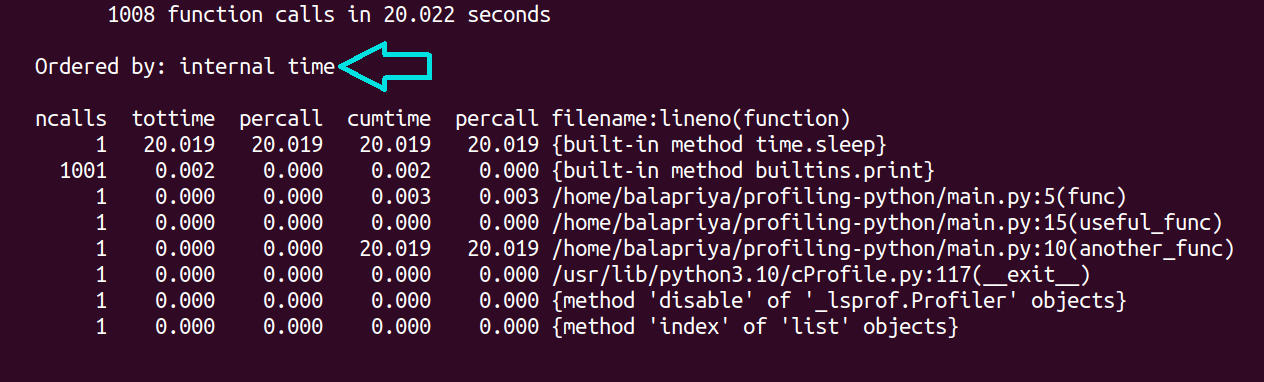
分析大型脚本时,按执行时间对结果进行排序会很有帮助。为此,您可以调用配置文件对象并根据执行时间进行排序:sort_stats
...
if __name__ == "__main__":
    with cProfile.Profile() as profile:
        func(1000)
        another_func(20)
        useful_func([2, 8, 12, 4], 12)
    profile_result = pstats.Stats(profile)
    profile_result.sort_stats(pstats.SortKey.TIME)
    profile_result.print_stats()
现在运行脚本时,您应该能够看到按时间排序的结果:
结论
我希望本指南能帮助您开始使用 Python 中的分析。永远记住,优化永远不应该以牺牲可读性为代价。如果你有兴趣了解其他探查器(包括第三方 Python 包),请查看这篇关于 Python 探查器的文章。
由3D建模学习工作室 整理翻译,转载请注明出处!